🥾 TrailSync User Guide
Get your crew in sync for every adventure
📋 Table of Contents
- Getting Started
- Friends
- Setting Up Your Personal Gear Library
- Creating Gear Templates
- Creating a New Trip
- Inviting Participants
- Route Planning
- Adding Gear to Your Trip
- Planning Meals
- Messages & Communication
- Managing Action Items
- Tracking Expenses
- Weather Forecasts
- Permits
- Changing Trip Status
- GPS Route Following
- Trip Report
- Preparing for Offline Use
- Working Offline
- Explore — Community Templates
🚀 Getting Started
Creating Your Account
- Download TrailSync from the App Store
- Tap Sign Up
- Enter your email and create a password
- Verify your email address
- Complete your profile with your hiking experience and preferences
Setting Up Your Profile
A complete profile helps trip organizers plan appropriately for the group.
- Tap the Profile tab at the bottom
- Tap Edit Profile
- Add a profile photo (optional but recommended)
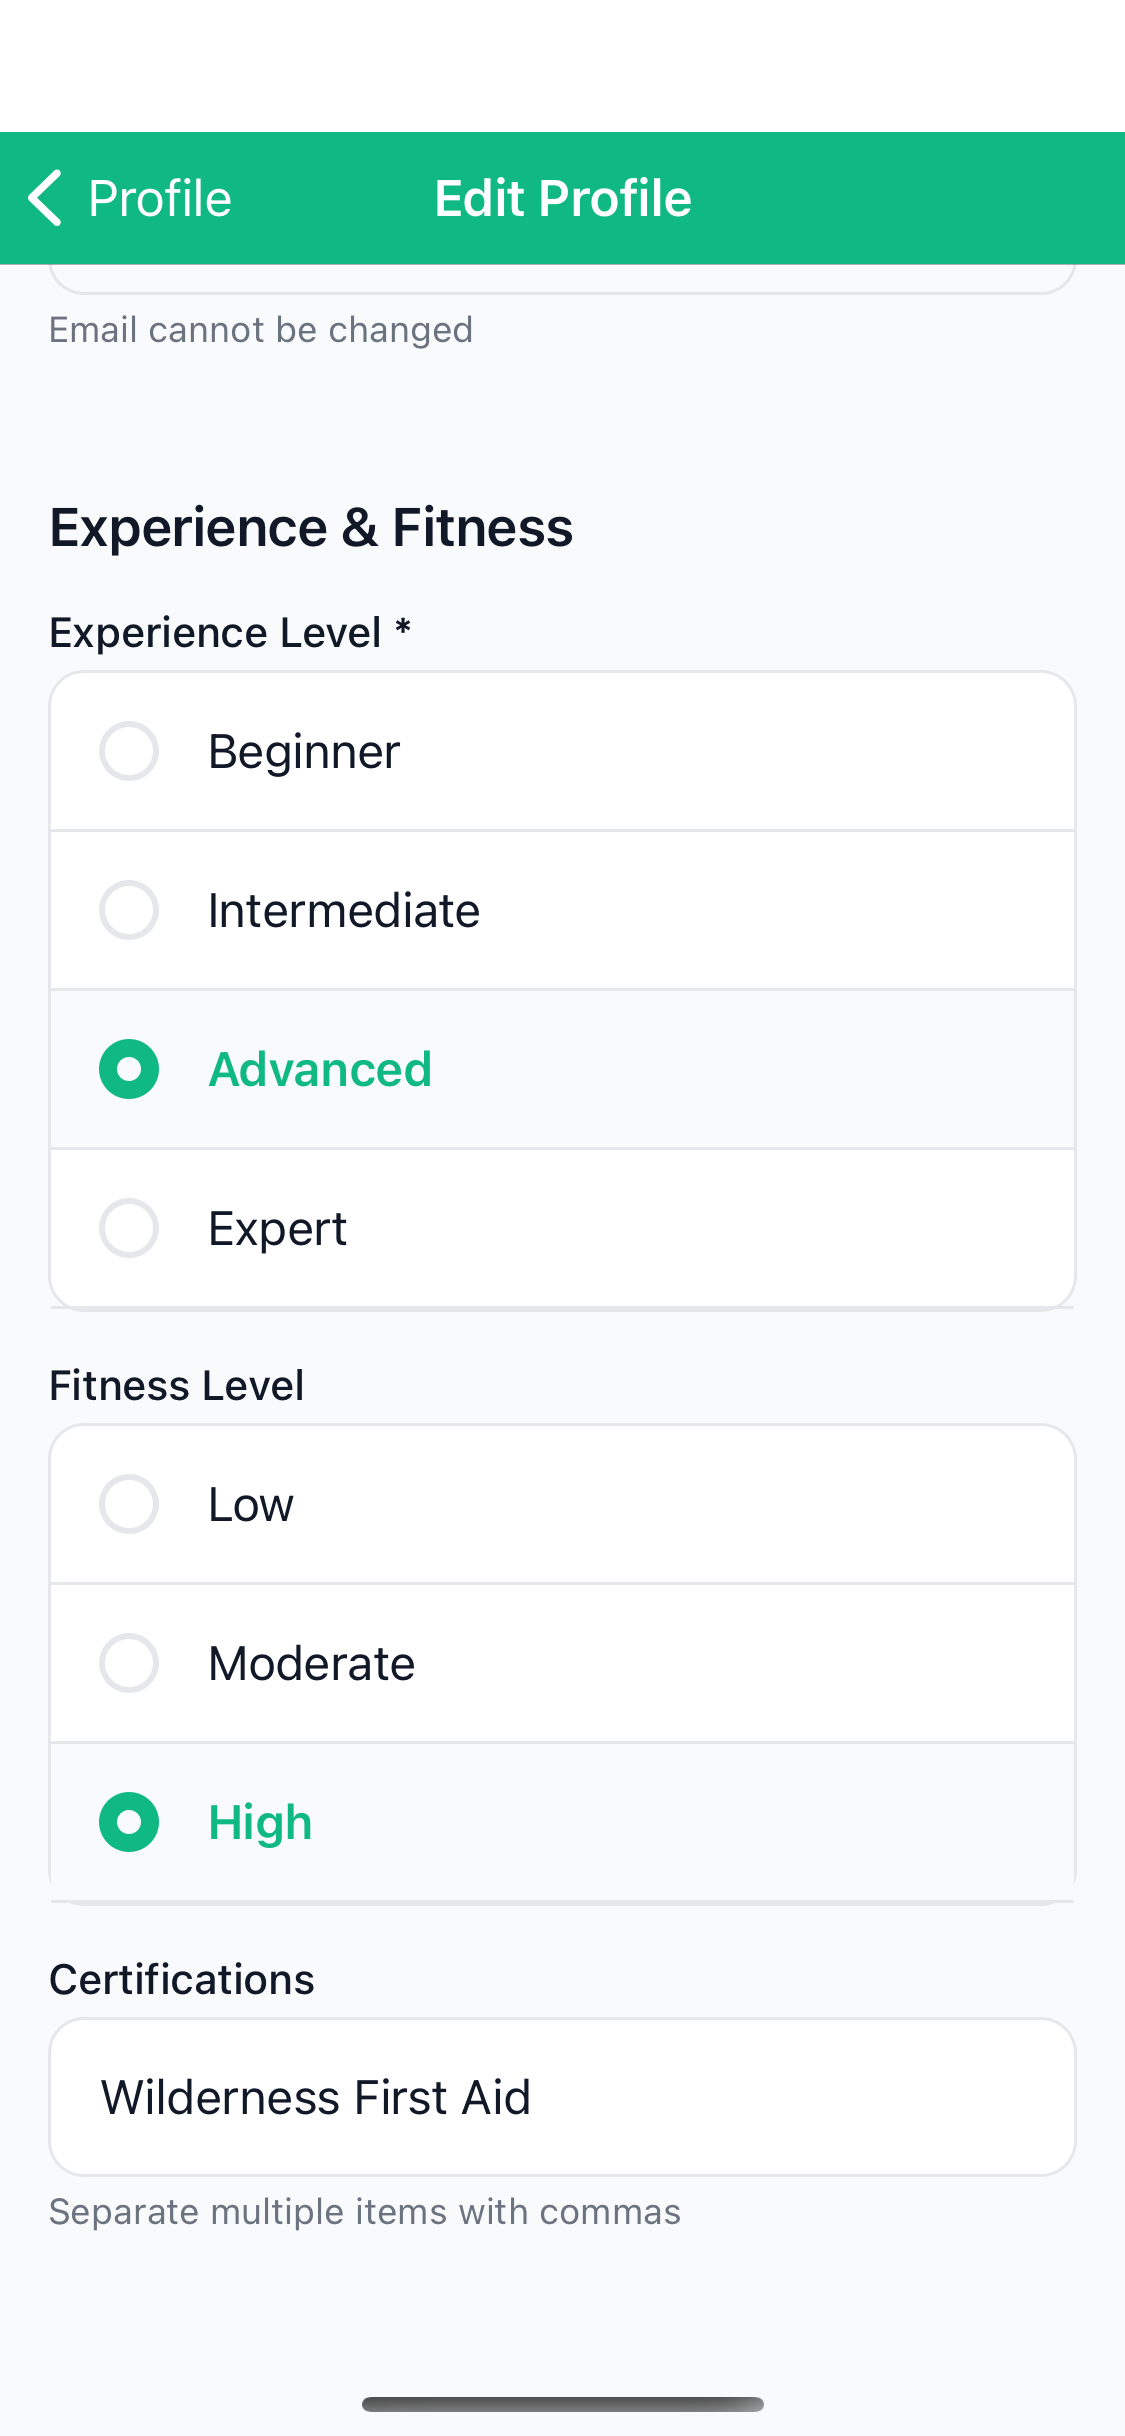
- Fill in:
- Display Name: How you'll appear to other participants
- Experience Level: Beginner, Intermediate, Advanced, or Expert
- Fitness Level: Low, Moderate, or High
- Certifications: Wilderness First Aid, WFR, Navigation, etc.
- Dietary Restrictions: Vegetarian, Vegan, Gluten-free, etc.
- Emergency Contact: Name and phone number
- Tap Save
Enabling Biometric Login (Face ID / Touch ID)
If you're heading somewhere with limited cell service, it's worth enabling biometric login before you leave home. When you're offline and the app needs to verify your identity to load cached trip data, Face ID or Touch ID lets you back in without needing your password or a network connection.
- Tap the Profile tab
- Tap Settings
- Toggle on Enable Face ID / Touch ID
- Authenticate once to confirm
Setting Your Units
TrailSync supports both imperial (miles, feet, pounds) and metric (kilometers, meters, kilograms). Pick whichever you prefer and distances, elevations, gear weights, and off-trail alerts will all display consistently throughout the app.
- Tap the Profile tab
- Tap Settings
- Select Imperial or Metric under Unit System
👫 Friends
TrailSync's friend system makes trip planning with your regular crew much faster. Once you're friends with someone, you can invite them to trips without needing to remember their email each time — they'll show up as suggestions automatically.
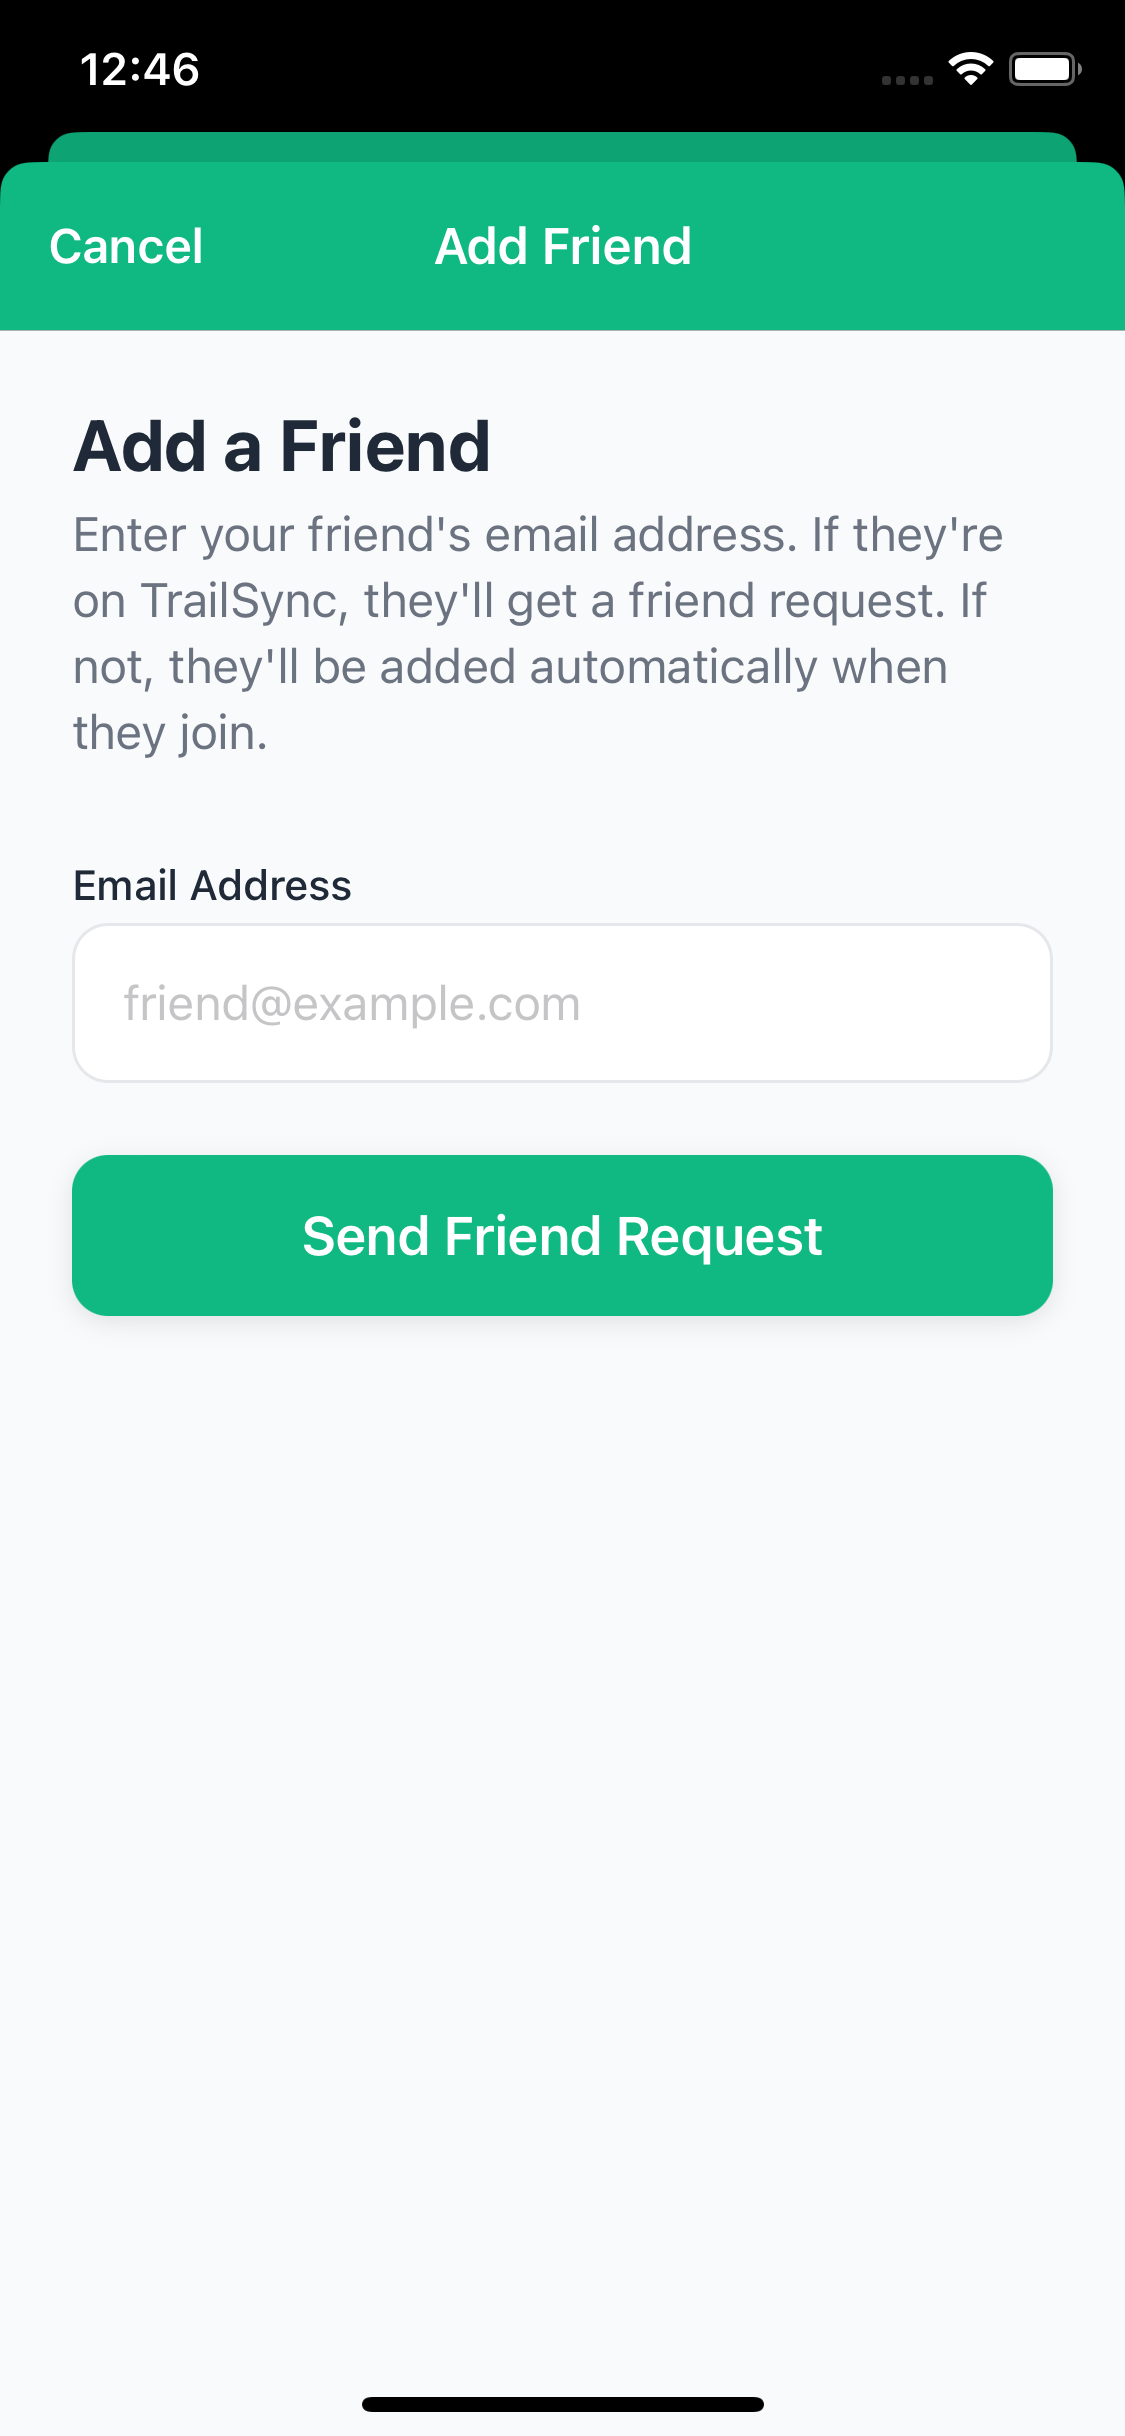
Adding a Friend
- Tap the Friends item in the Profile screen
- Tap the add friend icon in the top right corner
- Enter your friend's email address
- Tap Send Friend Request
If they're already on TrailSync, they'll receive a friend request straight away. If they haven't joined yet, don't worry — they'll automatically be added as your friend when they sign up using that email address.
Accepting a Friend Request
When someone sends you a friend request, it appears at the top of your Friends screen the next time you open it.
- Tap the Friends tab
- Pending requests appear in the Friend Requests section at the top
- Tap Accept to confirm, or Decline to pass
People You've Hiked With
TrailSync notices when you've shared trips with other users and suggests them as potential friends in the People You've Hiked With section. It's a handy shortcut — you've already been on the trail together, so you probably want them in your crew for future trips too.
Managing Your Friends List
All your confirmed friends appear in the Your Friends section. Once you have five or more friends, a search bar appears so you can quickly find someone by name. To remove a friend, swipe left on their card and tap Remove.

🎒 Setting Up Your Personal Gear Library
TrailSync includes a library of common backpacking gear, but you'll want to build your own personal gear closet with the items you actually own.
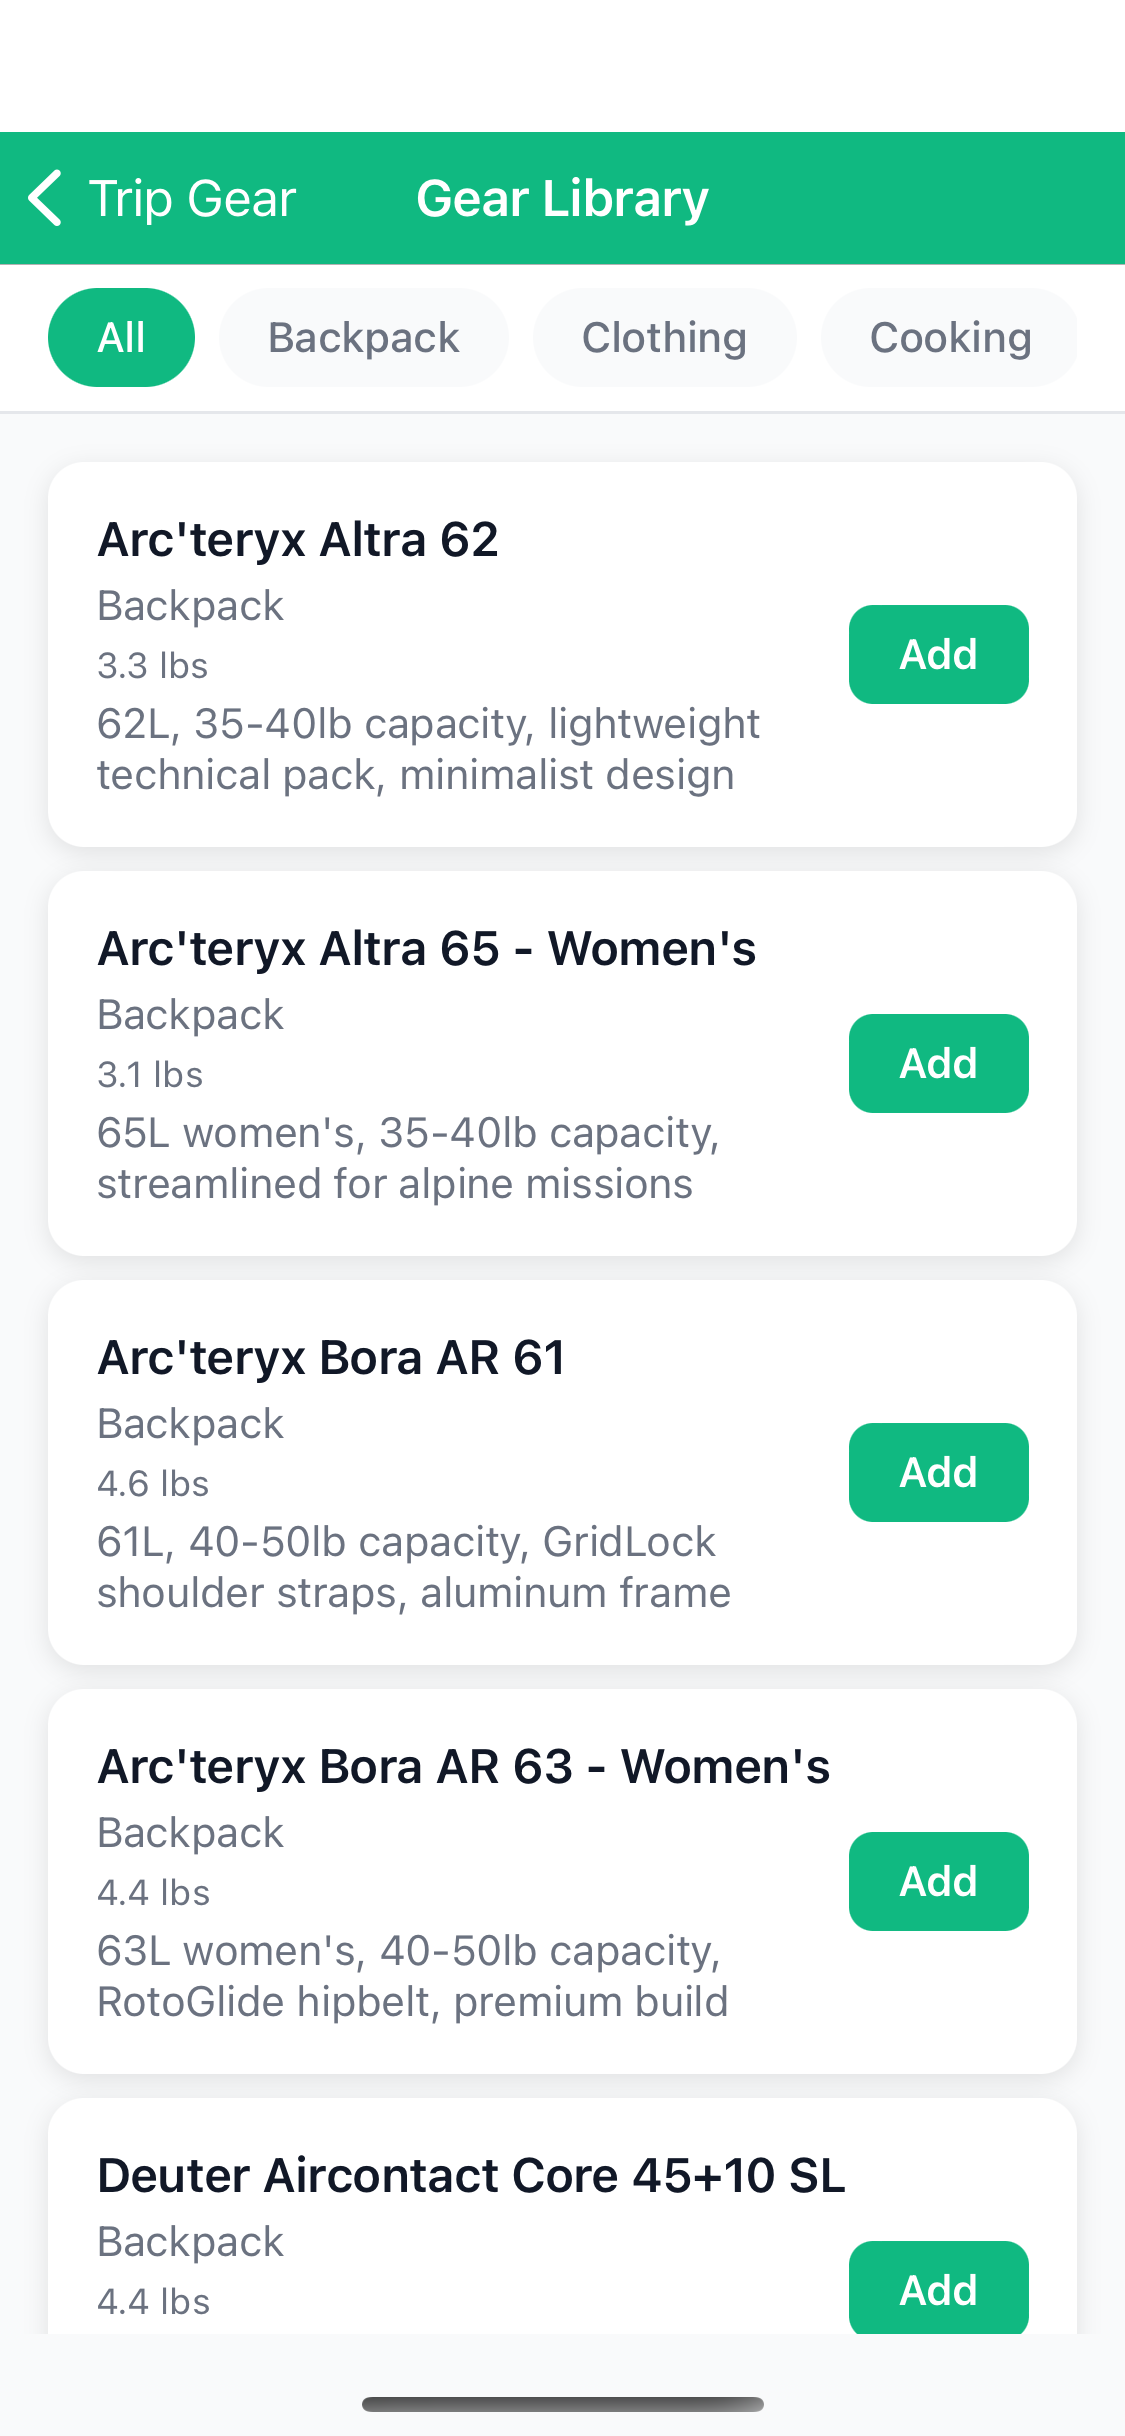
Browsing the System Gear Library
- Go to the Manage tab
- Tap Gear Library
- Browse through 251 pre-loaded common items organized by category:
- Shelter
- Sleep System
- Cooking
- Clothing
- Navigation
- First Aid
- Tools
Adding Gear to Your Personal Library
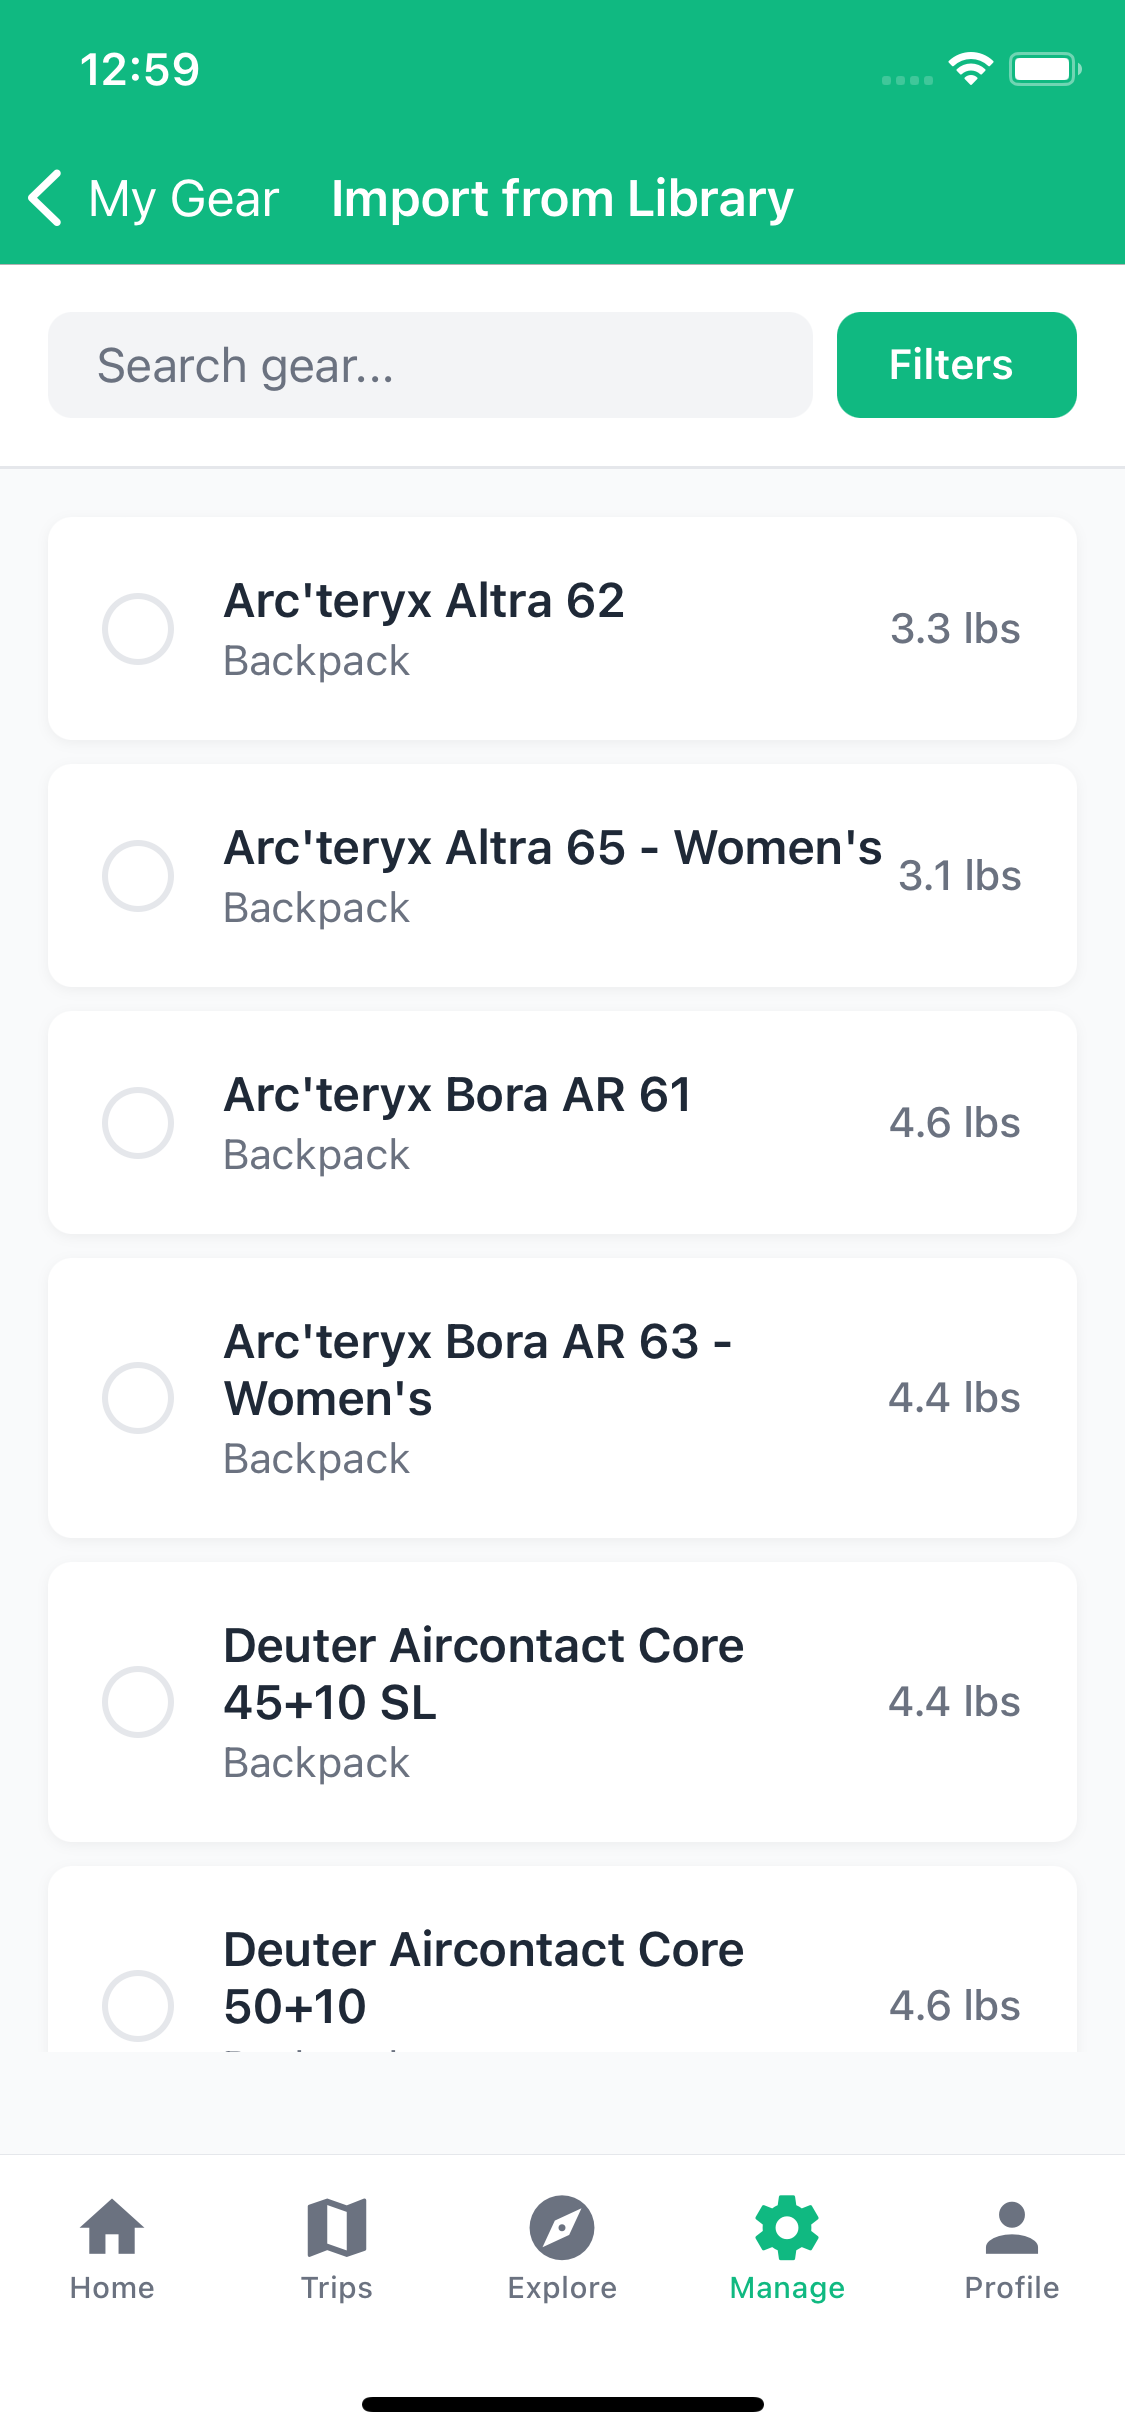
Method 1: Import from System Library
- Browse the System Gear Library
- Find an item you own (e.g., "Tent - 2 Person")
- Tap Import to My Gear
- The item is copied to your personal library
- Edit details like:
- Actual weight of your specific tent
- Season tags (3-season, 4-season, summer)
- Personal notes or brand info

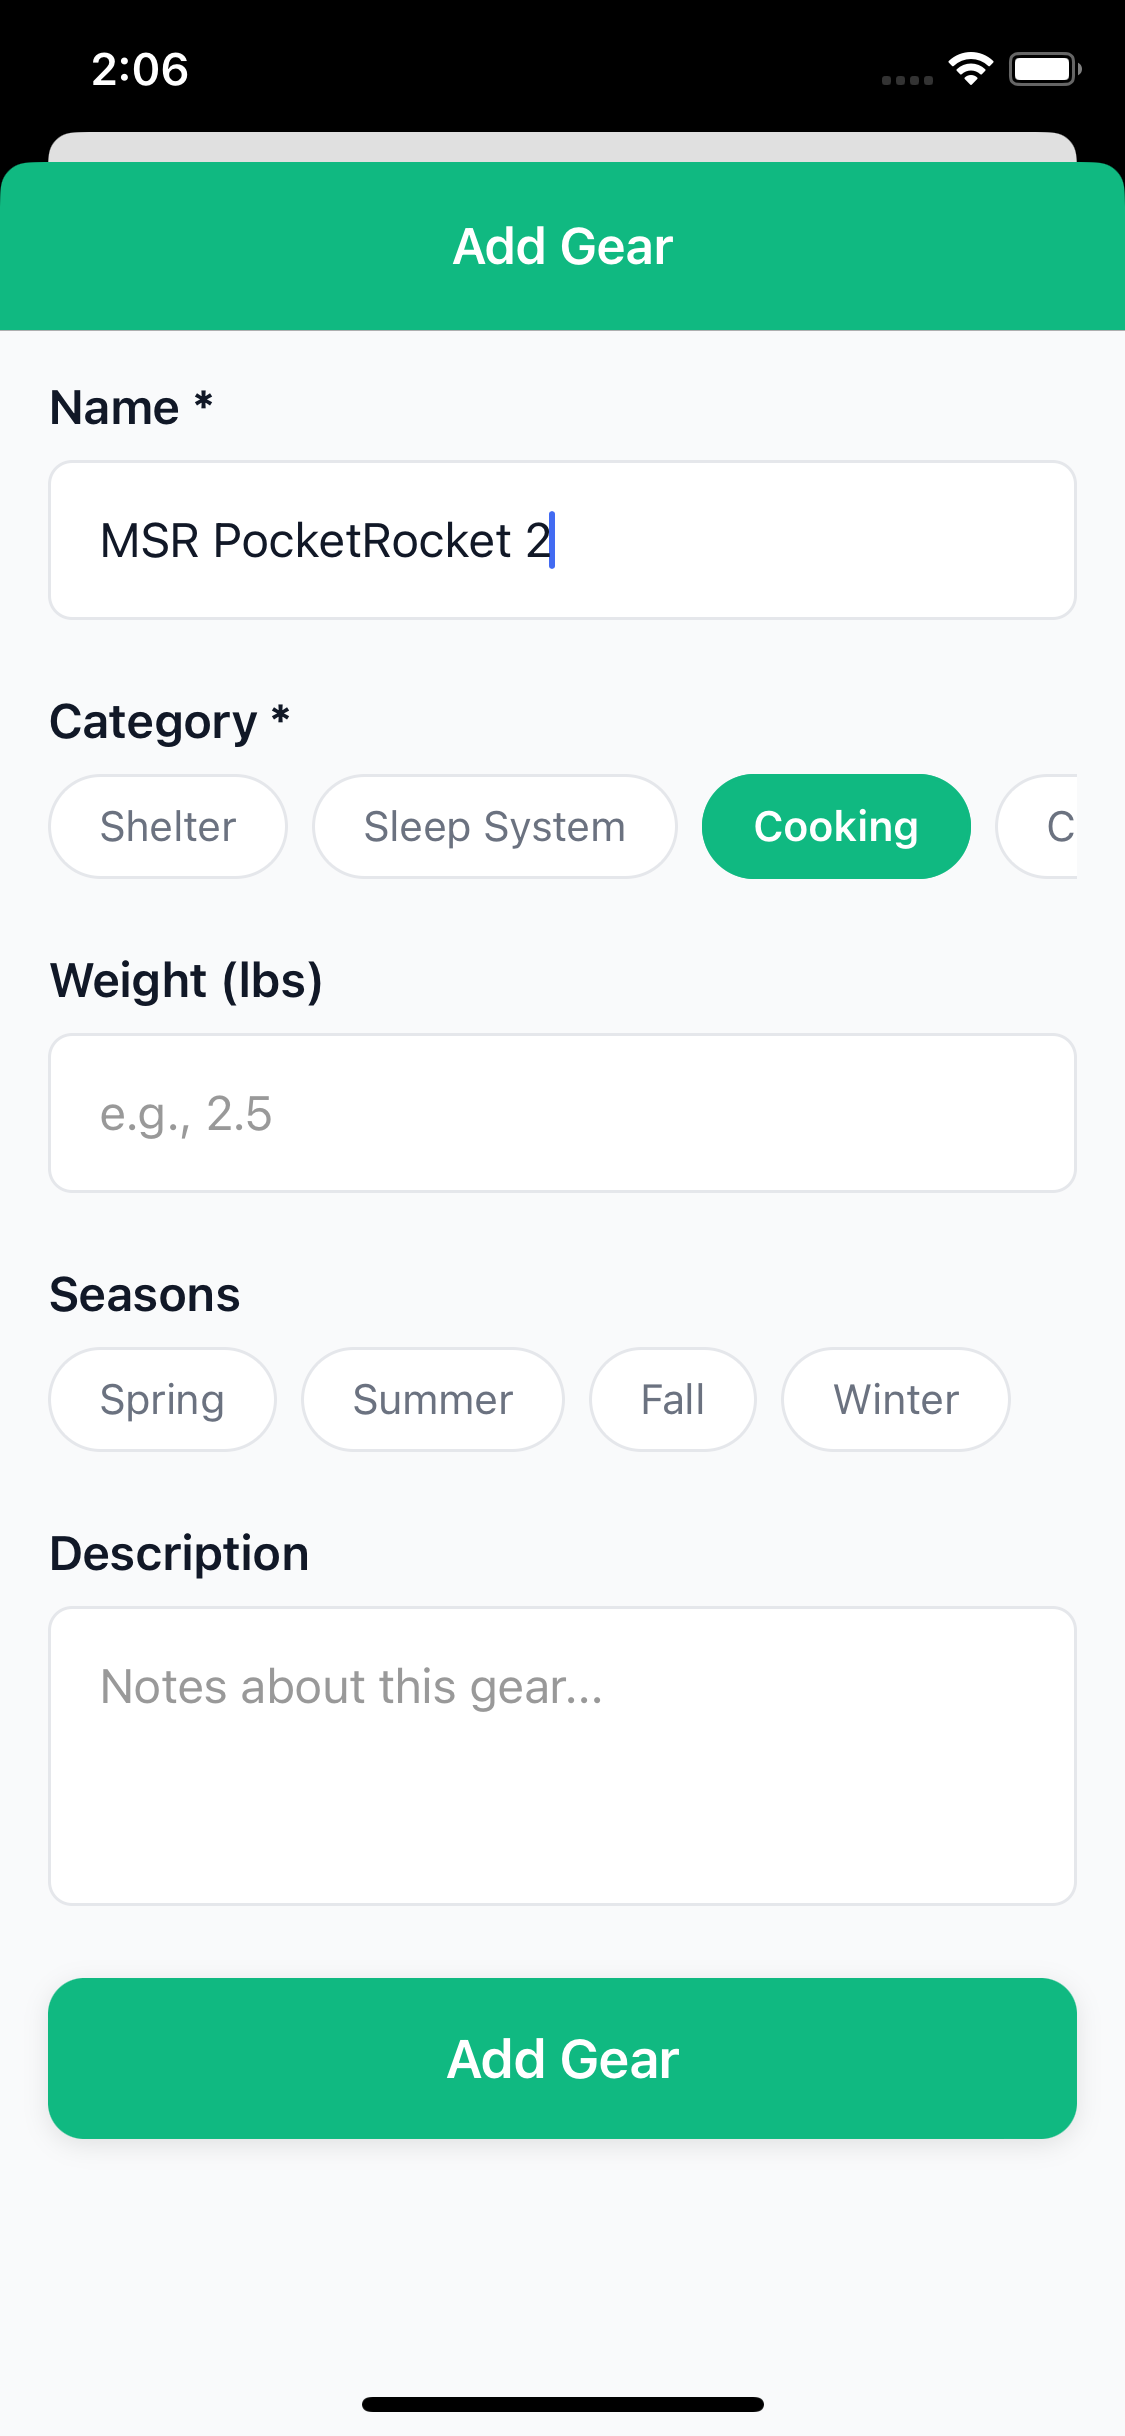
Method 2: Create Custom Gear
- Go to Manage → My Gear
- Tap the + button
- Enter gear details:
- Name: e.g., "MSR PocketRocket 2"
- Category: Select from dropdown
- Weight: In pounds
- Description: Brand, model, notes
- Season Tags: When you use this gear
- Tap Save
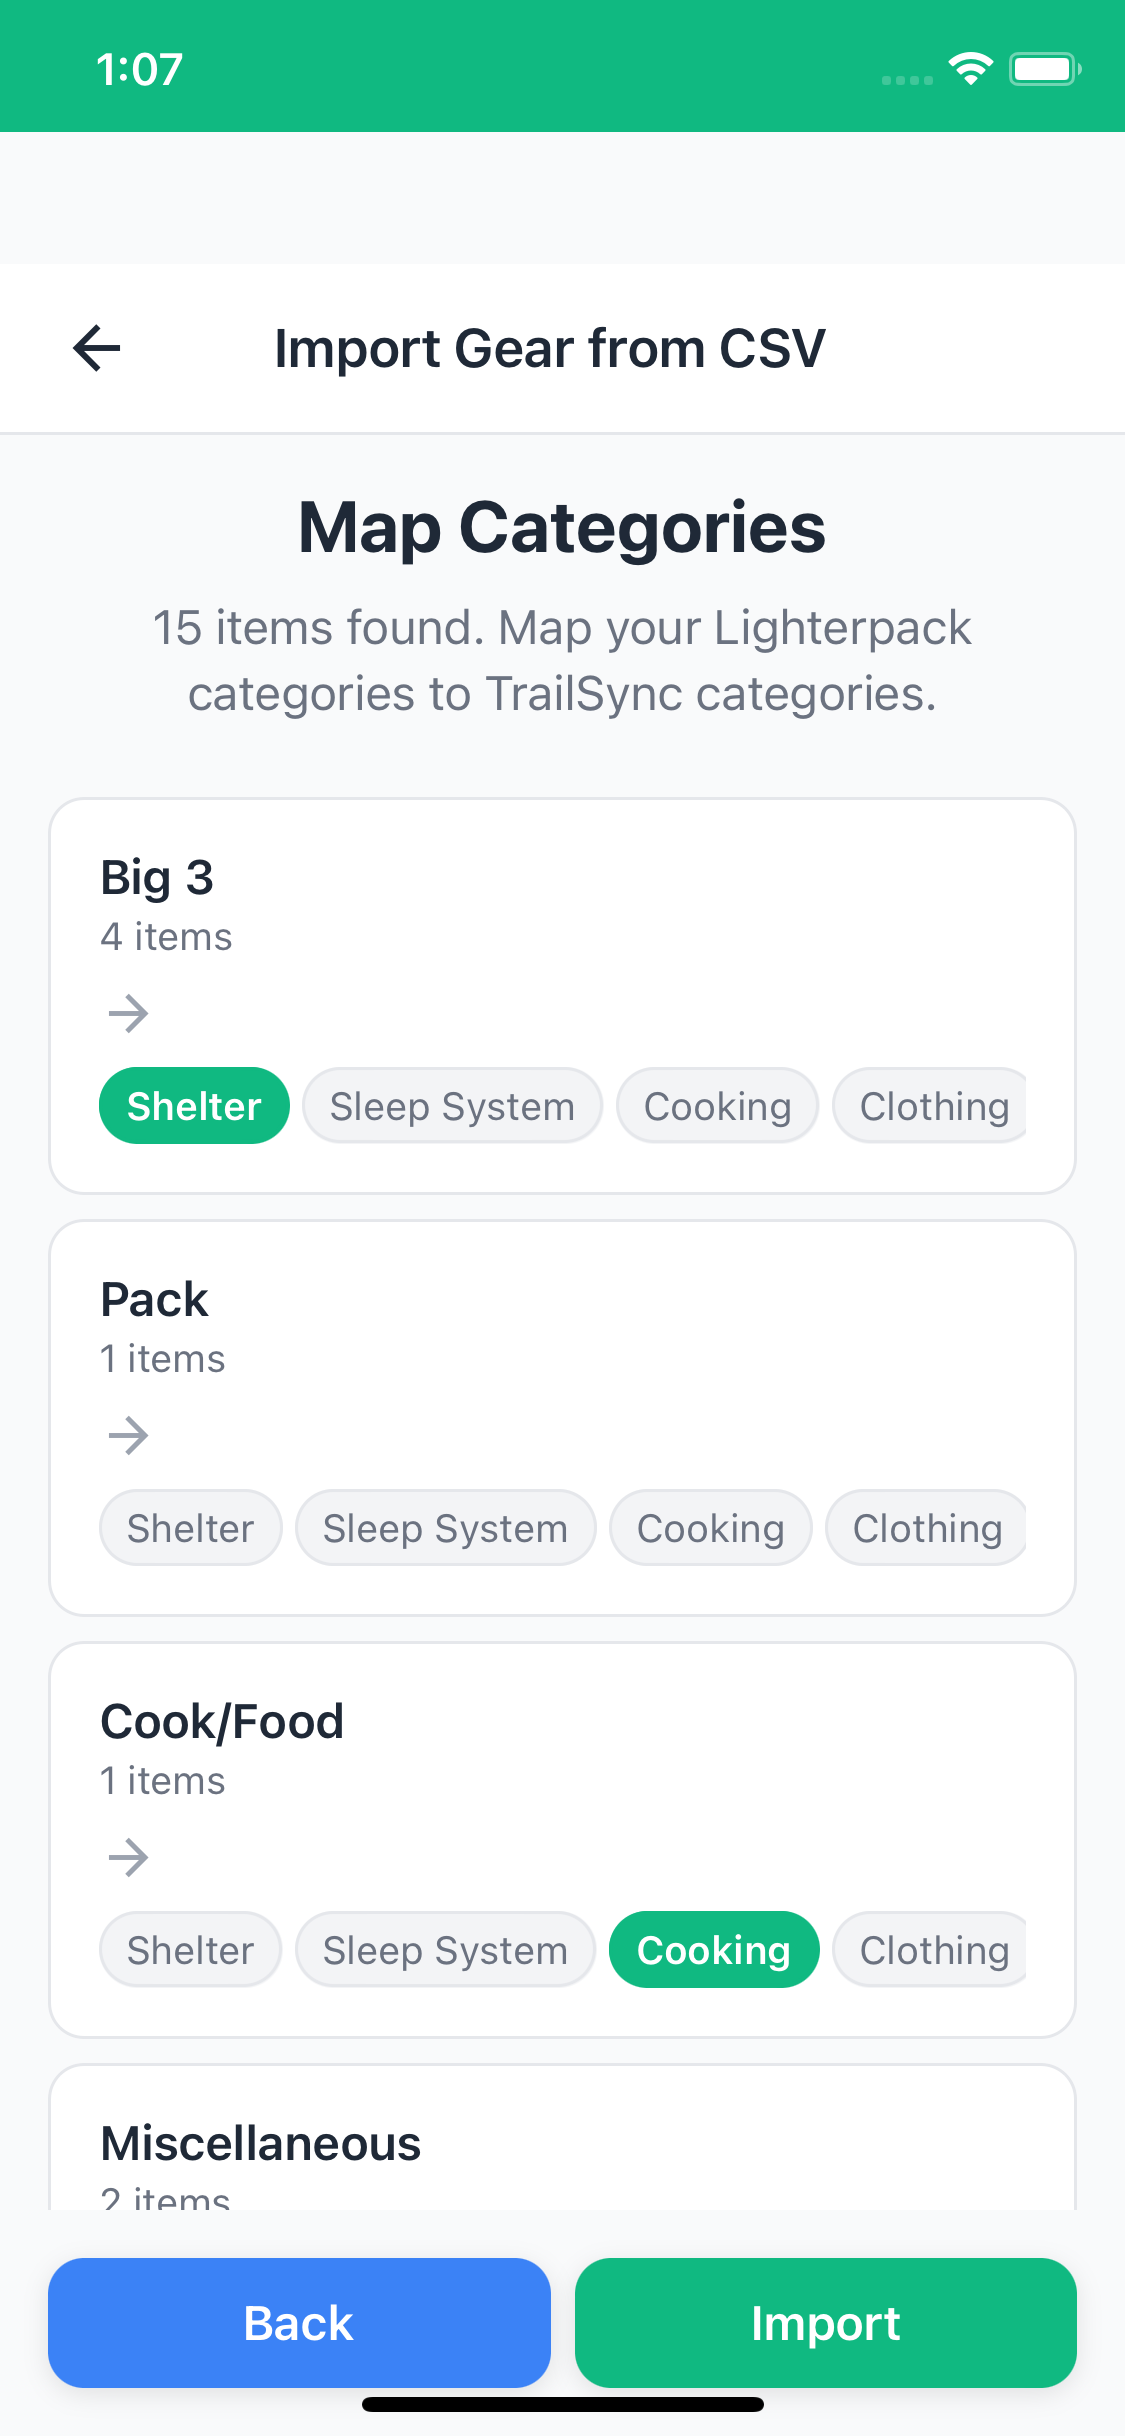
Method 3: Import from Lighterpack
If you already manage your gear on Lighterpack, you can bring your whole list across in one go rather than re-entering everything by hand.
- In Lighterpack, export your gear list as a CSV file
- In TrailSync, go to the Manage tab
- Tap My Gear
- Tap Import from CSV
- Select your exported CSV file
- Review the items detected and tap Import
Your Lighterpack items are added to your personal gear library with their original names, categories, and weights — ready to be added to any trip straight away.
📝 Creating Gear Templates
While TrailSync doesn't have formal "templates," you can use a smart workflow to quickly set up gear for similar trips.
Strategy: Use Past Trips as Templates
- Complete a trip with your gear list fully set up
- When creating a new similar trip, reference your past trip's gear
- Manually add the same items to your new trip
- Adjust quantities as needed
Quick Setup for Common Trip Types
Weekend Trip (2 days, 1 night)
Essential gear to add:
- Shelter: Tent, stakes, groundsheet
- Sleep: Sleeping bag, sleeping pad
- Cooking: Stove, fuel, pot, utensils
- Hydration: Water bottles, filter
- Navigation: Map, compass, GPS
- Safety: First aid kit, emergency shelter
Week-Long Expedition
Add to weekend essentials:
- Extra fuel canisters
- Repair kit (duct tape, patches, needle & thread)
- More comprehensive first aid
- Personal hygiene items
- Additional clothing layers
🏔️ Creating a New Trip
Basic Trip Creation
- Tap the Trips tab
- Tap the + Create Trip button
- Fill in trip details:
- Trip Name: e.g., "Mt. Whitney Summit"
- Description: Brief overview of the adventure
- Start Date: First day of trip
- End Date: Last day of trip
- GPX File: Optional load an existing GPX file for the route
- Tap Create Trip
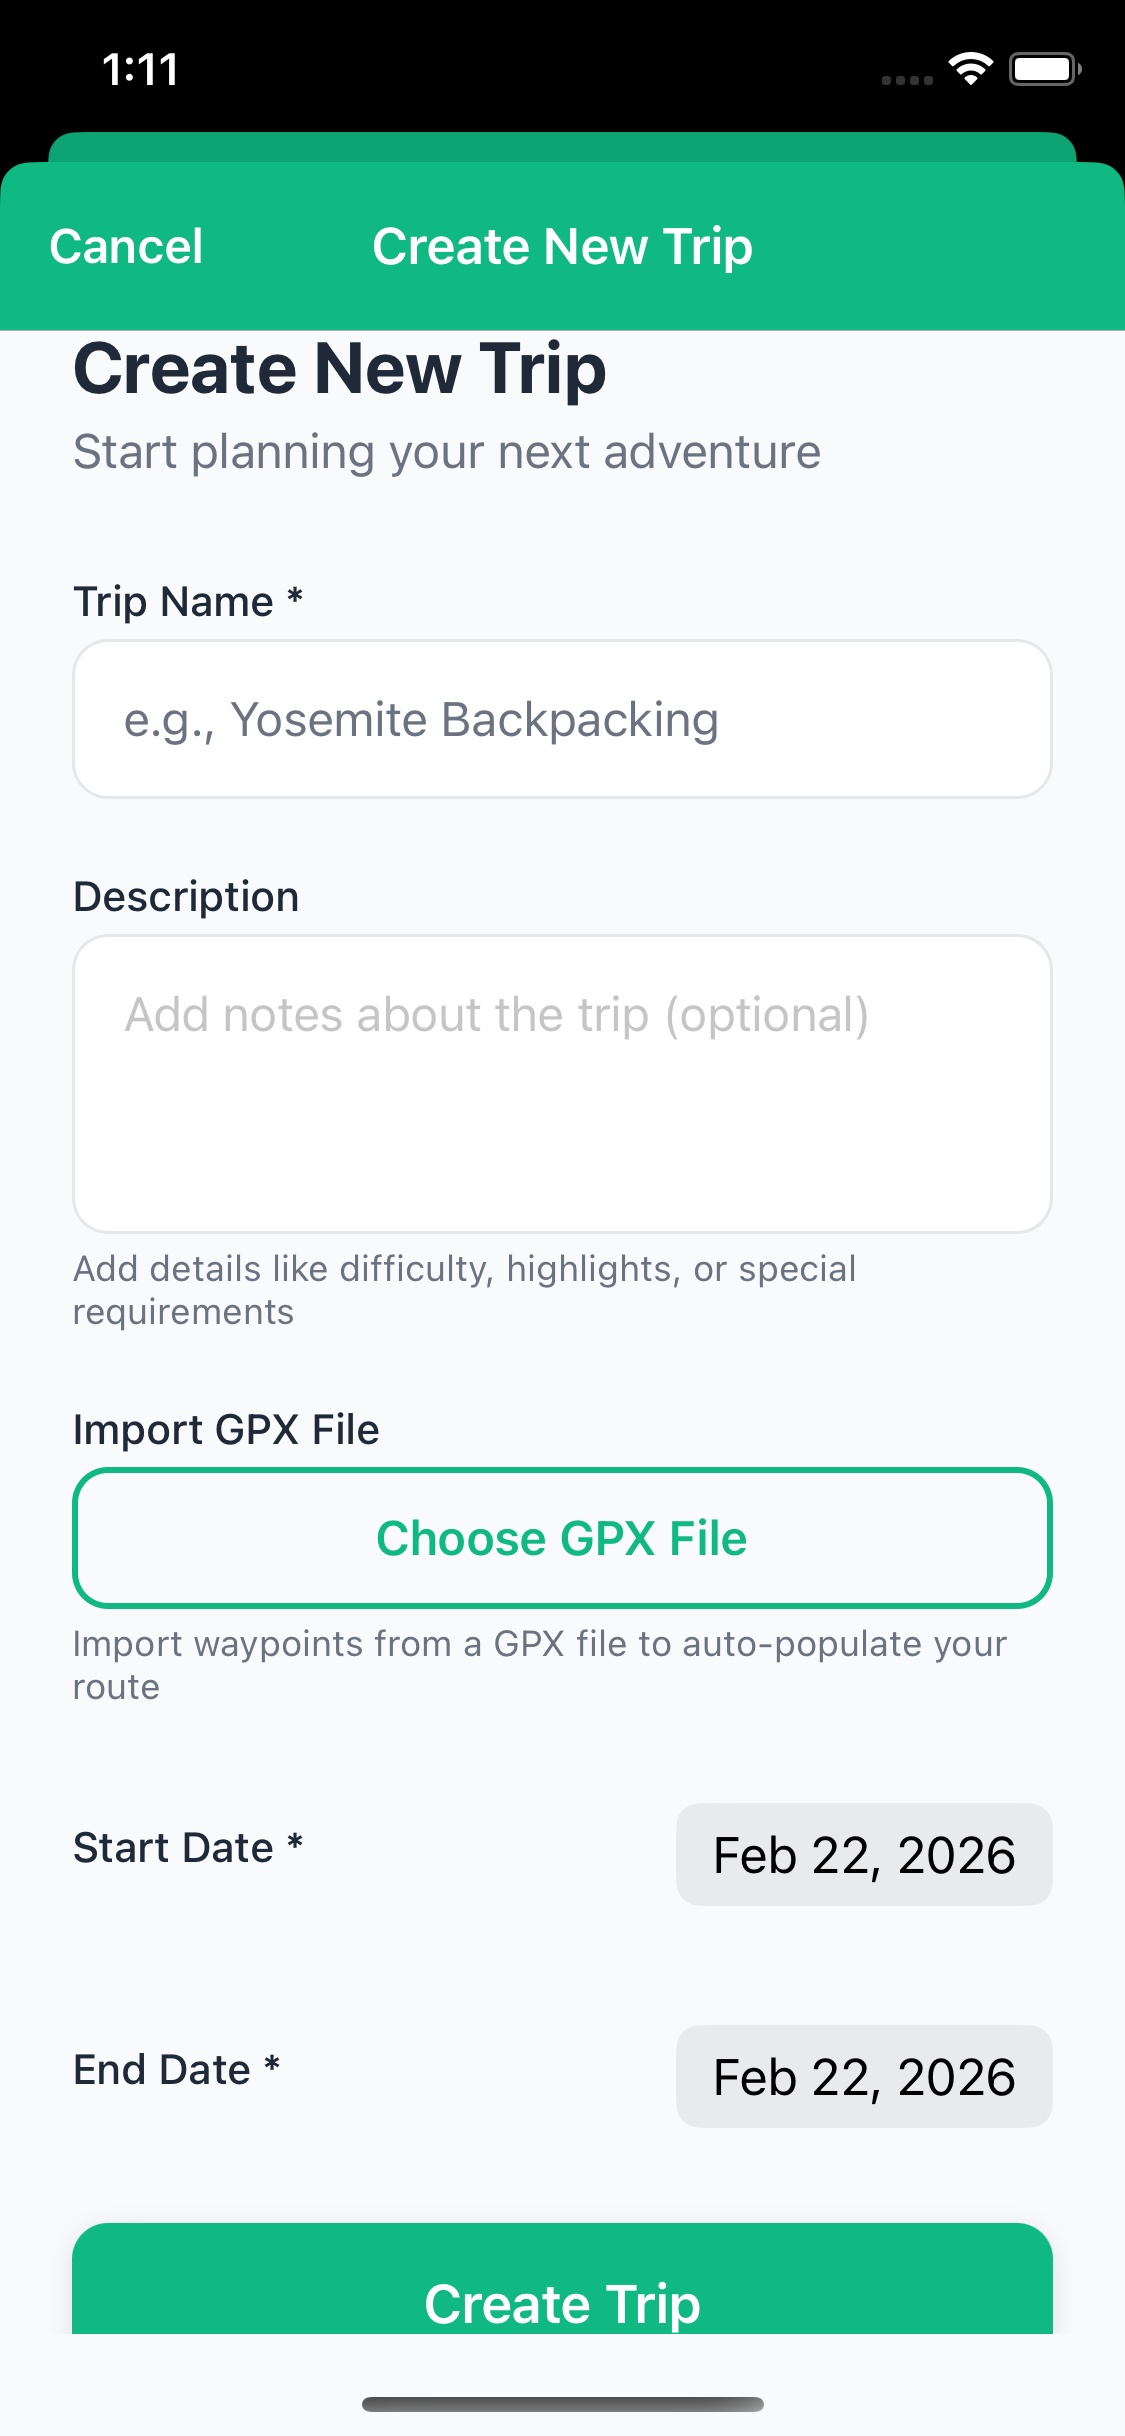
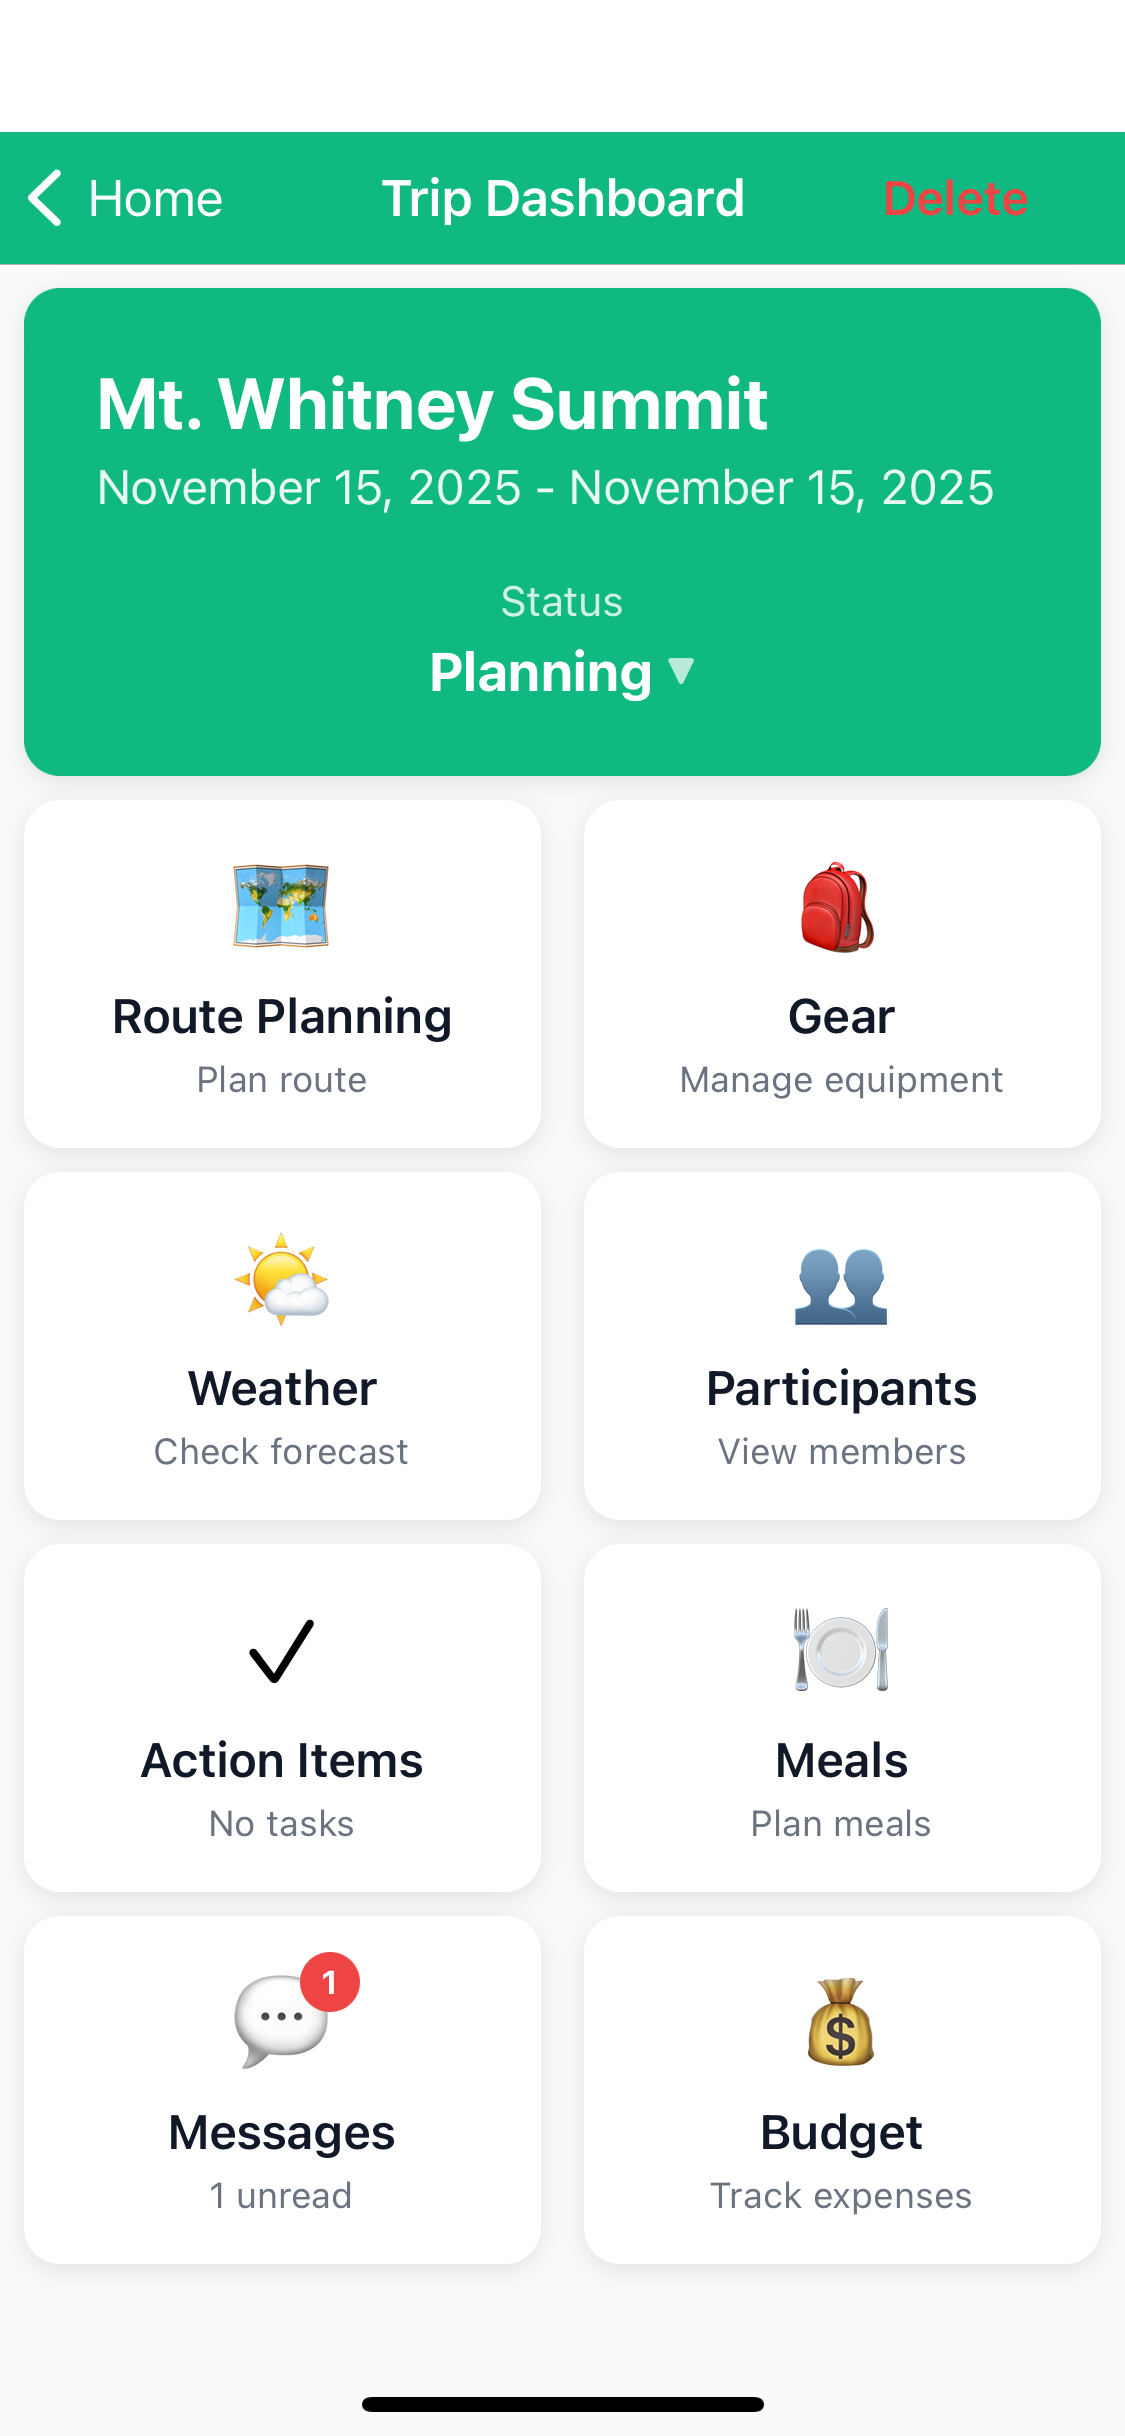
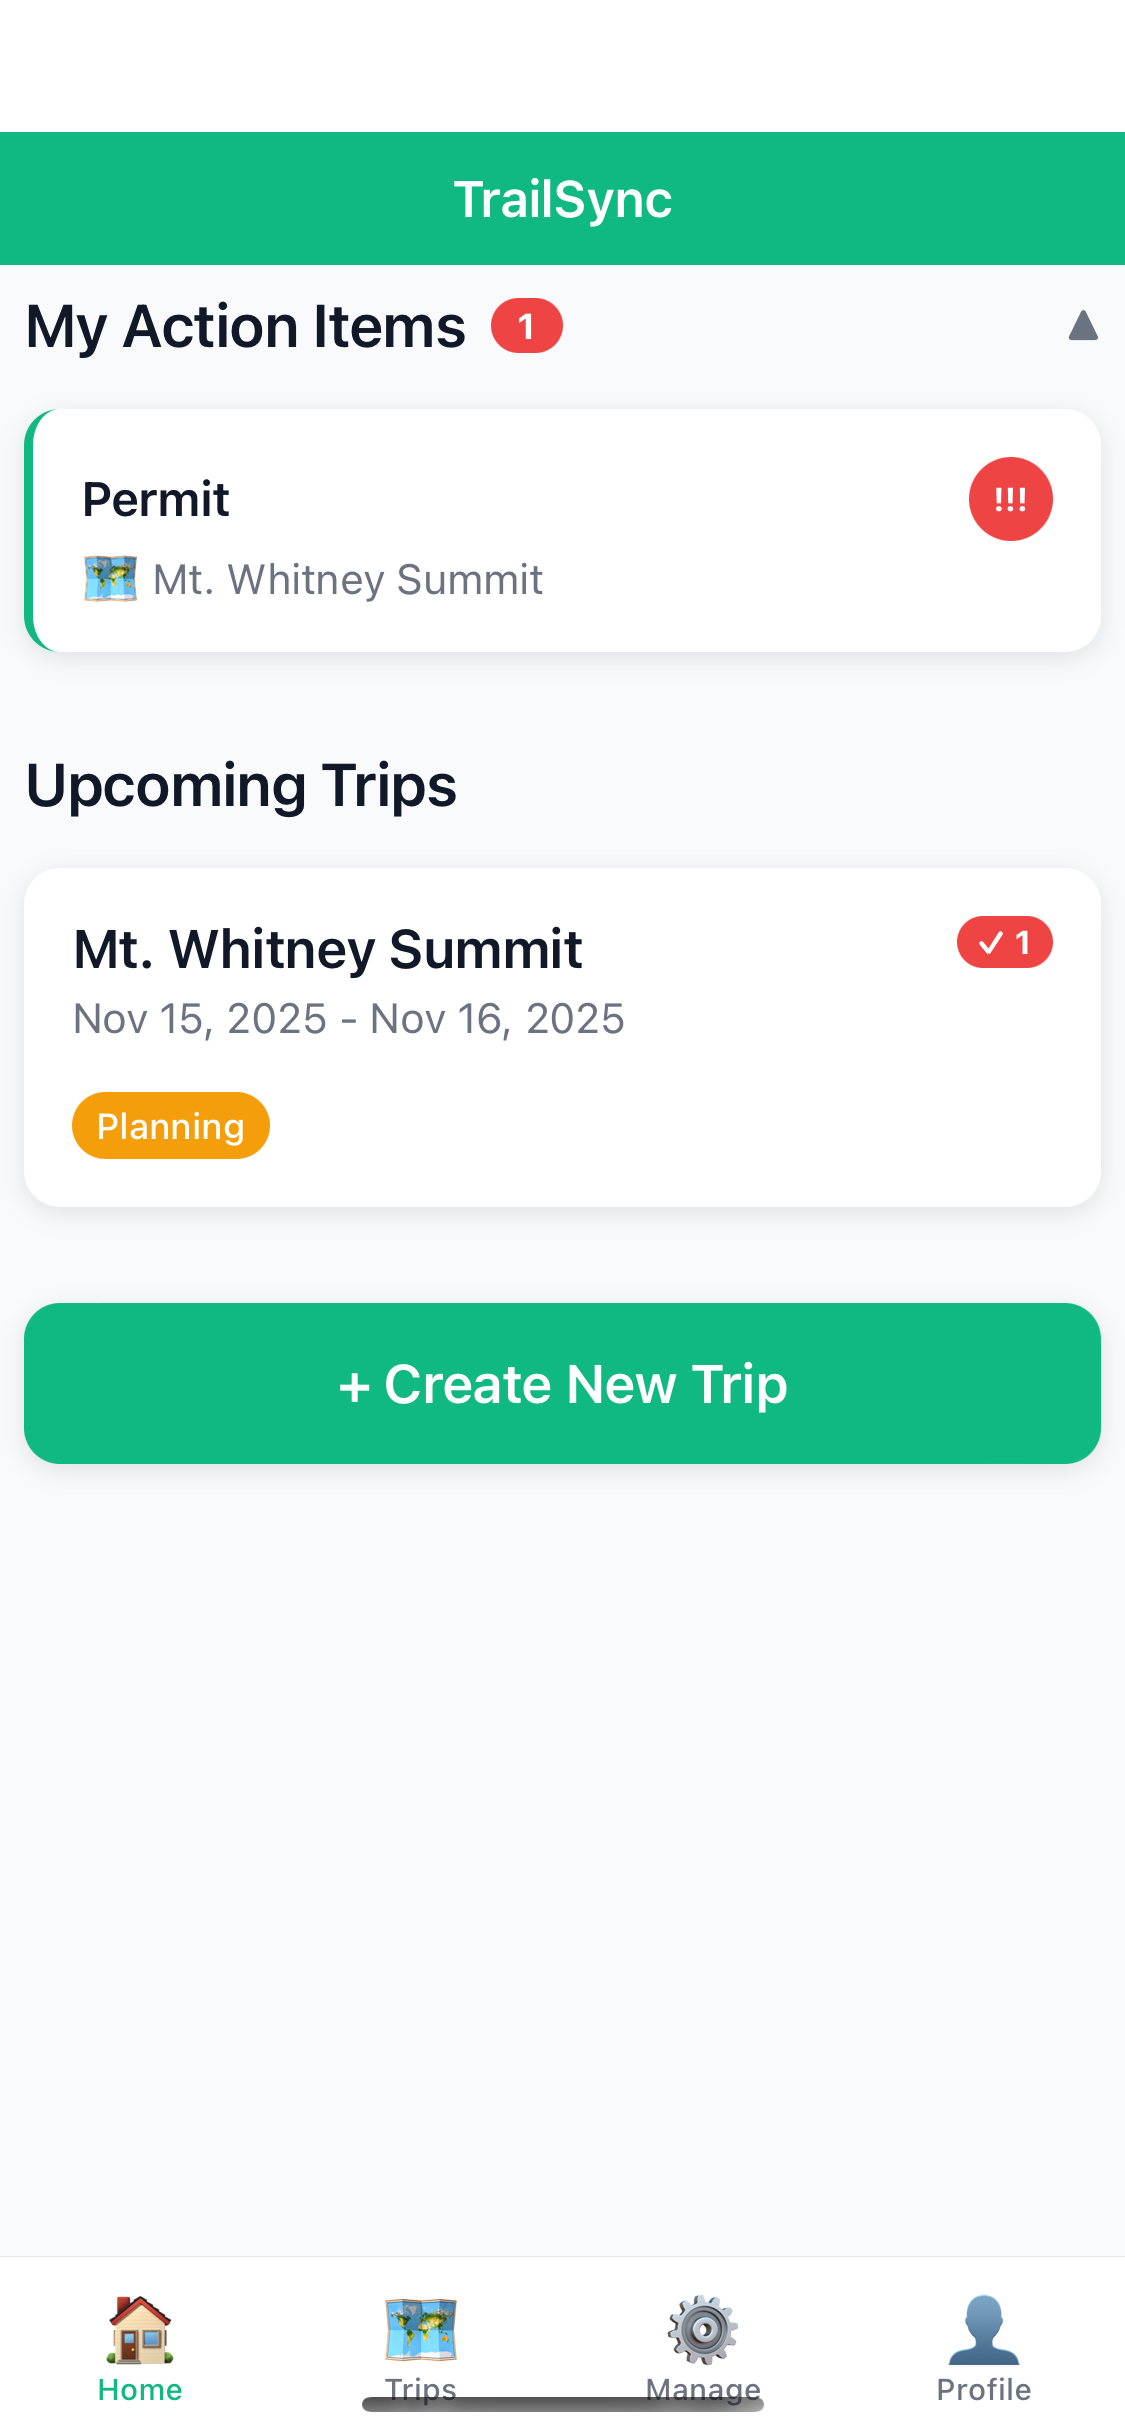
Your new trip is created with status Planning and you're automatically set as the Organizer.
Understanding Trip Roles
- Organizer Full Control
- Can edit all trip details
- Can delete the trip
- Can invite/remove participants
- Can change trip status
- Participant Contributor
- Can view all trip info
- Can add gear, meals, expenses, messages
- Cannot edit core trip details
- Can leave trip voluntarily
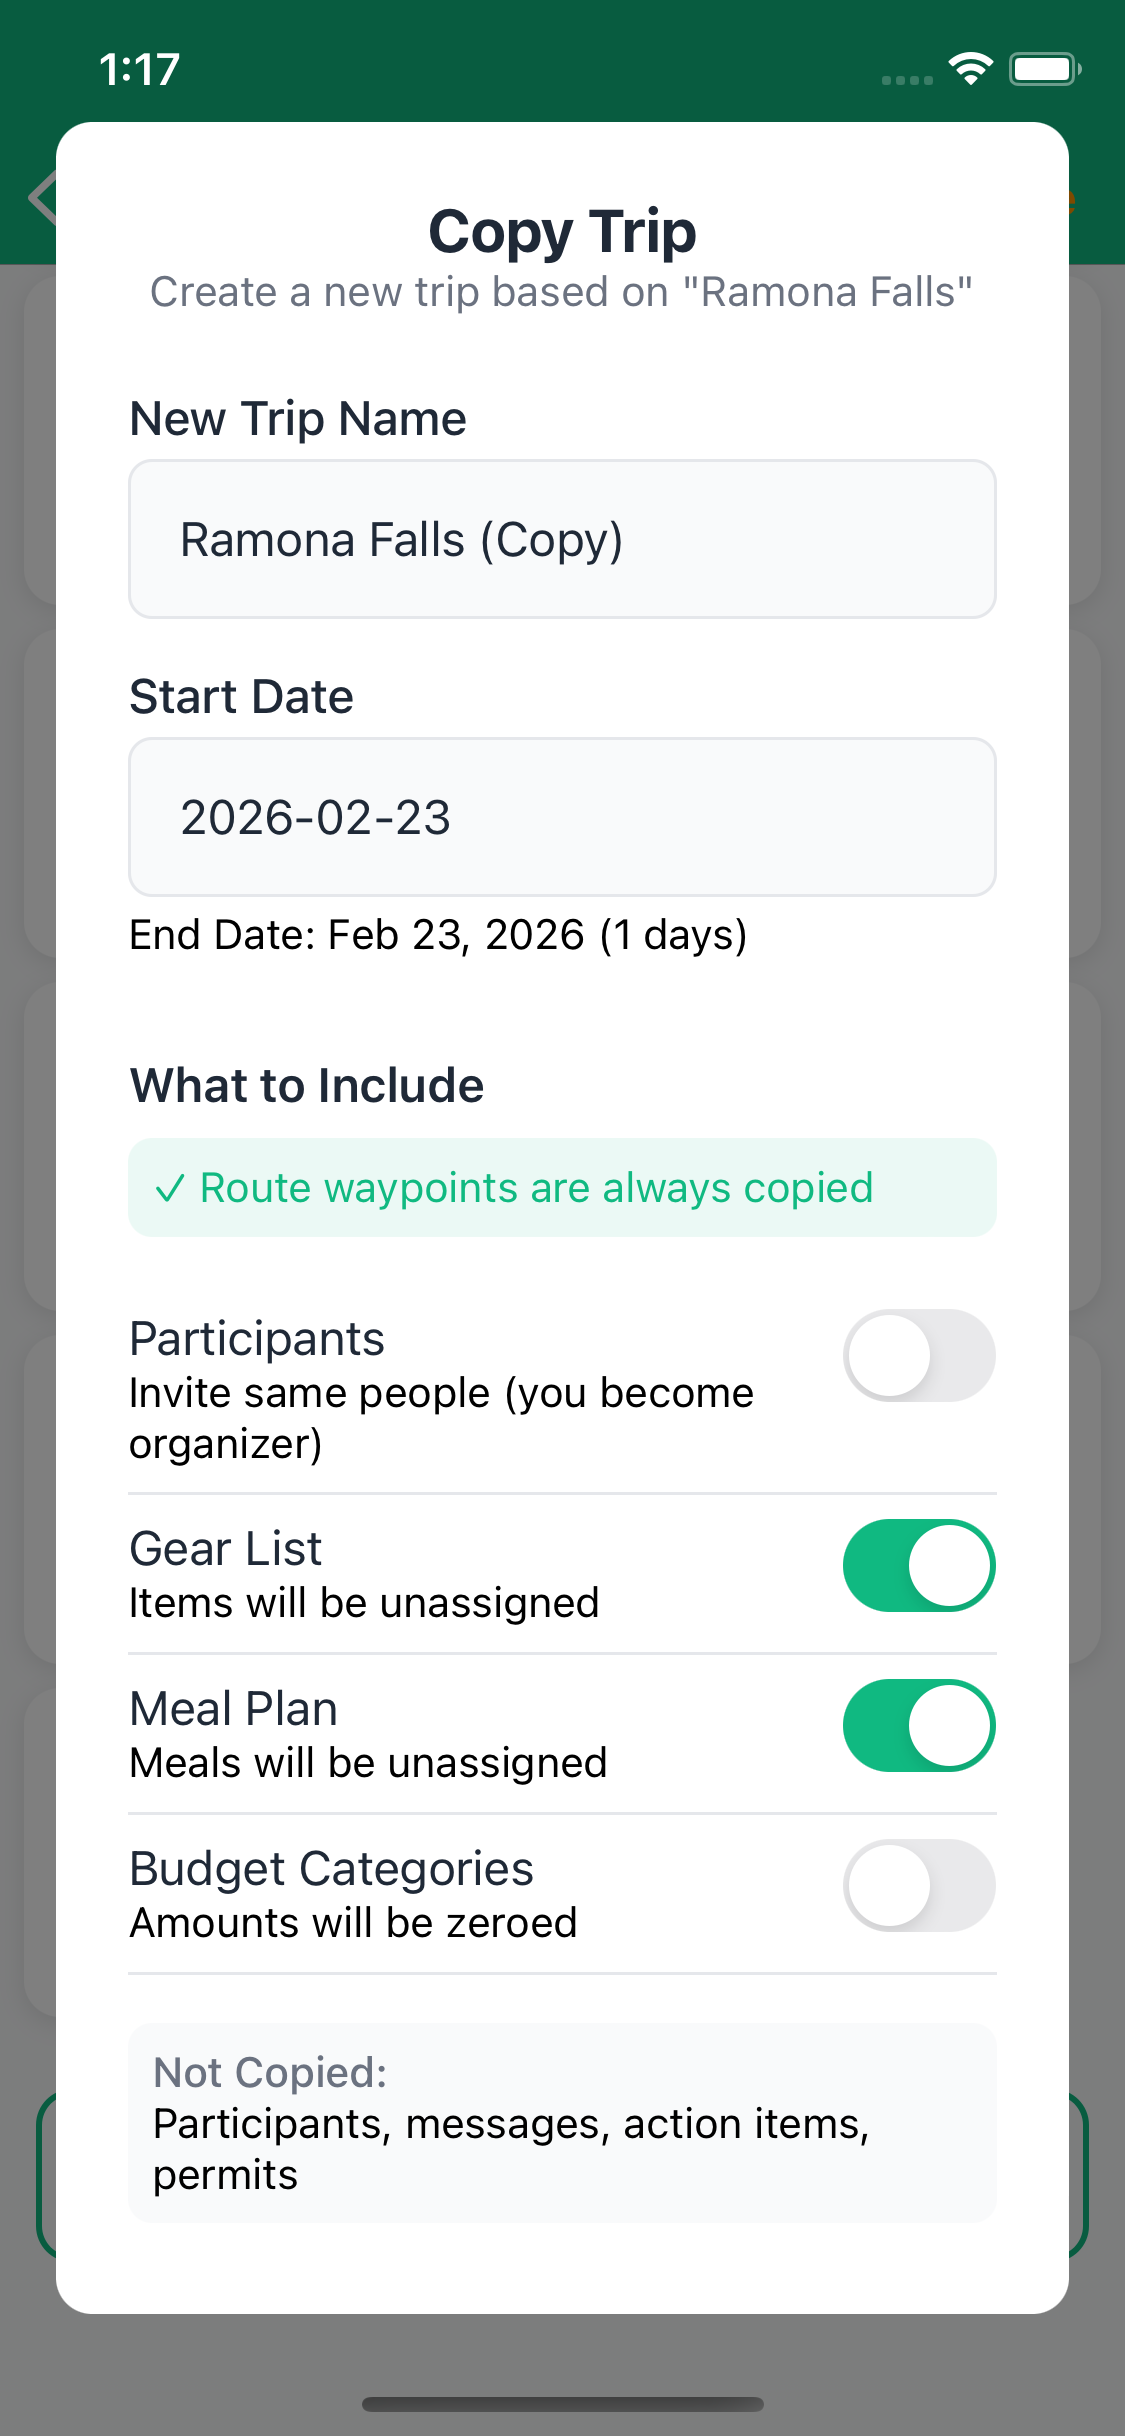
Copying an Existing Trip
If you're heading back to a trail you've done before, or running a similar trip with a different group, you can copy an existing trip instead of starting from scratch. The route carries over automatically, and you choose what else to bring across.
- Open the trip you want to copy
- Tap Copy Trip
- Enter a name for the new trip
- Set the new start date — the end date adjusts automatically to match the same duration
- Choose what to bring across:
- Route — always included (it's the whole point)
- Gear list — copied unassigned, ready for your new group to claim
- Meal plan — copied without assignments
- Budget categories — copied with amounts zeroed out
- Tap Create Copy
You become the organizer of the new trip. Participants, action items, permits, and messages from the original aren't carried over — it's a clean slate for the new adventure.
👥 Inviting Participants
Sending Invitations
- Open your trip
- Tap the Participants tile
- Tap Invite Participant
- Tap Invite from the friend list to quick invite a friend
- Enter the person's email address
- Tap Send Invitation

Accepting an Invitation
When someone invites you to a trip:
- Open TrailSync
- Go to the Home tab
- Look for the Invitations section
- Tap on the invitation card
- Review trip details
- Tap Accept or Decline

Managing Participants
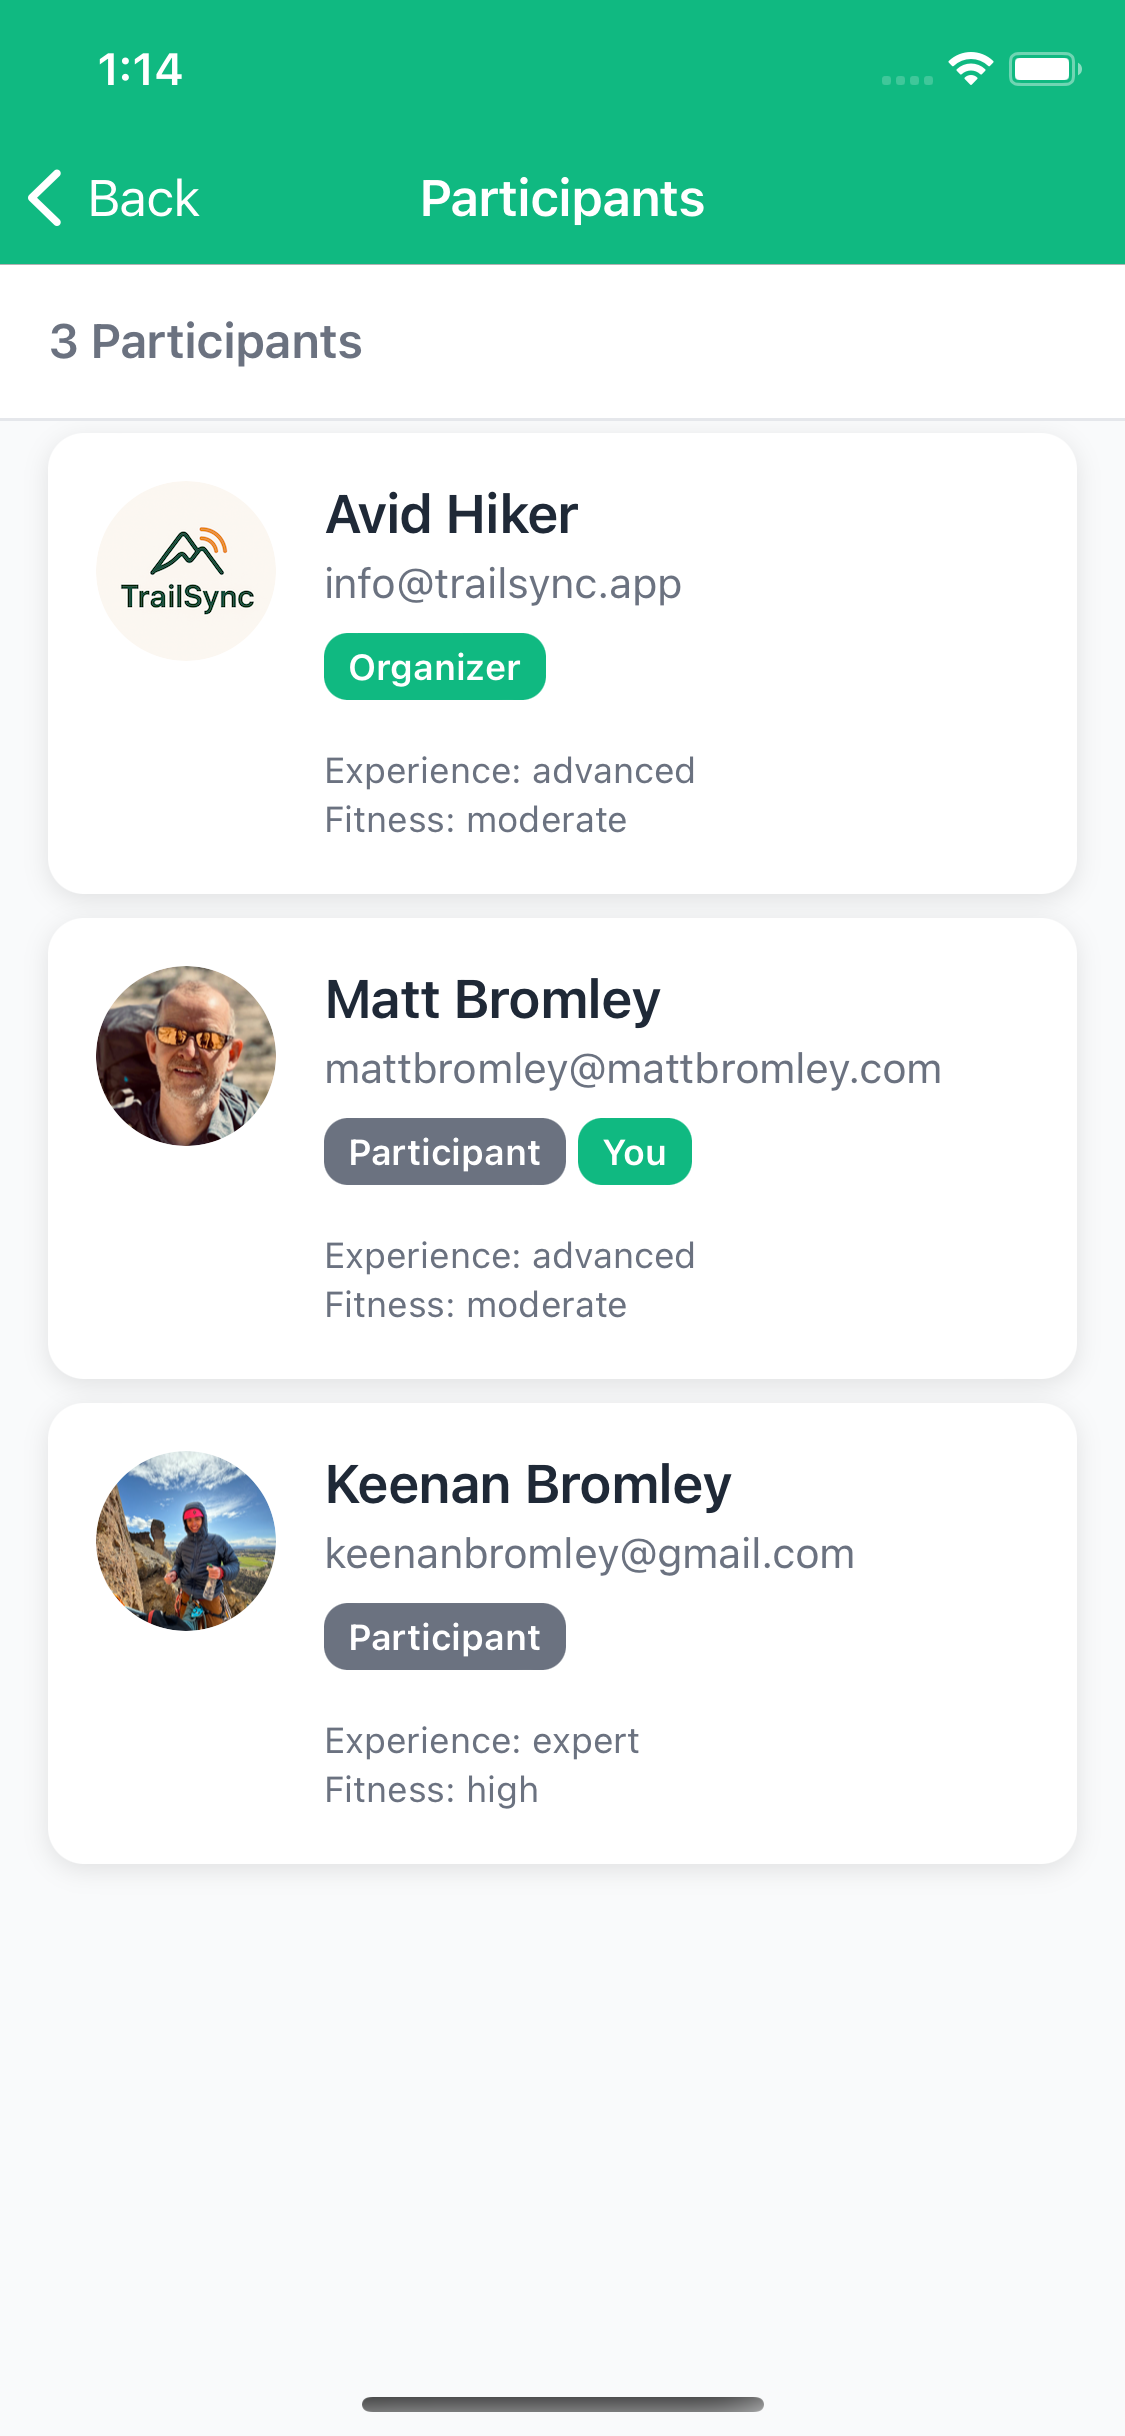
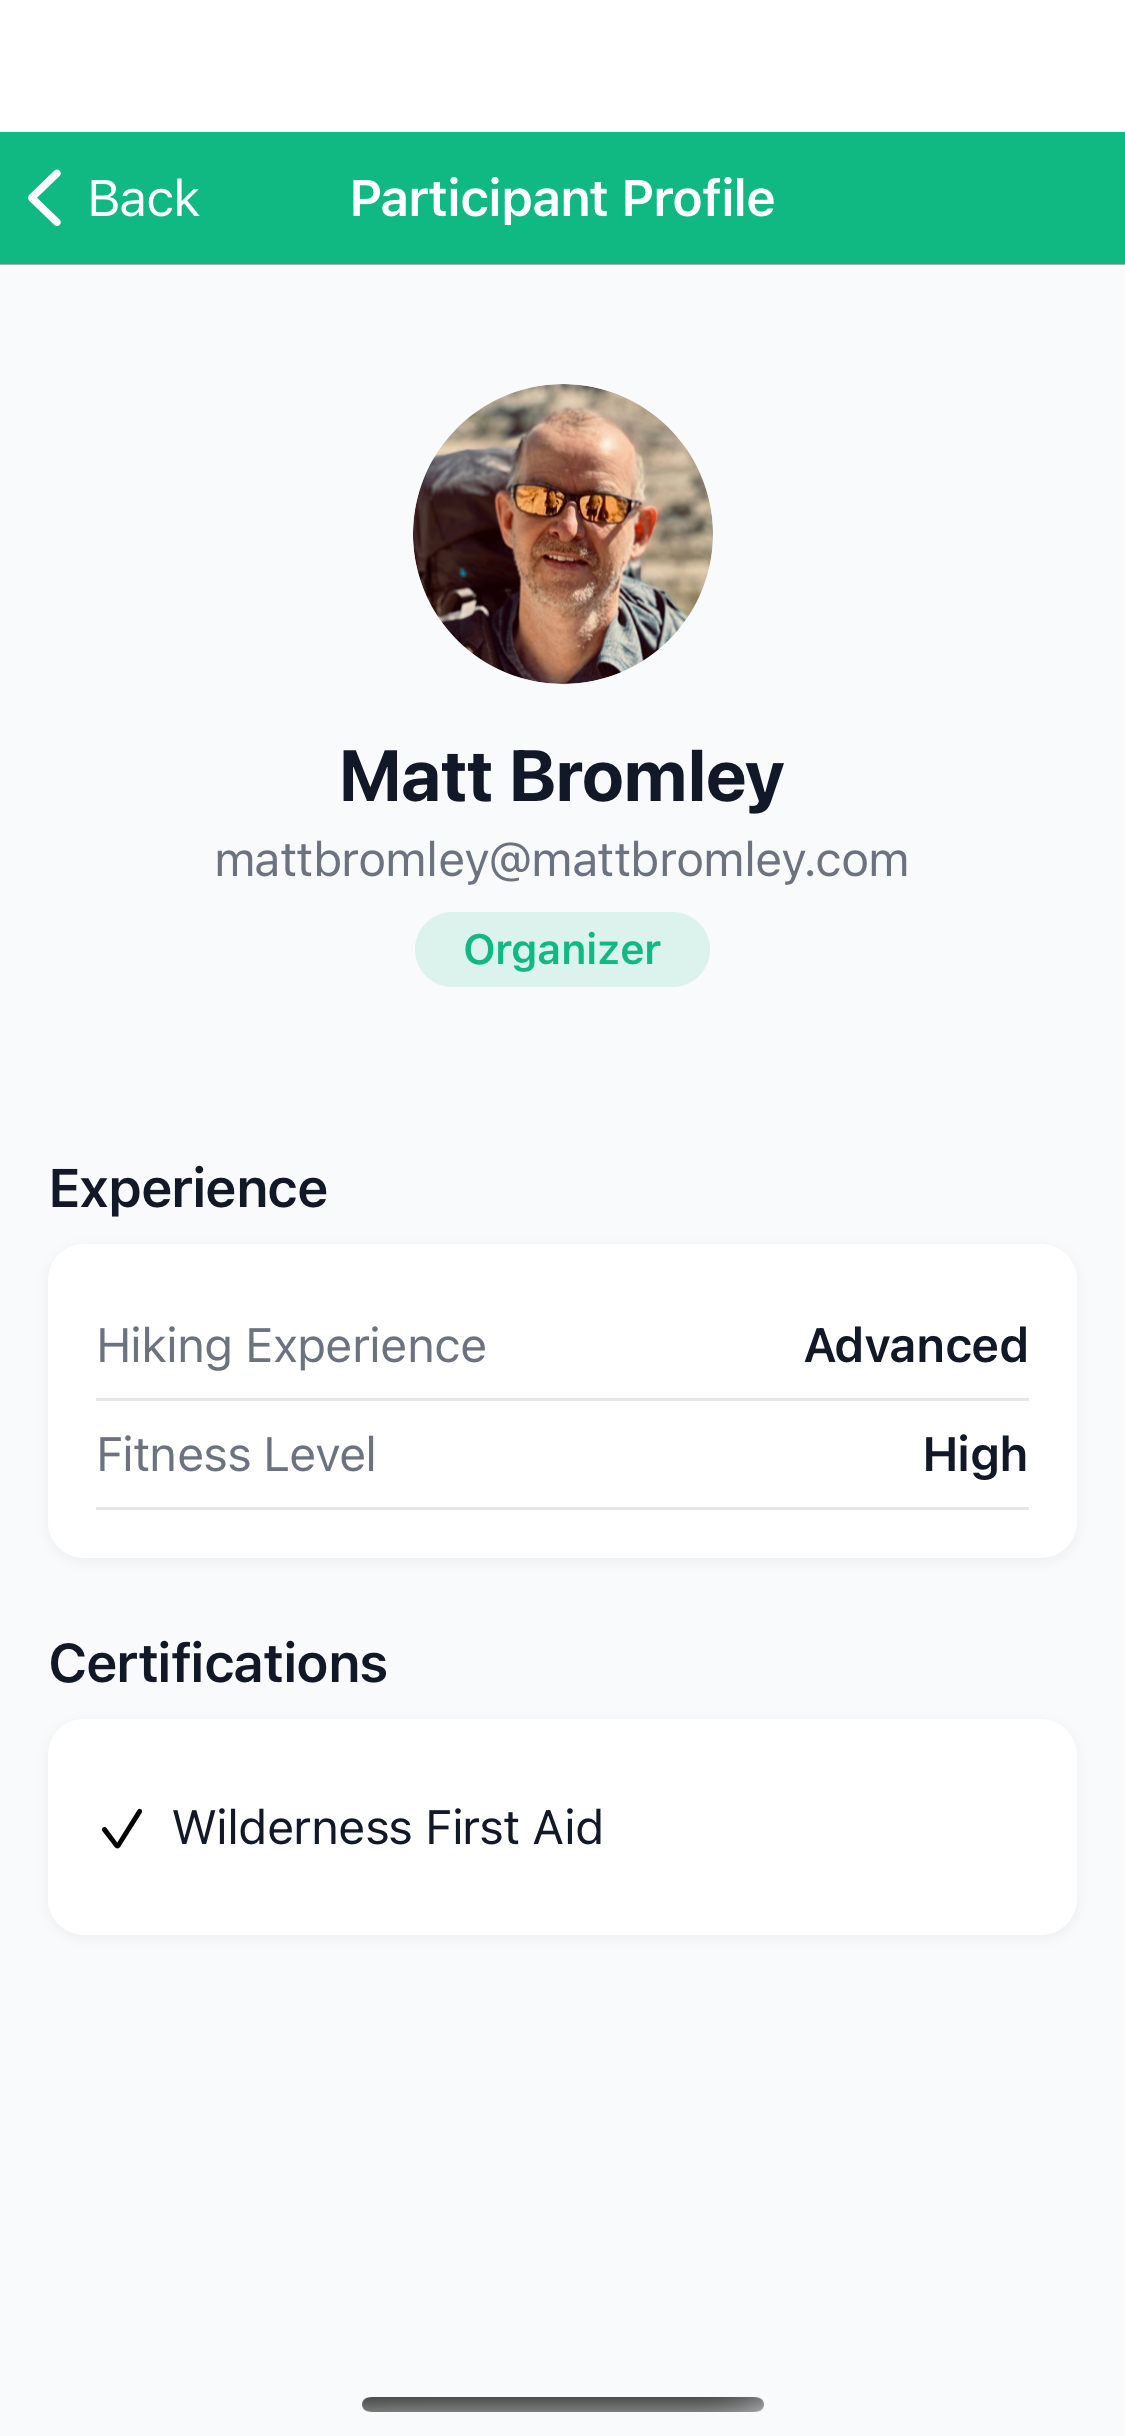
Viewing Participant Profiles
- Go to Participants screen
- Tap on any participant's name
- View their:
- Experience and fitness level
- Certifications
- Dietary restrictions
- Emergency contact (if shared)
Canceling Invitations
Organizers can cancel pending invitations:
- Go to Participants
- Scroll to Pending Invitations
- Swipe left on the invitation
- Tap Cancel
Removing Participants
Only the Organizer can remove participants:
- Go to Participants
- Swipe left on the participant
- Tap Remove
- Confirm removal
🗺️ Route Planning
Setting Your Trailhead Location
- Open your trip
- Tap the Route tile
- Tap the search bar at the top
- Type your trailhead name (e.g., "Whitney Portal")
- Select from the search results
- The map centers on your location
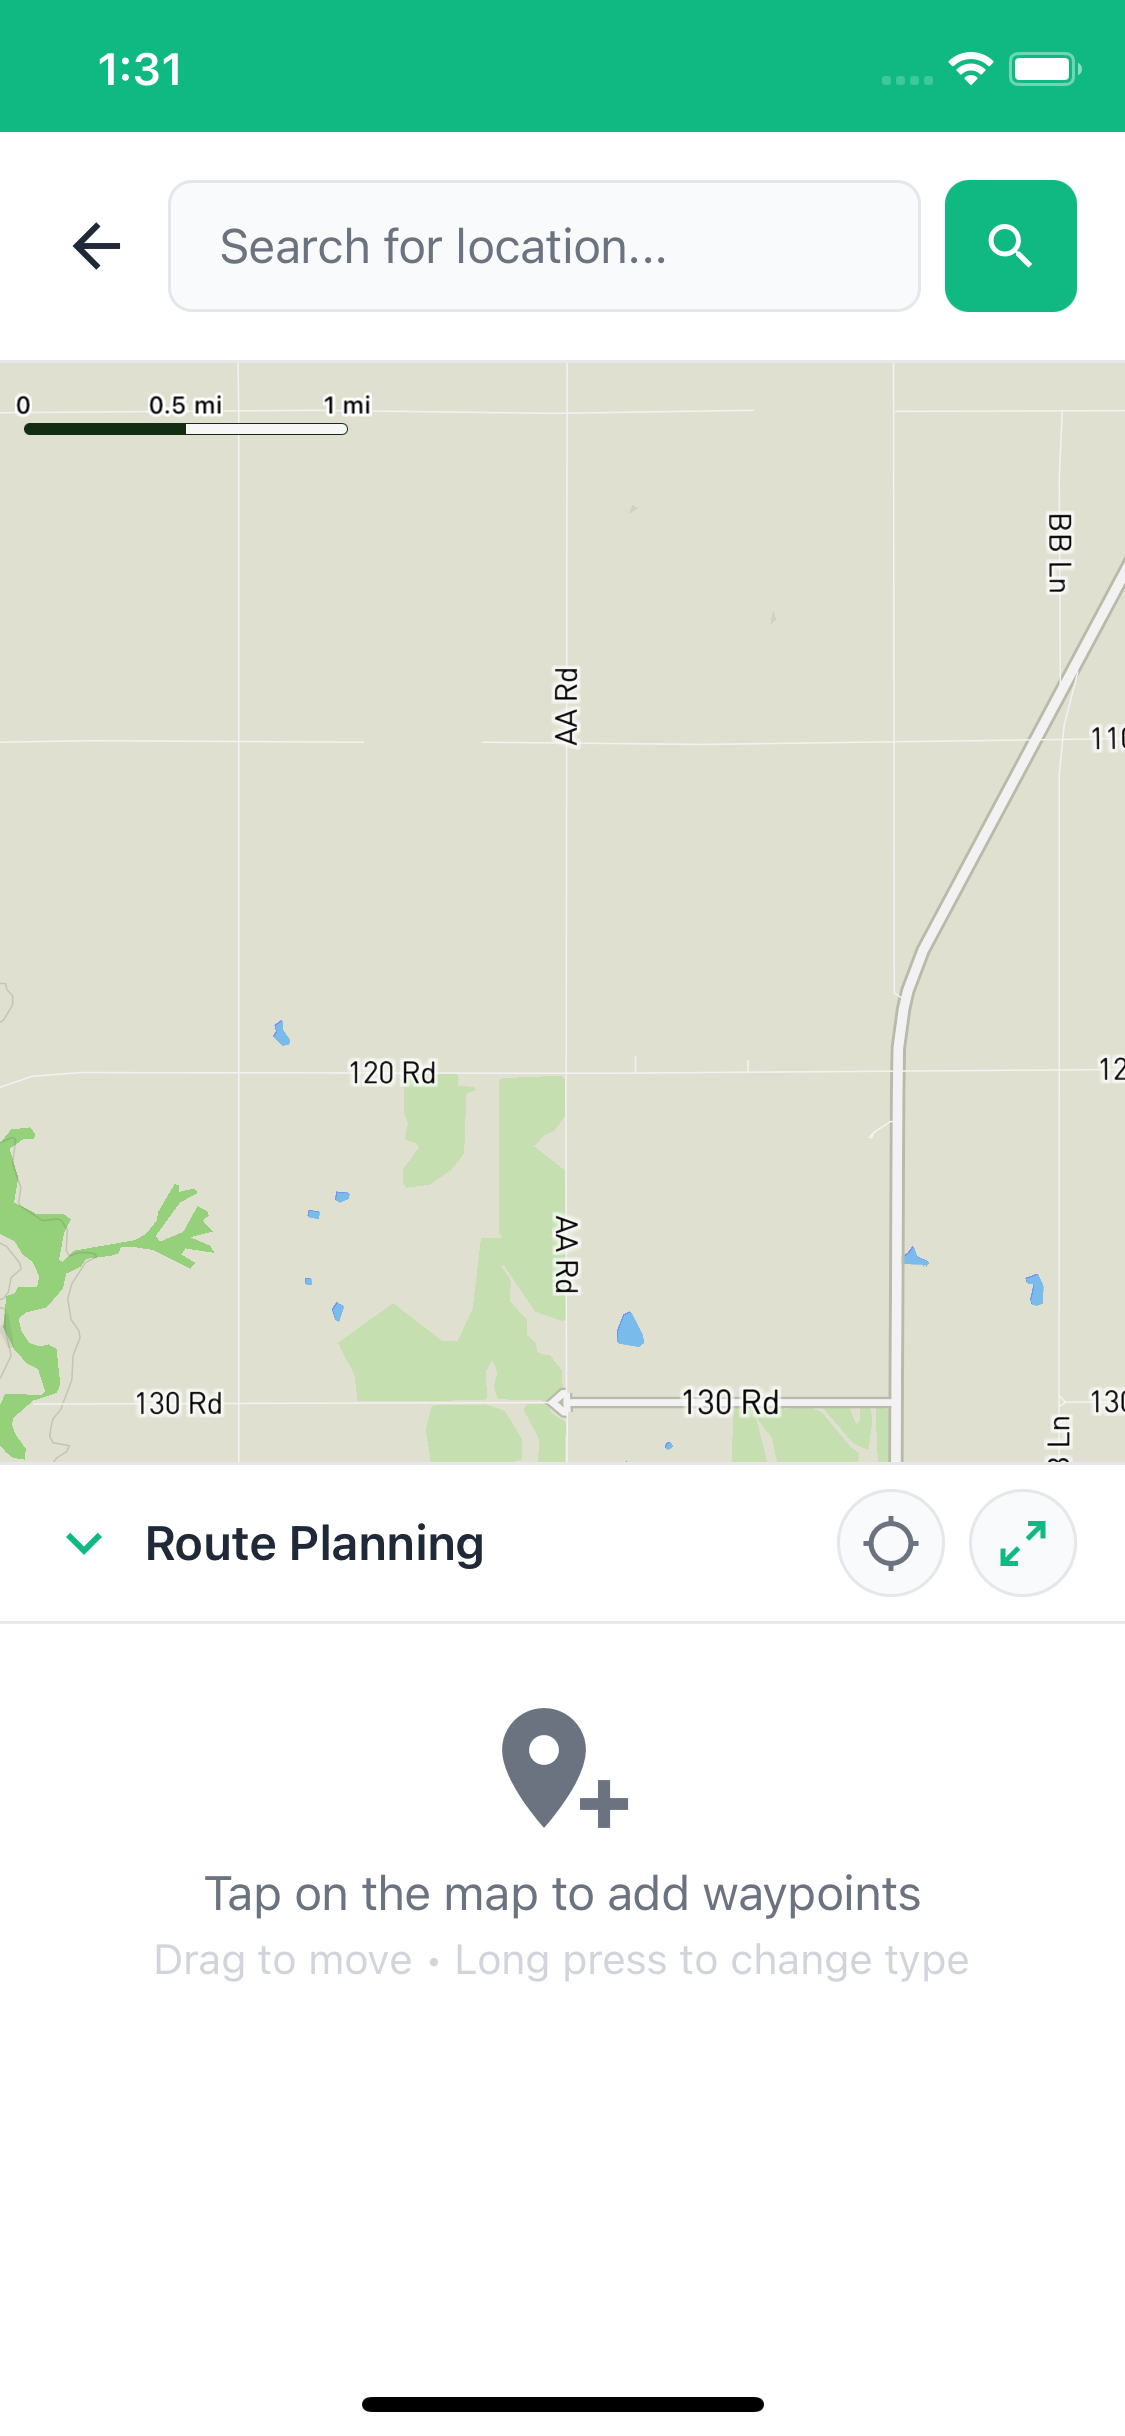
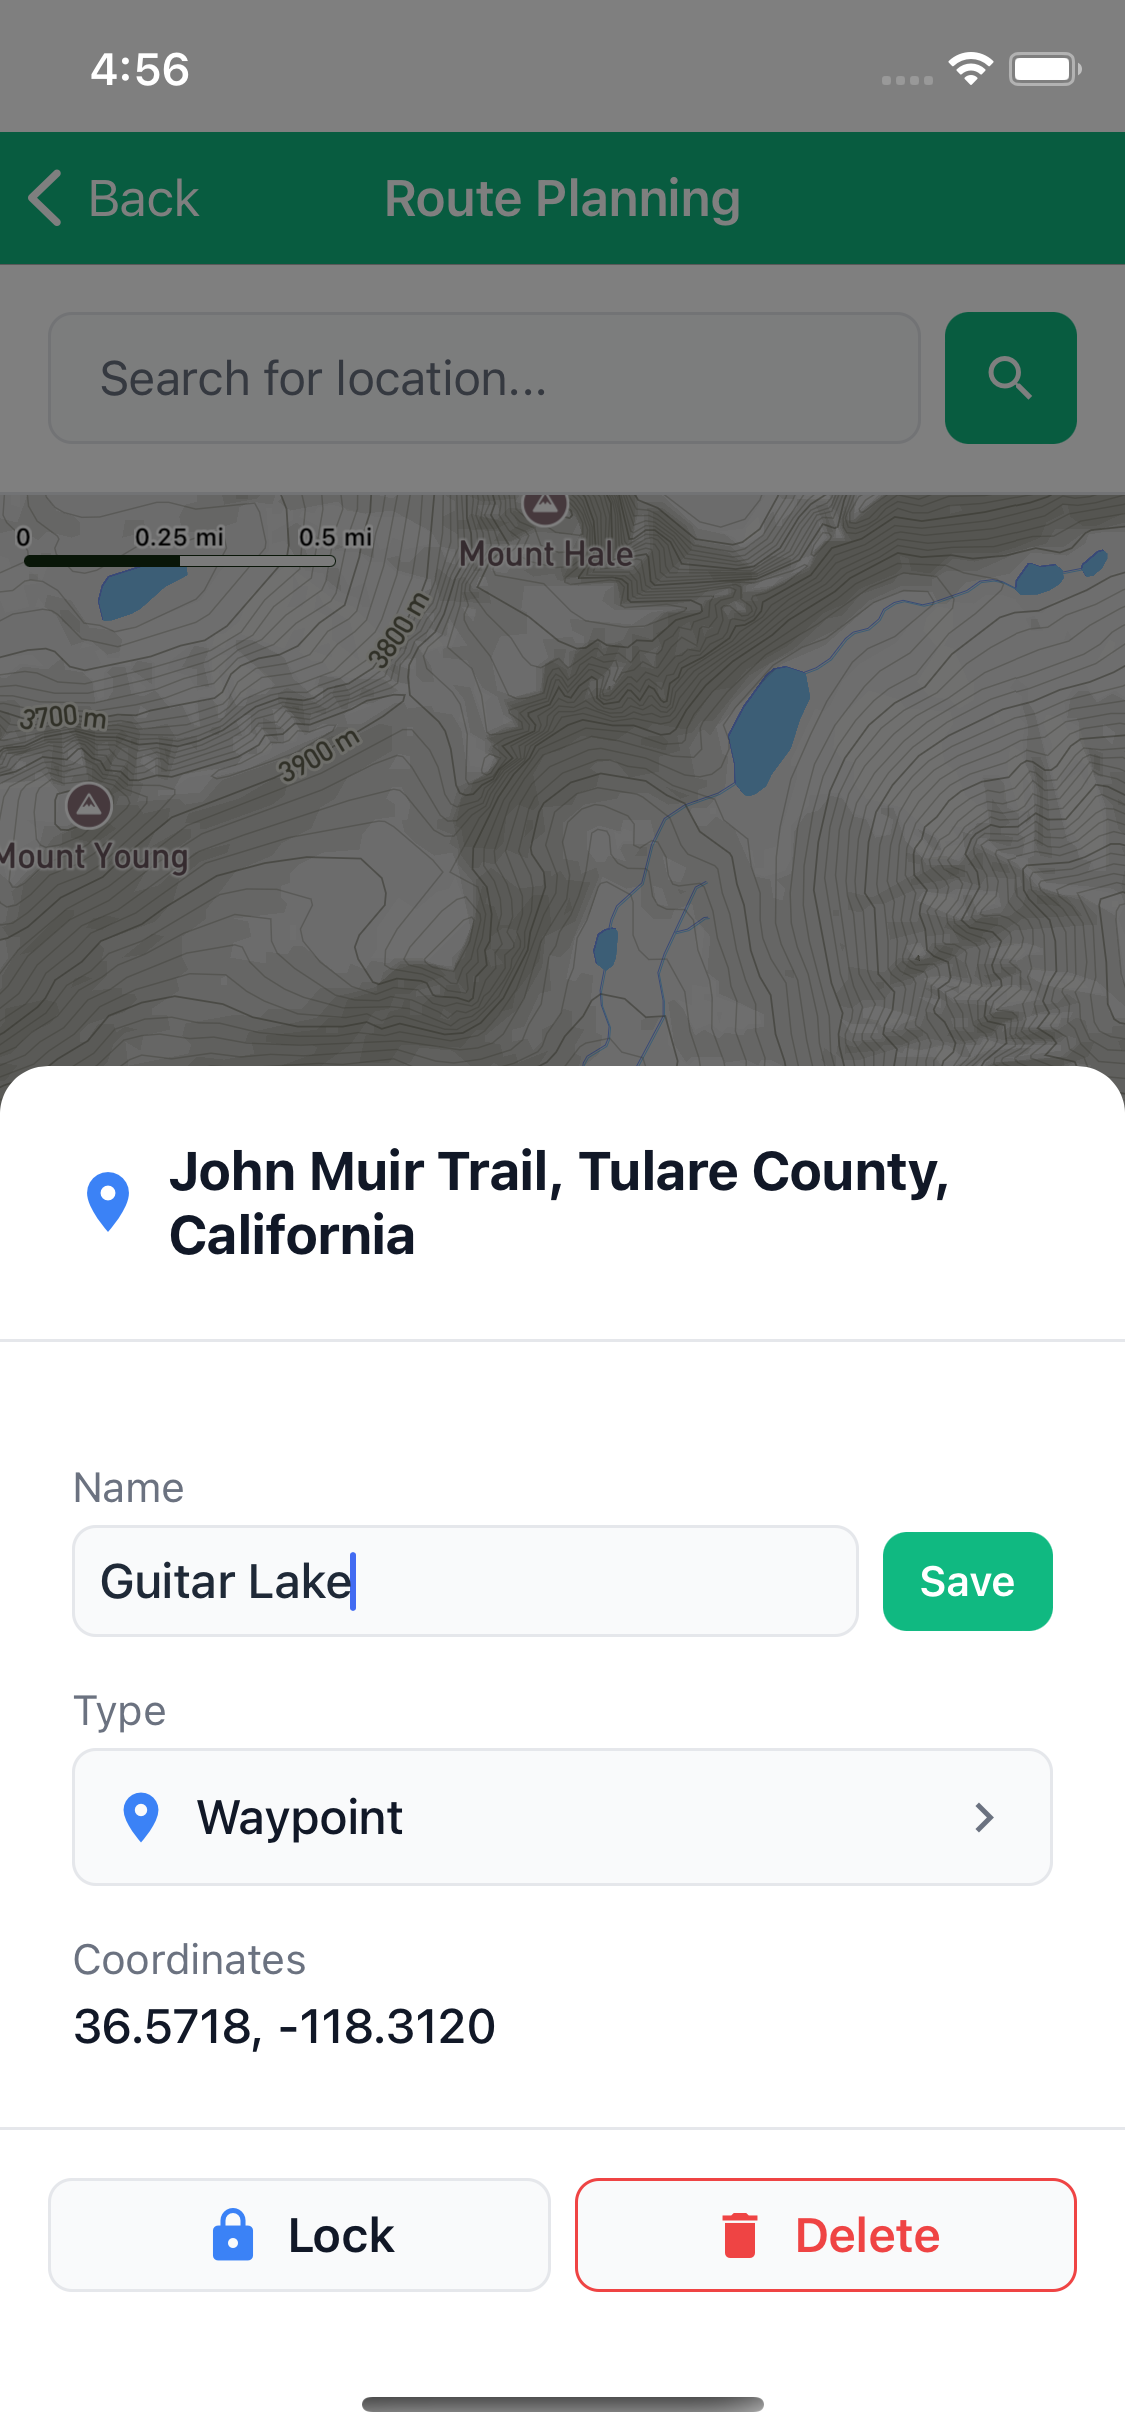
Adding Waypoints
Waypoints define your route. TrailSync supports several types:
- Start (S) - Where you begin
- End (E) - Where you finish
- Campsite (N1, N2...) - Overnight stops
- Water - Water sources
- Lunch/Dinner/Break - Meal stops
- Exit - Emergency exit points
To Add a Waypoint:
- Tap anywhere on the map
- Select waypoint type from the popup
- The waypoint appears with a numbered marker
- Optionally tap the waypoint to:
- Add a name (e.g., "Guitar Lake")
- Add notes
- Lock it to prevent accidental deletion
Generating Your Route
After adding waypoints, TrailSync calculates the route between them:
- Add at least 2 waypoints (Start and End)
- Tap Generate Route
- TrailSync calculates:
- Distance between each waypoint
- Elevation gain/loss per segment
- Total trip distance and elevation
- Estimated hiking time
- Green route line appears on map

Viewing Route Details
Expand the waypoint panel to see segment-by-segment breakdown:
- Distance: Miles per segment
- Elevation: Gain and loss in feet
- Terrain Profile: Steep, Moderate, Gradual, or Flat
- Cumulative Stats: Total distance, total elevation gain
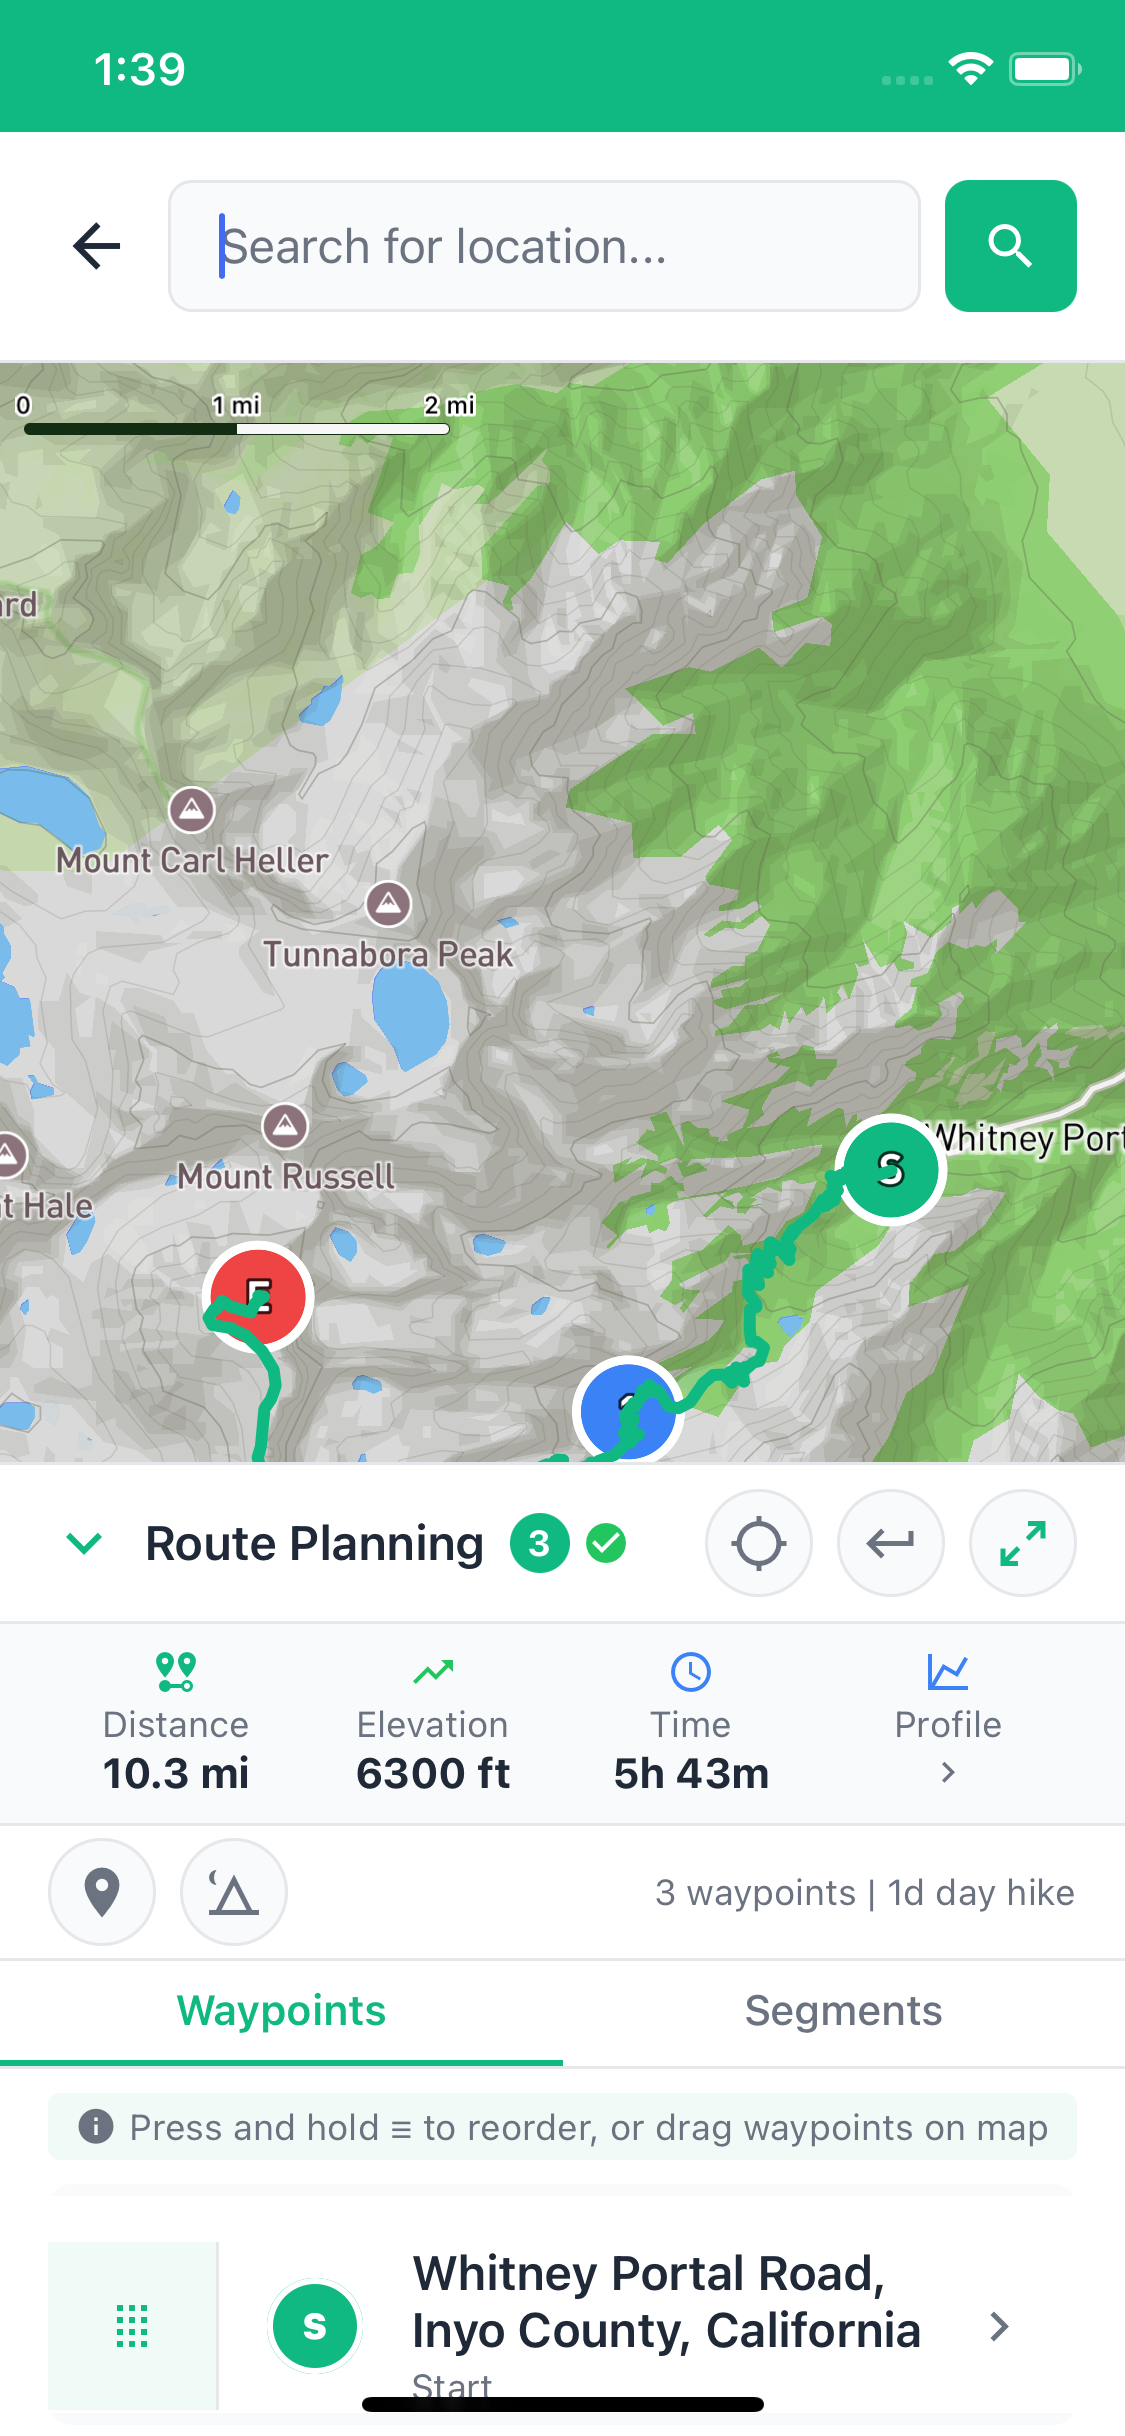
Reordering Waypoints
On iOS:
- Expand the waypoint panel
- Press and hold the drag handle (≡) next to a waypoint
- Drag to reorder
- Release to drop
- Tap Regenerate Route
On Android:
- View waypoint list (drag-to-reorder not available)
- To reorder, delete and recreate waypoints in desired order
Trip Duration Calculation
TrailSync calculates trip duration based on campsites:
- Campsites = Nights
- 2 campsites = 3 days / 2 nights
- This helps with meal planning
⛺ Adding Gear to Your Trip
From the System Library
- Open your trip
- Tap the Gear tile
- Tap Add Gear
- Browse the System Gear tab
- Tap items to add them to the trip
- Tap Done
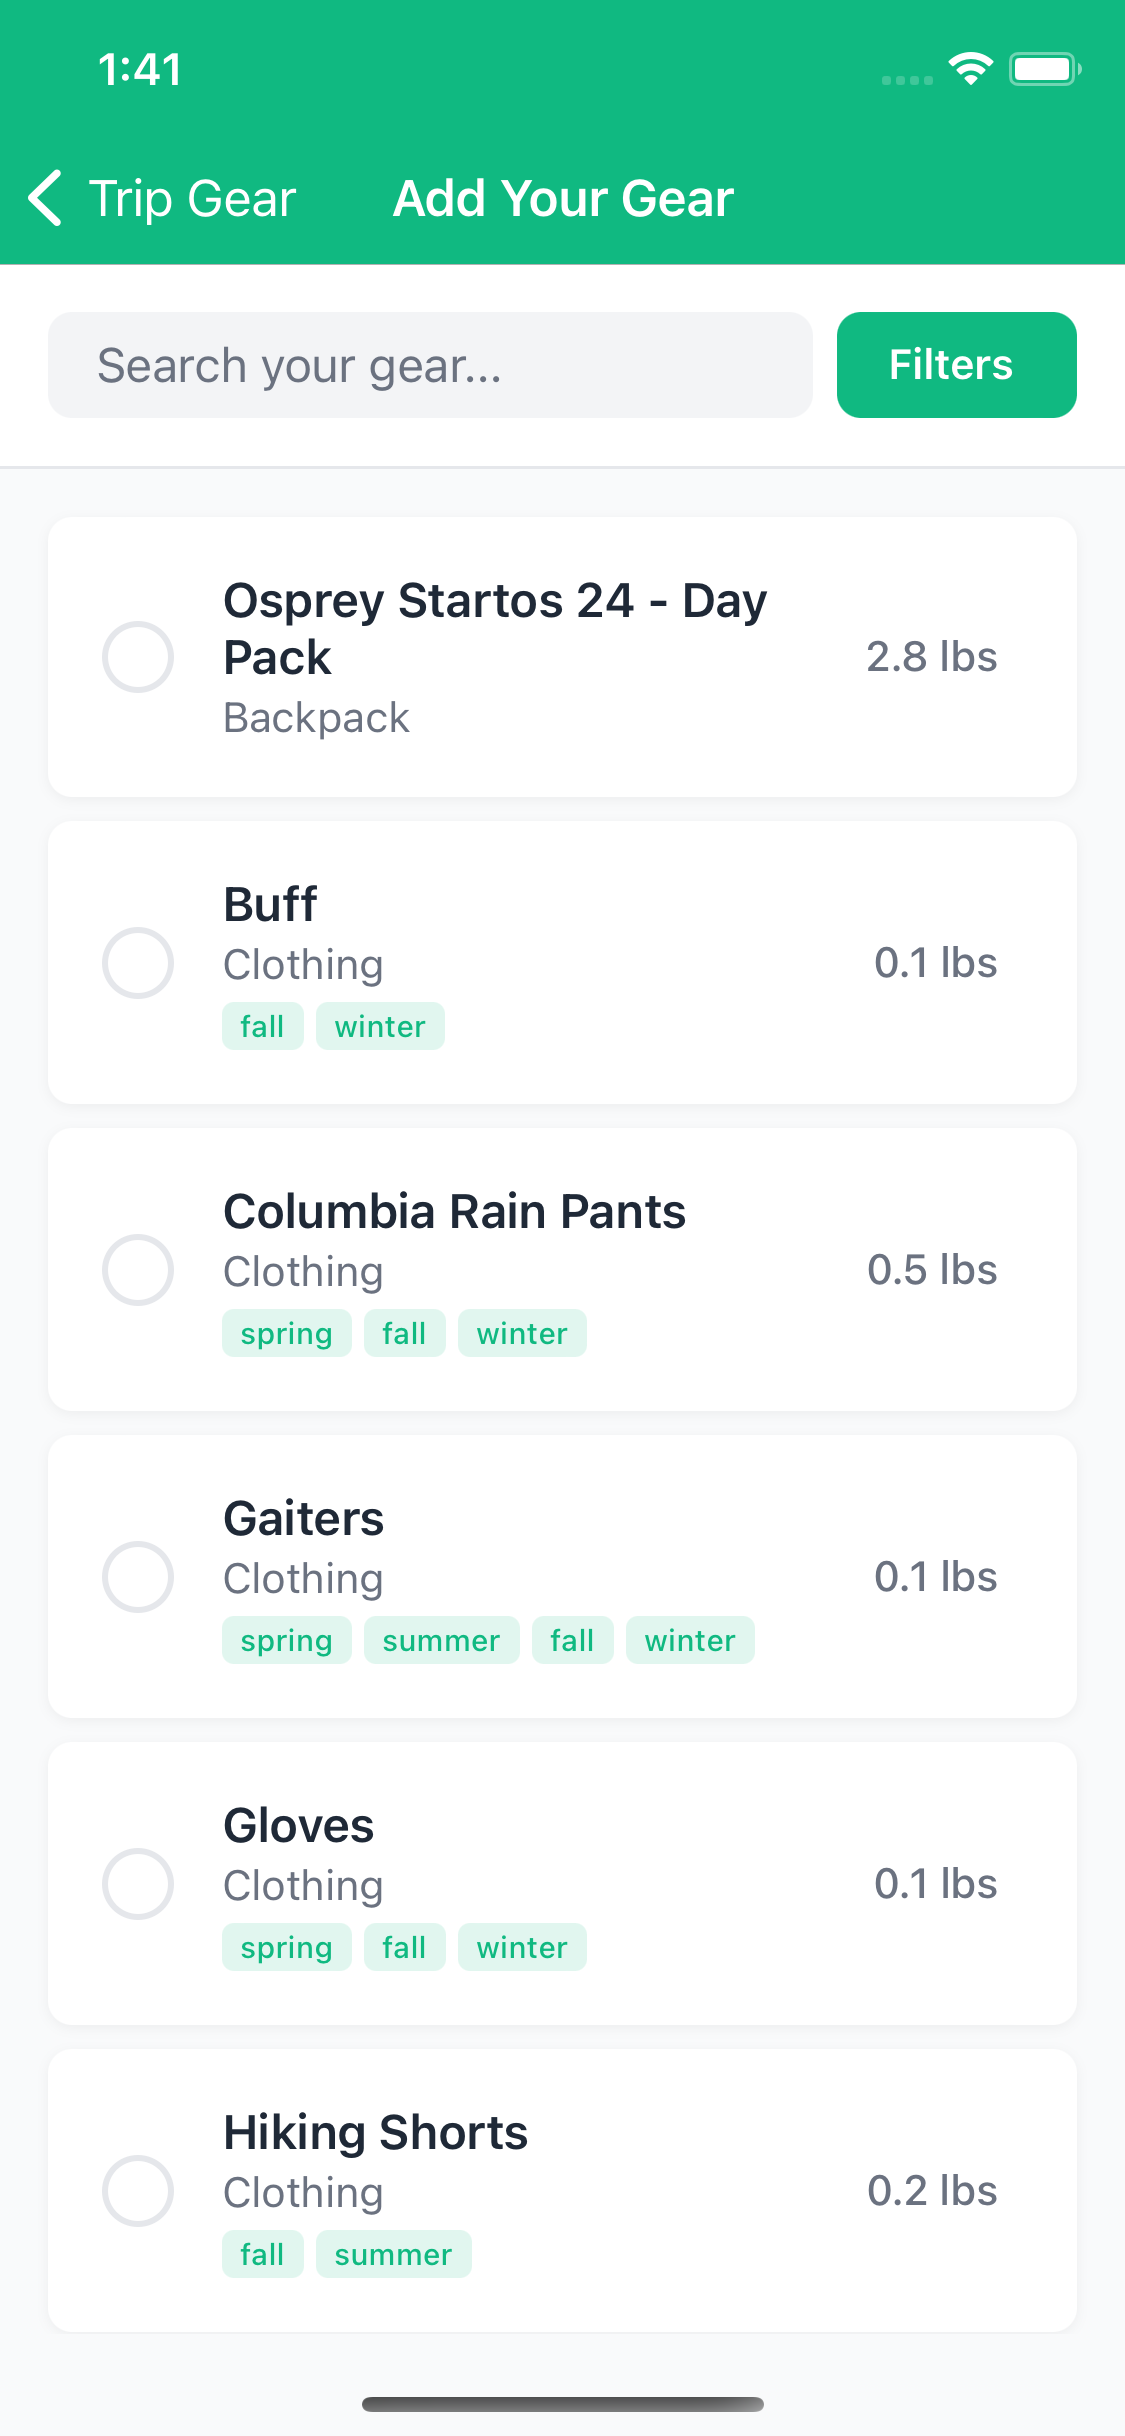
From Your Personal Gear
- In the Add Gear screen, switch to My Gear tab
- Select items from your personal collection
- These items use your saved weights and details
Adding Multiple of the Same Item
Need 3 sleeping bags? TrailSync uses individual records:
- Add the sleeping bag once
- In the gear list, tap the item
- Tap Copy
- A duplicate appears in the list
- Repeat as needed
Assigning Gear to Participants
- View your trip's gear list
- Items are grouped by name (e.g., "Tent (2 items)")
- Tap the group to expand
- For each individual item:
- Tap Assign
- Select a participant from the list
- Checkmark appears next to their name
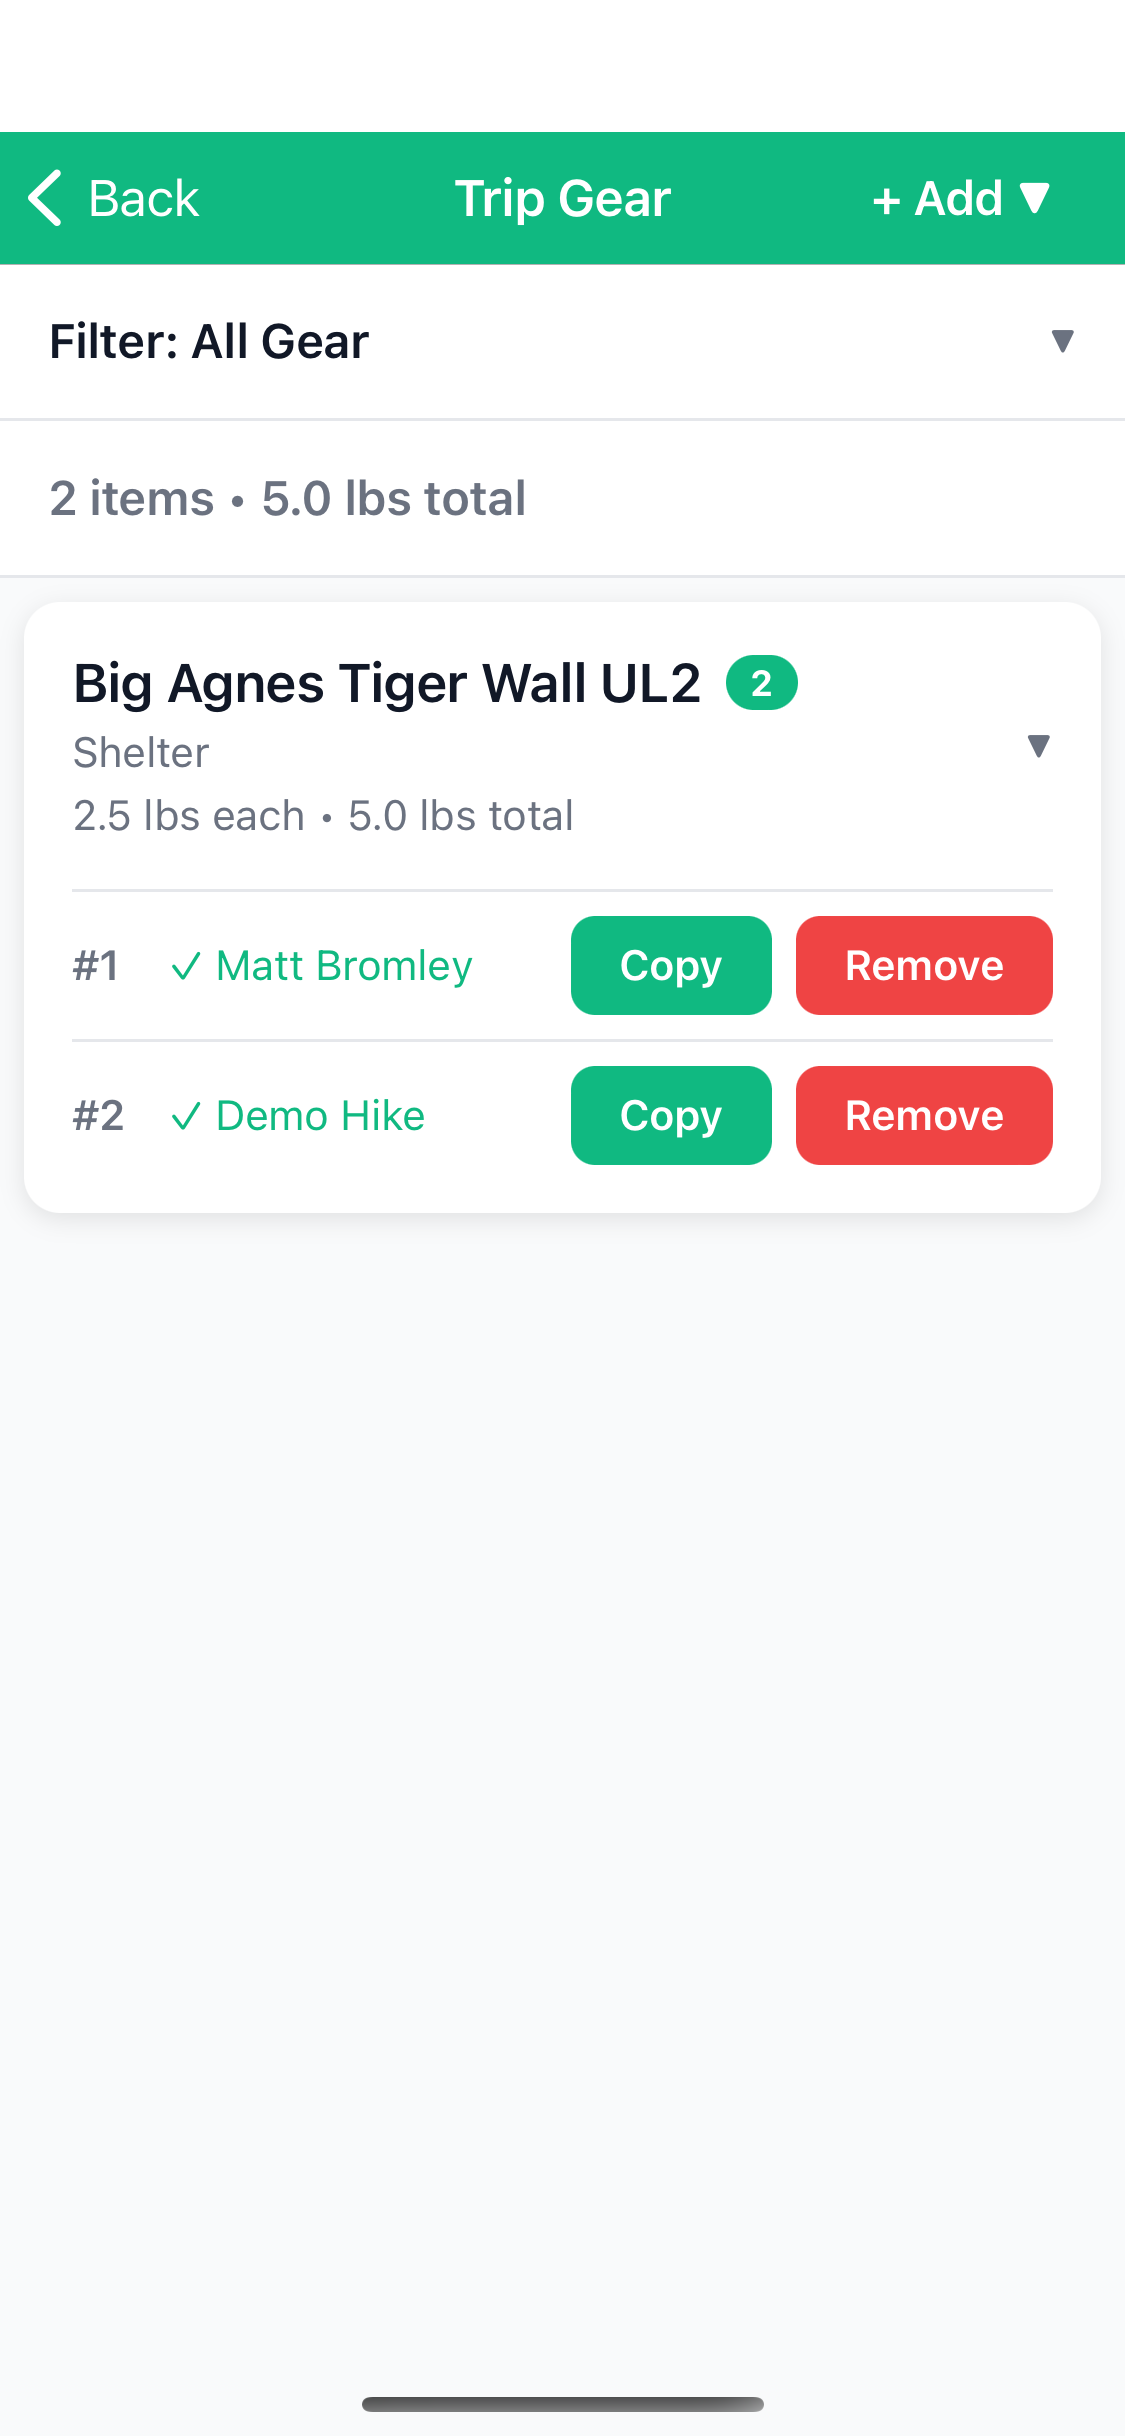
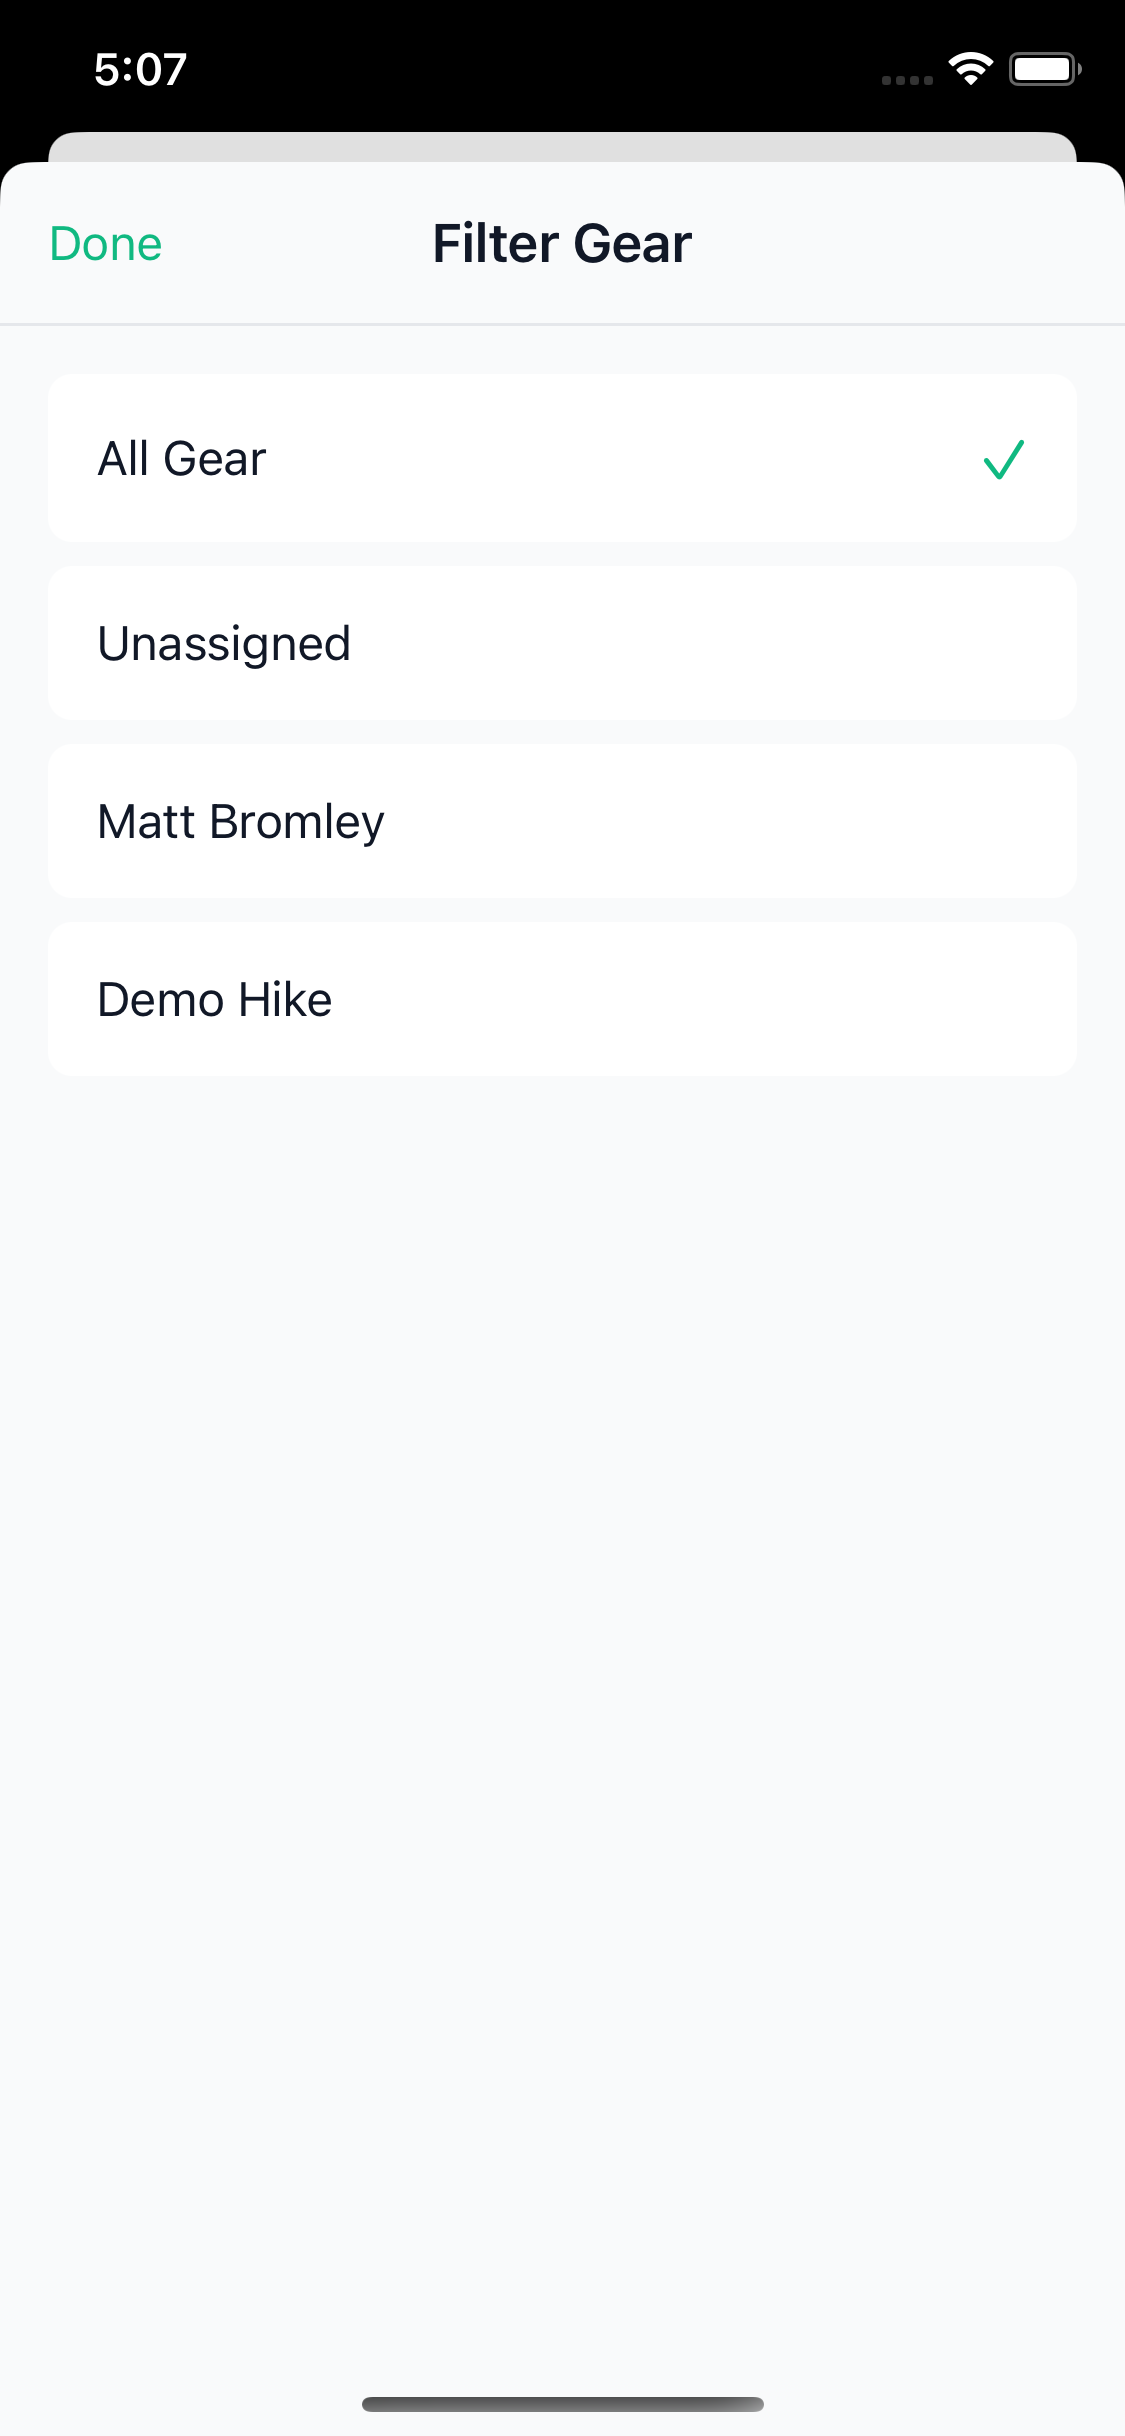
Filtering the Gear List
Use filters to see specific views:
- All Items: Complete gear list
- Unassigned: Items needing assignment
- By Participant: See what each person is carrying
Viewing Pack Weight
TrailSync automatically calculates pack weight:
- Filter by a participant
- Total weight shown at top
- Helps balance load across group
- Identify if someone is carrying too much/little
🍽️ Planning Meals
Browsing the Meal Library
TrailSync includes 22 backpacking meal recipes:
- Open your trip
- Tap the Meals tile
- You'll see a day-by-day calendar view
- Tap Browse Meals to explore options
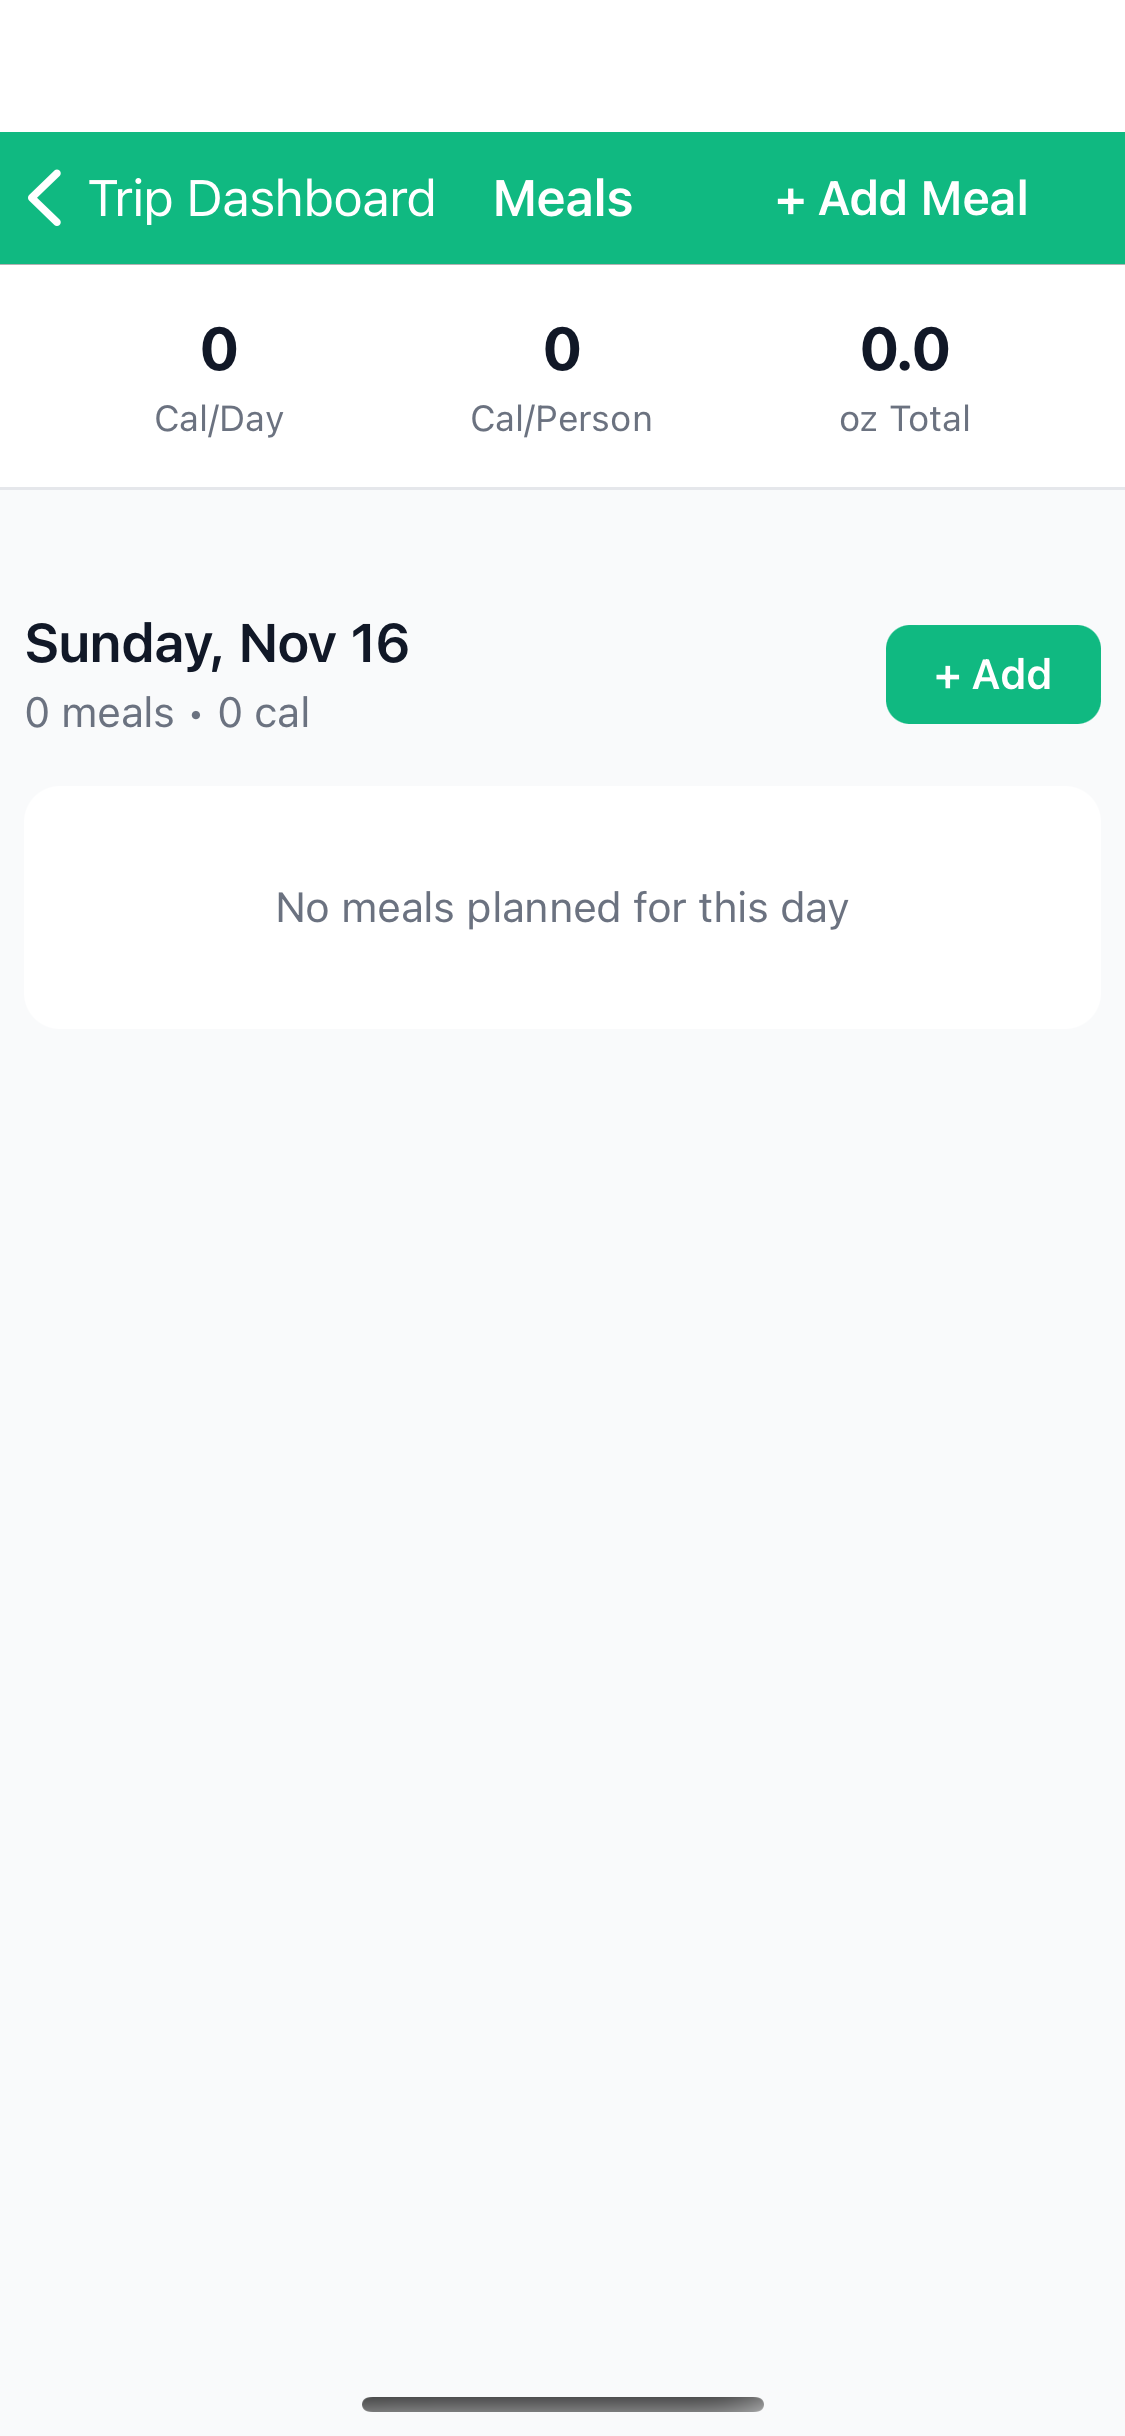
Adding Meals to Your Trip
- In the meal calendar, find the day you want to add a meal
- Tap the Add button for that day
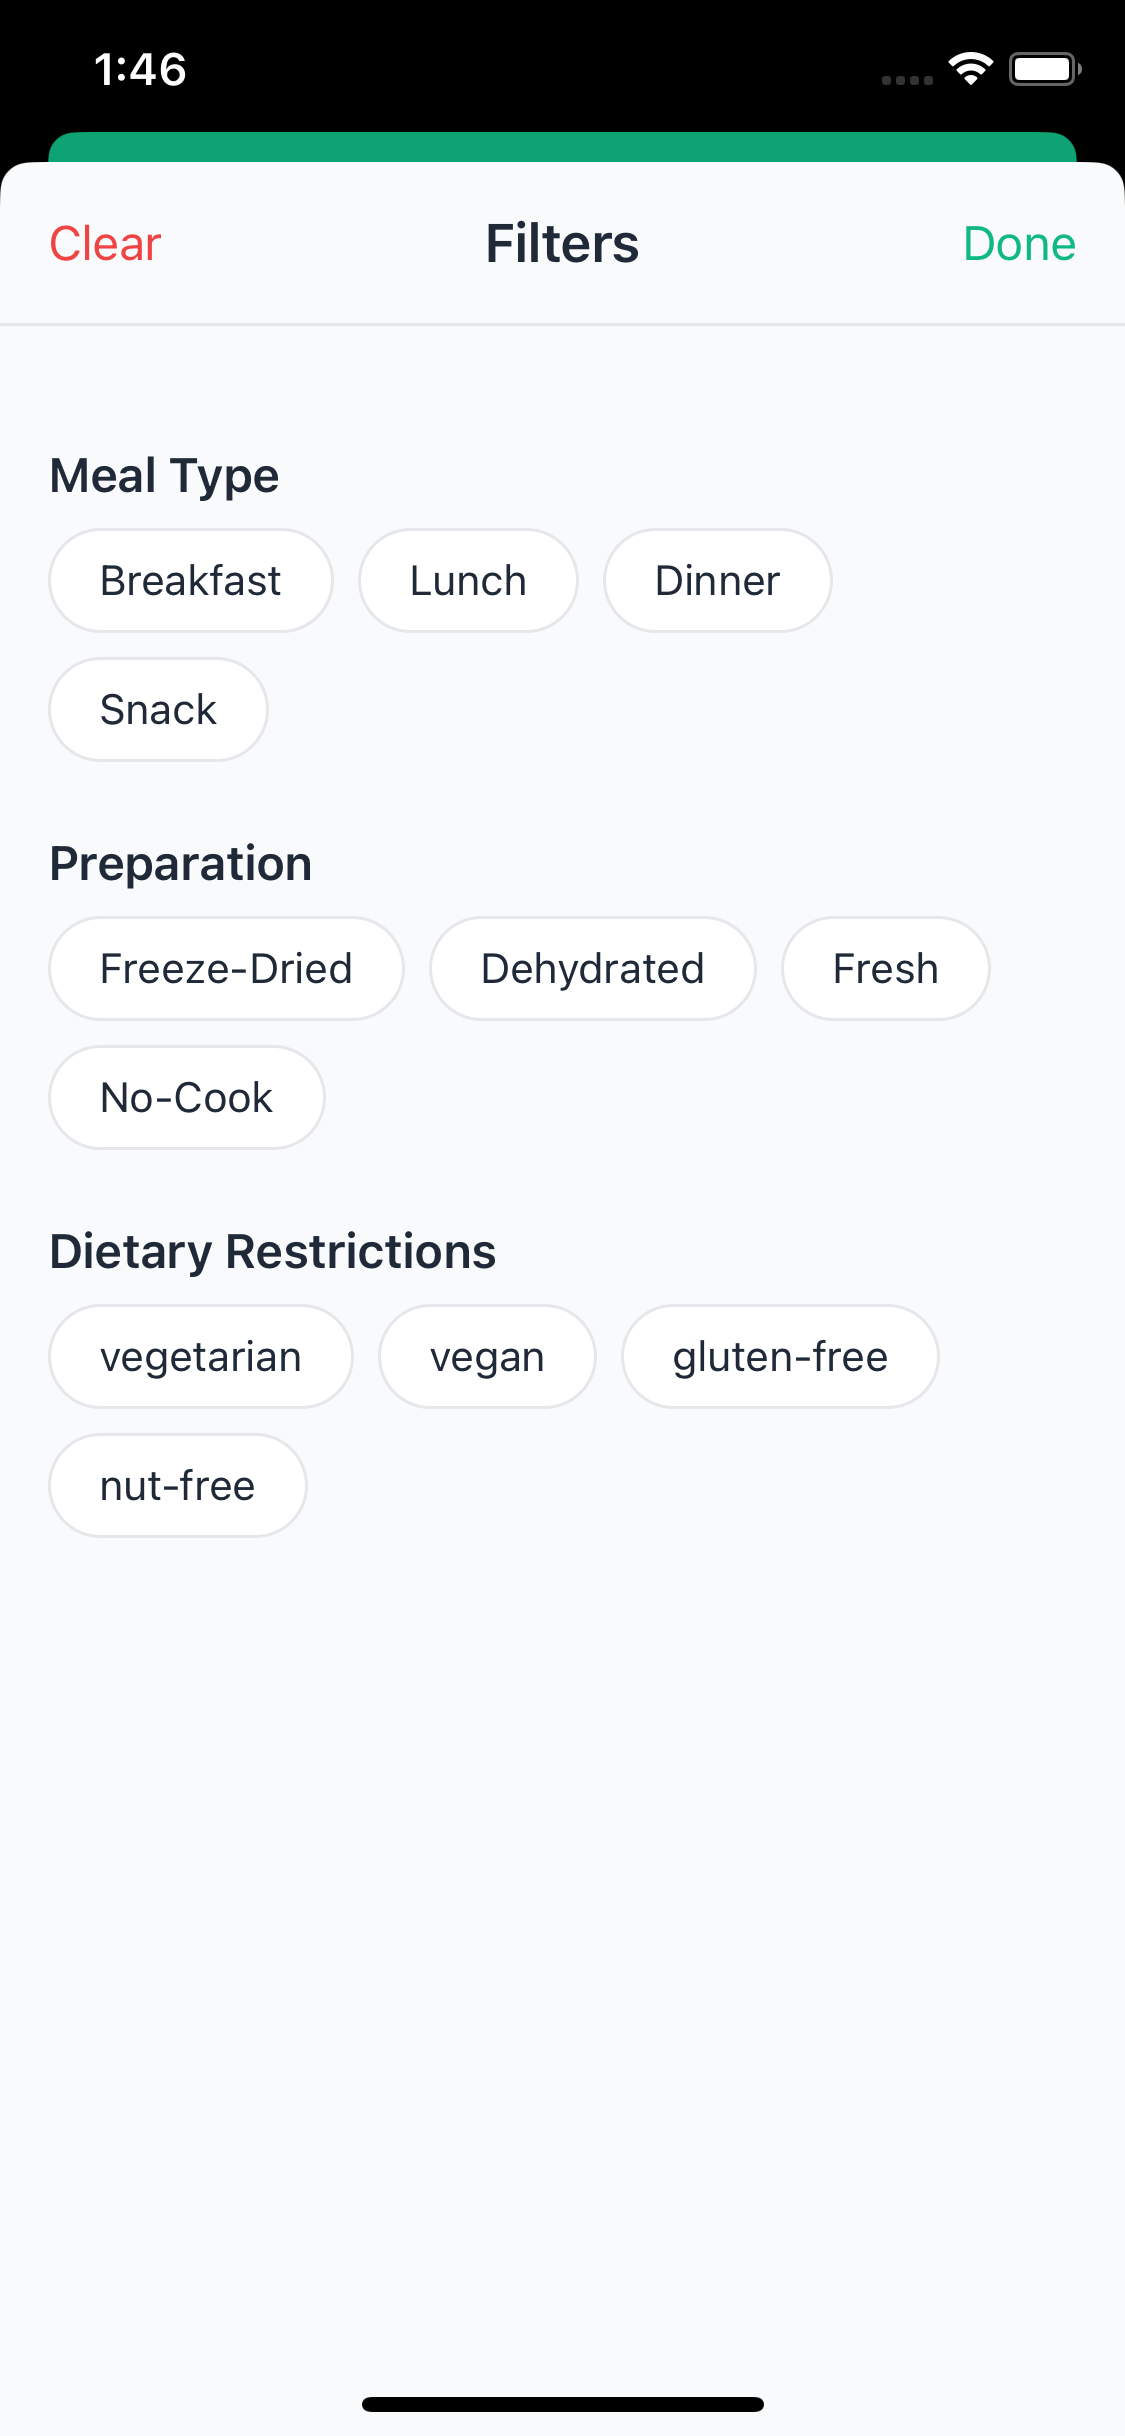
- Filter meals by:
- Meal Type: Breakfast, Lunch, Dinner, Snack
- Preparation: Freeze-dried, Dehydrated, Fresh, No-cook
- Dietary Tags: Vegetarian, Vegan, Gluten-free, Nut-free
- Tap a meal to see details:
- Calories per serving
- Preparation time
- Weight per serving
- Ingredients
- Instructions
- Tap Add to Trip
Assigning Meal Responsibility
- After adding a meal to your trip
- Tap on the meal in the calendar
- Tap Assign To
- Select who's bringing/preparing this meal
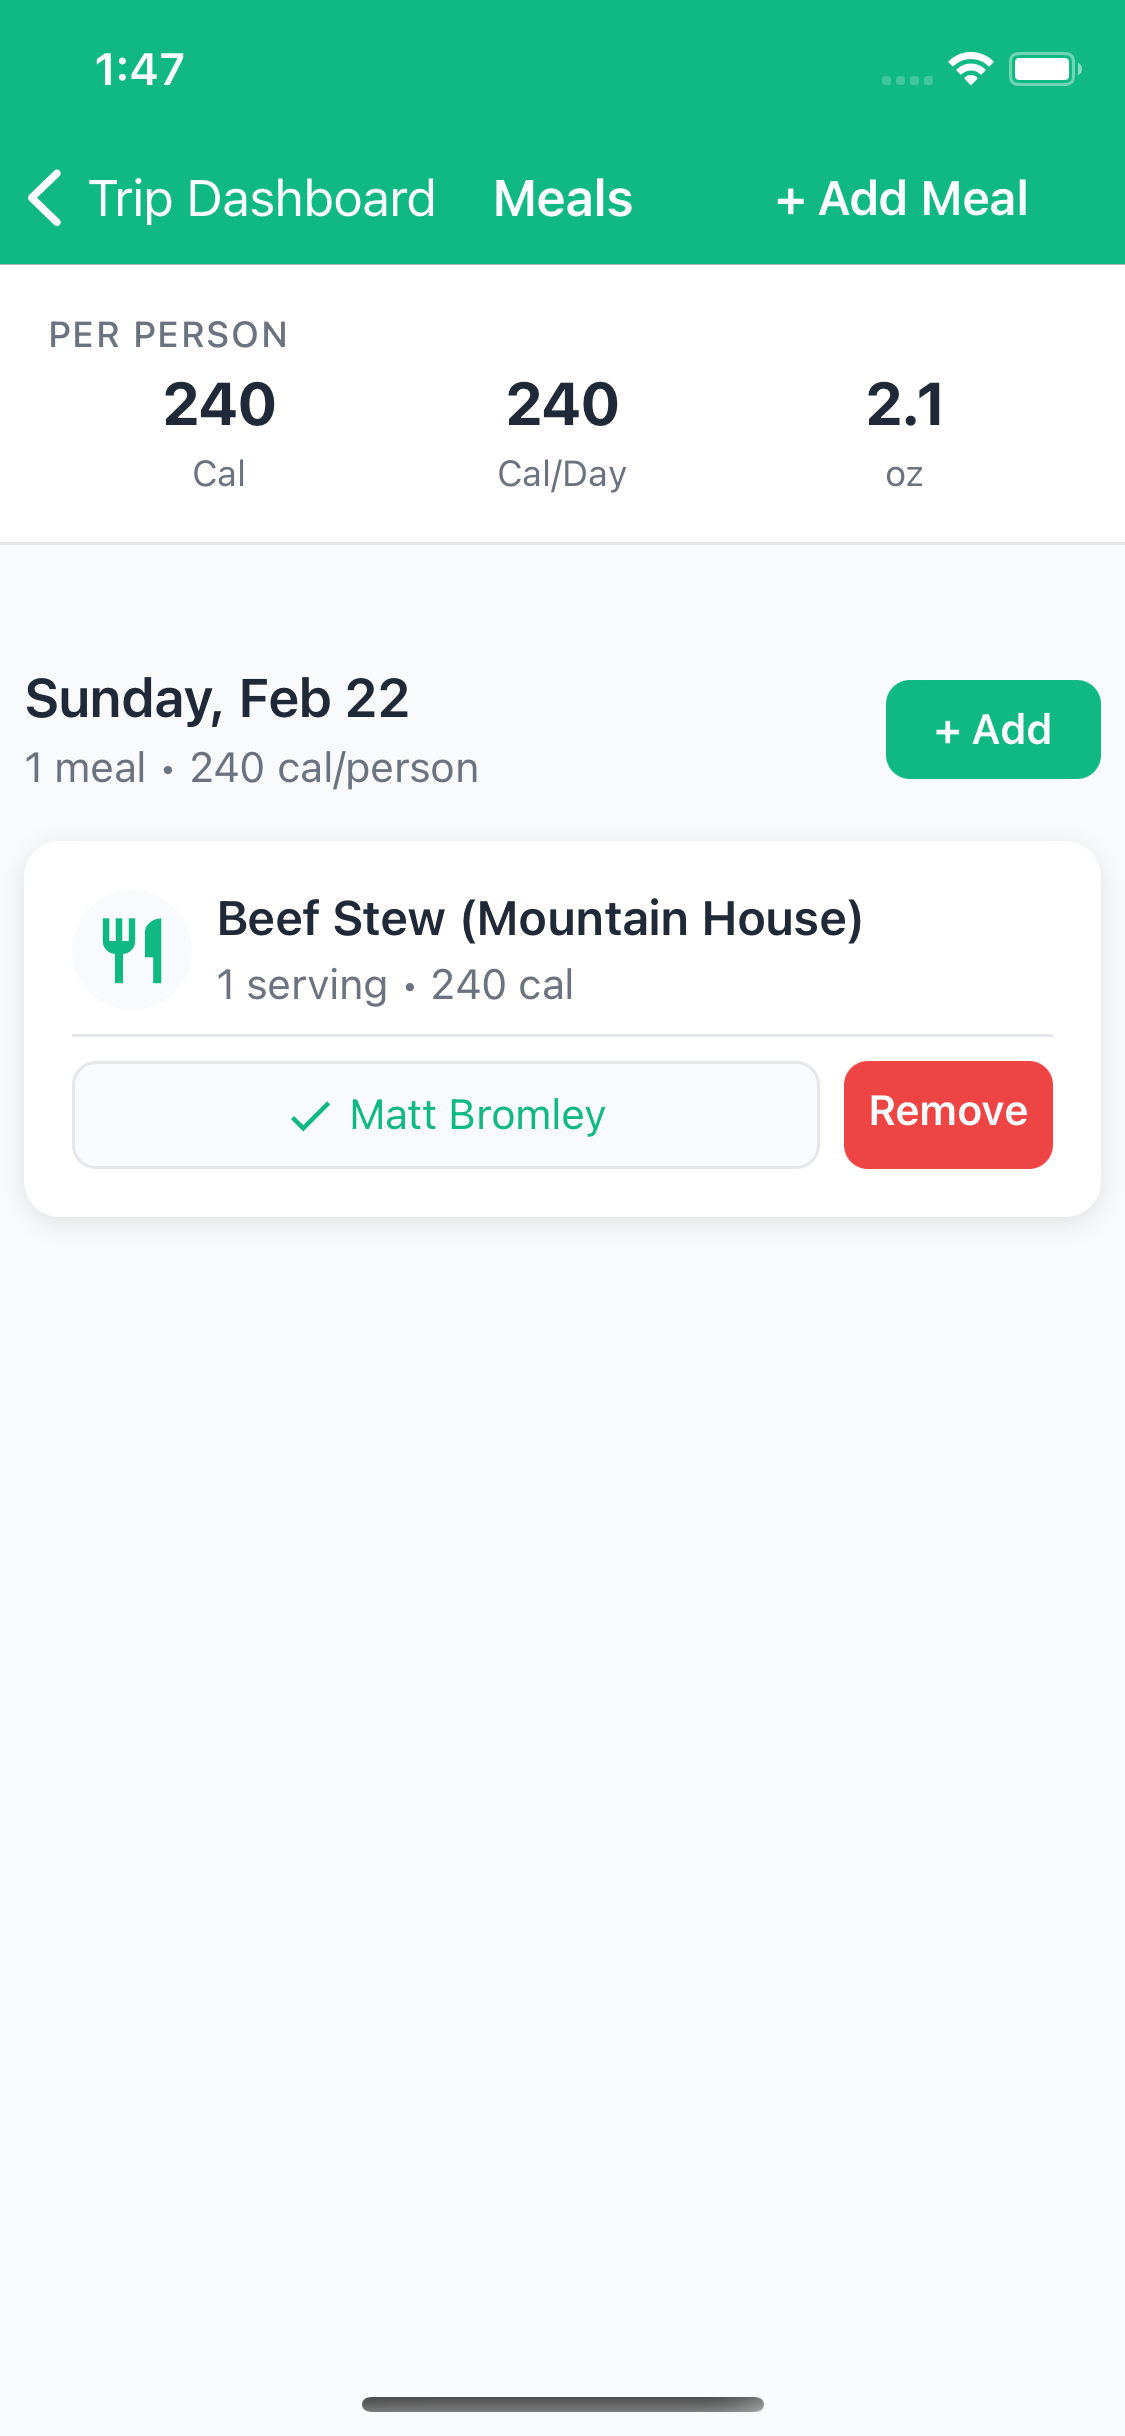
Viewing Nutrition Summary
TrailSync shows calorie totals to ensure adequate nutrition:
- Total calories for the trip
- Calories per person per day
- Meal count breakdown
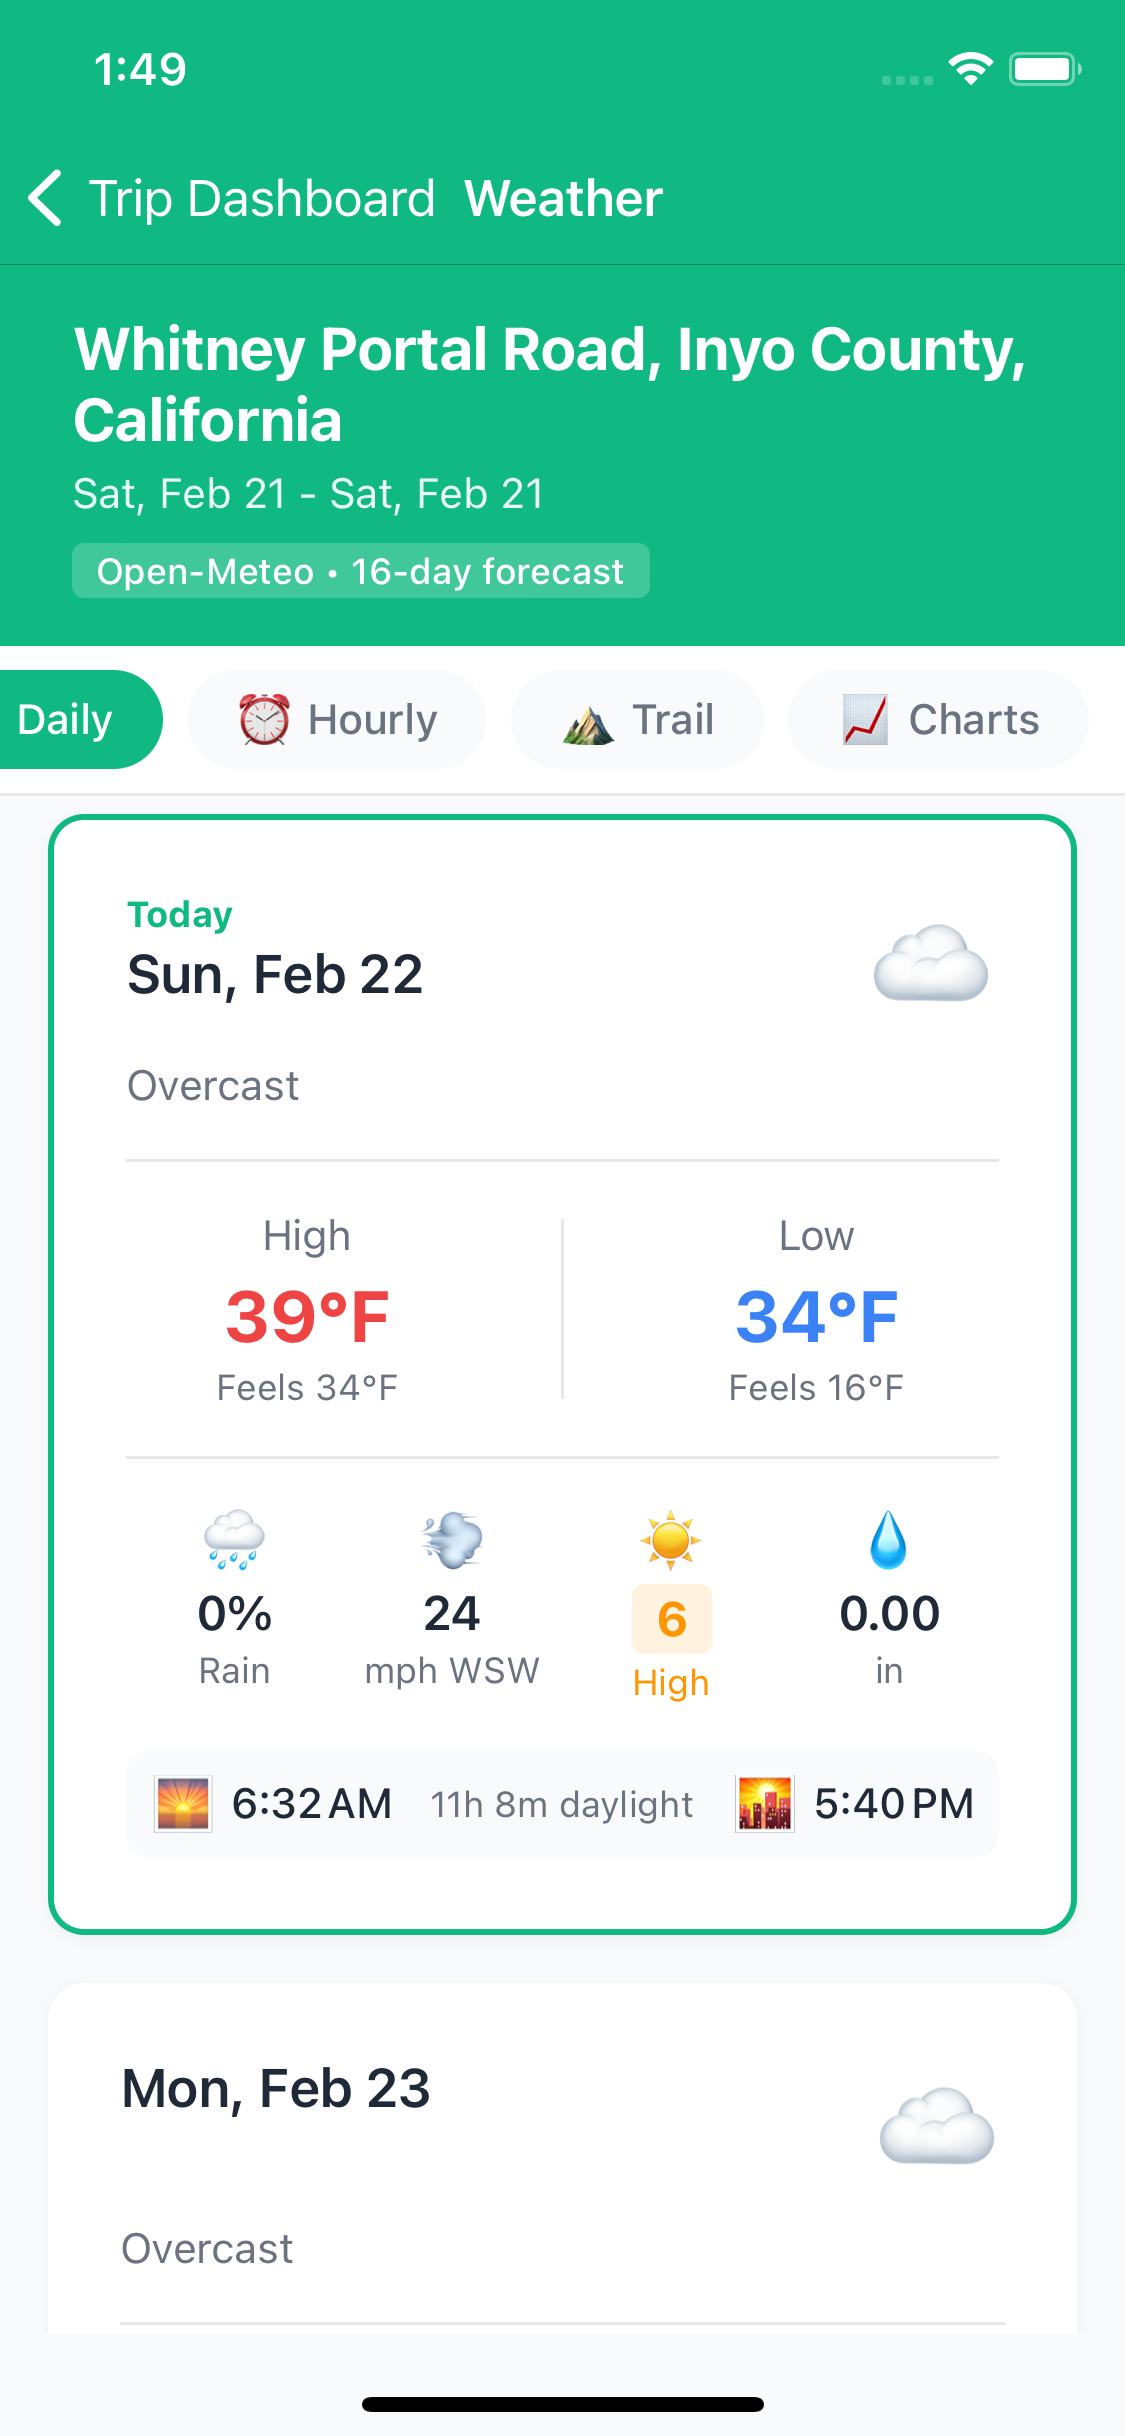
🌤️ Weather Forecasts
Planning around the weather is part of any good trip. TrailSync pulls a 5-day forecast for your trip's location automatically, based on your saved route coordinates, so you know what you're heading into before you leave the trailhead.
Viewing the Forecast
- Open your trip
- Tap the Weather tile on the trip dashboard
- You'll see a day-by-day summary starting from your trip's start date
Each day shows the high and low temperatures, weather conditions with an icon, and precipitation probability at a glance. Tap any day to expand into the detailed 3-hour interval view.
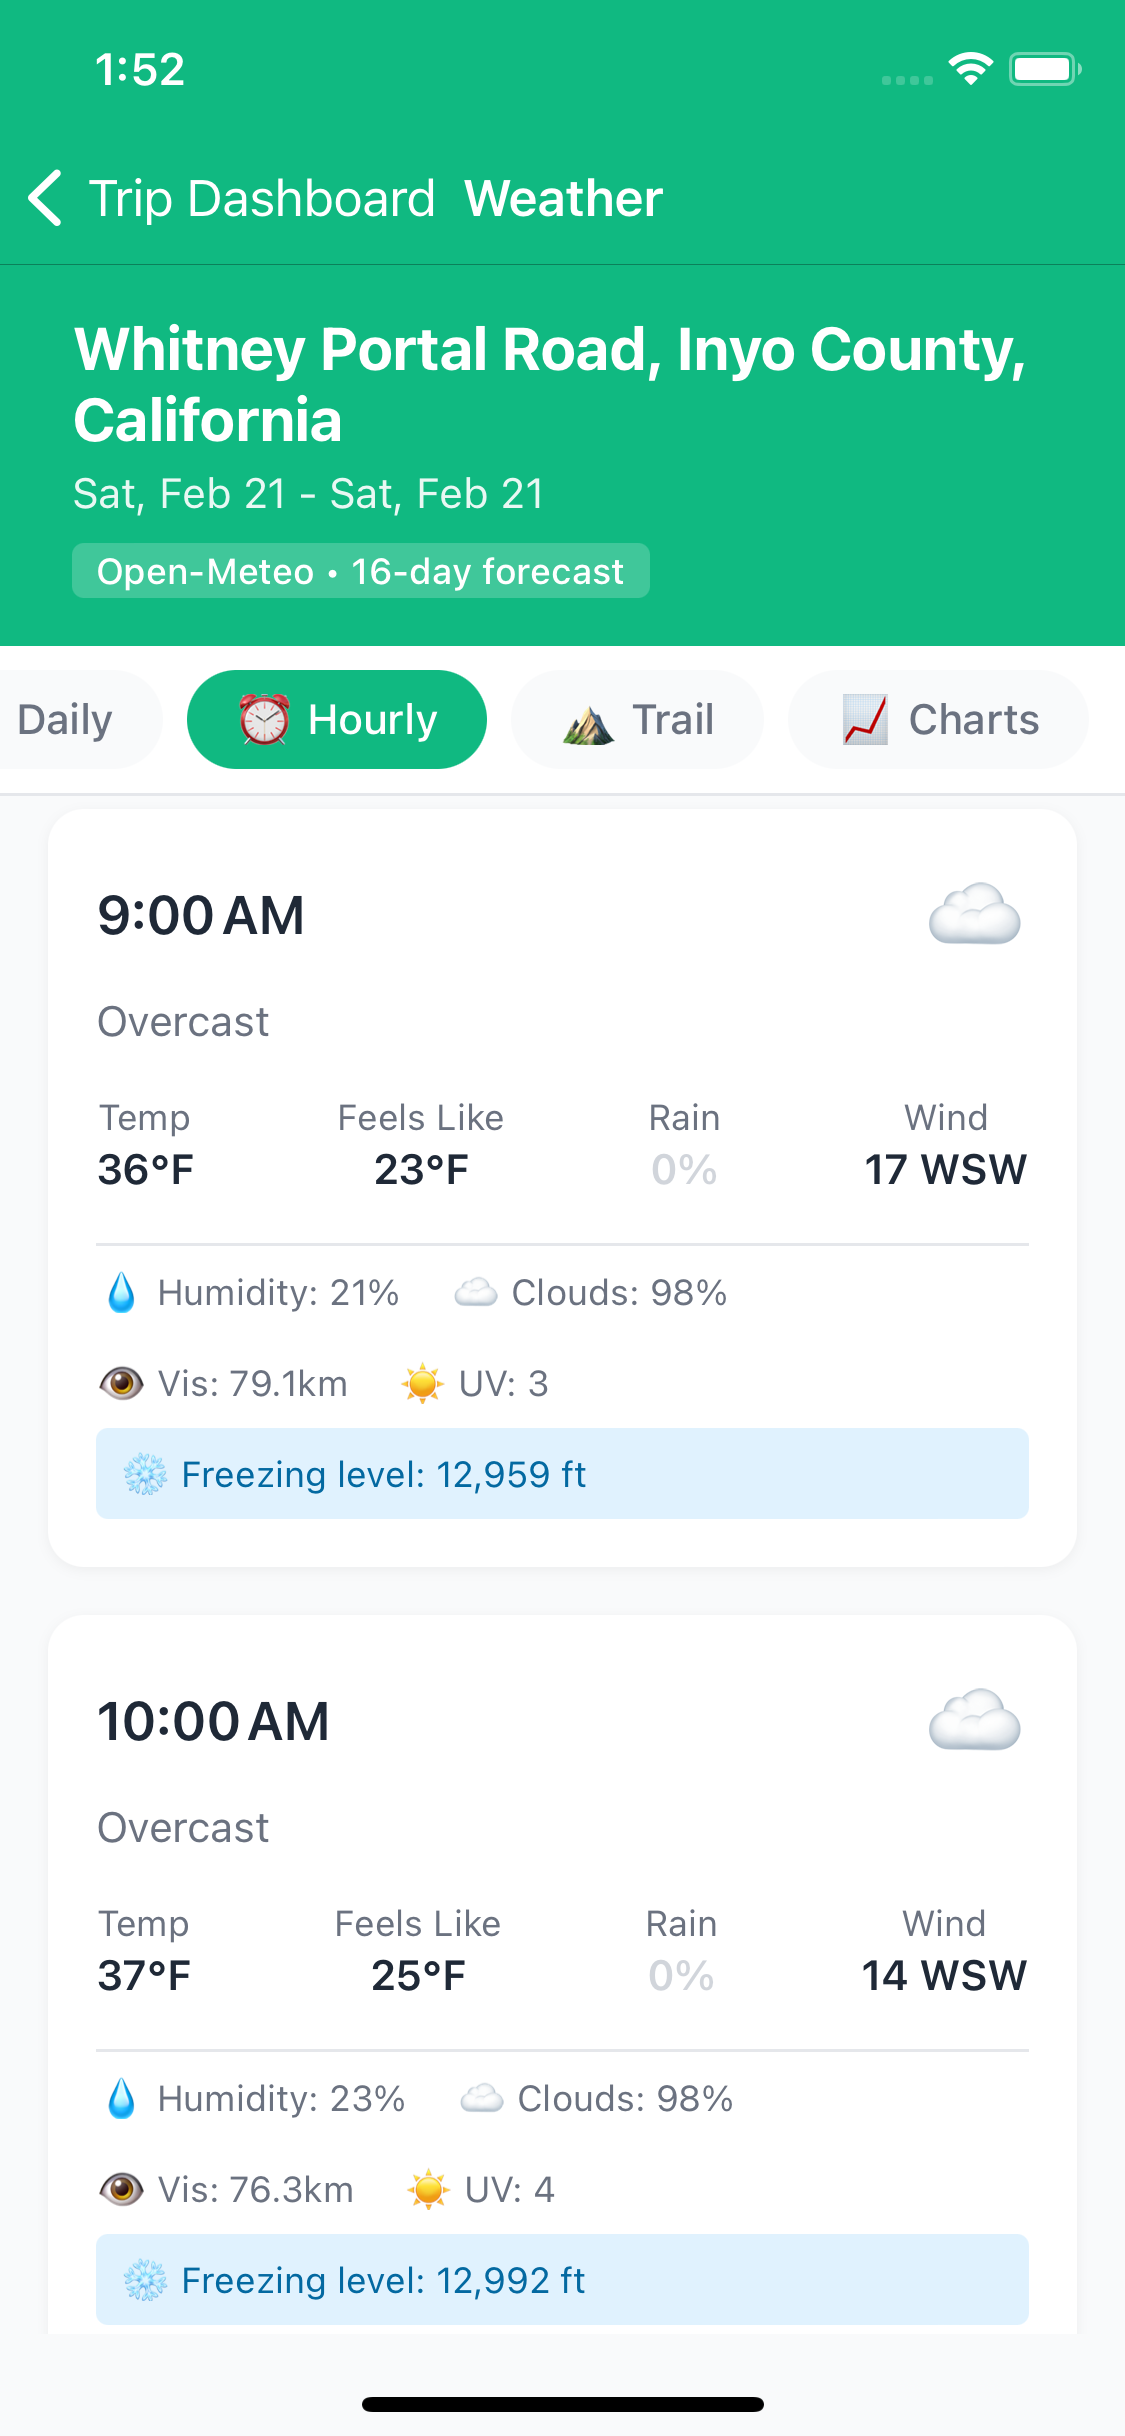
Detailed Forecast View
The 3-hour breakdown gives you the full picture for planning each day on the trail:
- Temperature and feels-like temperature
- Precipitation probability — useful for deciding when to break camp or push to the next site
- Wind speed
- Humidity
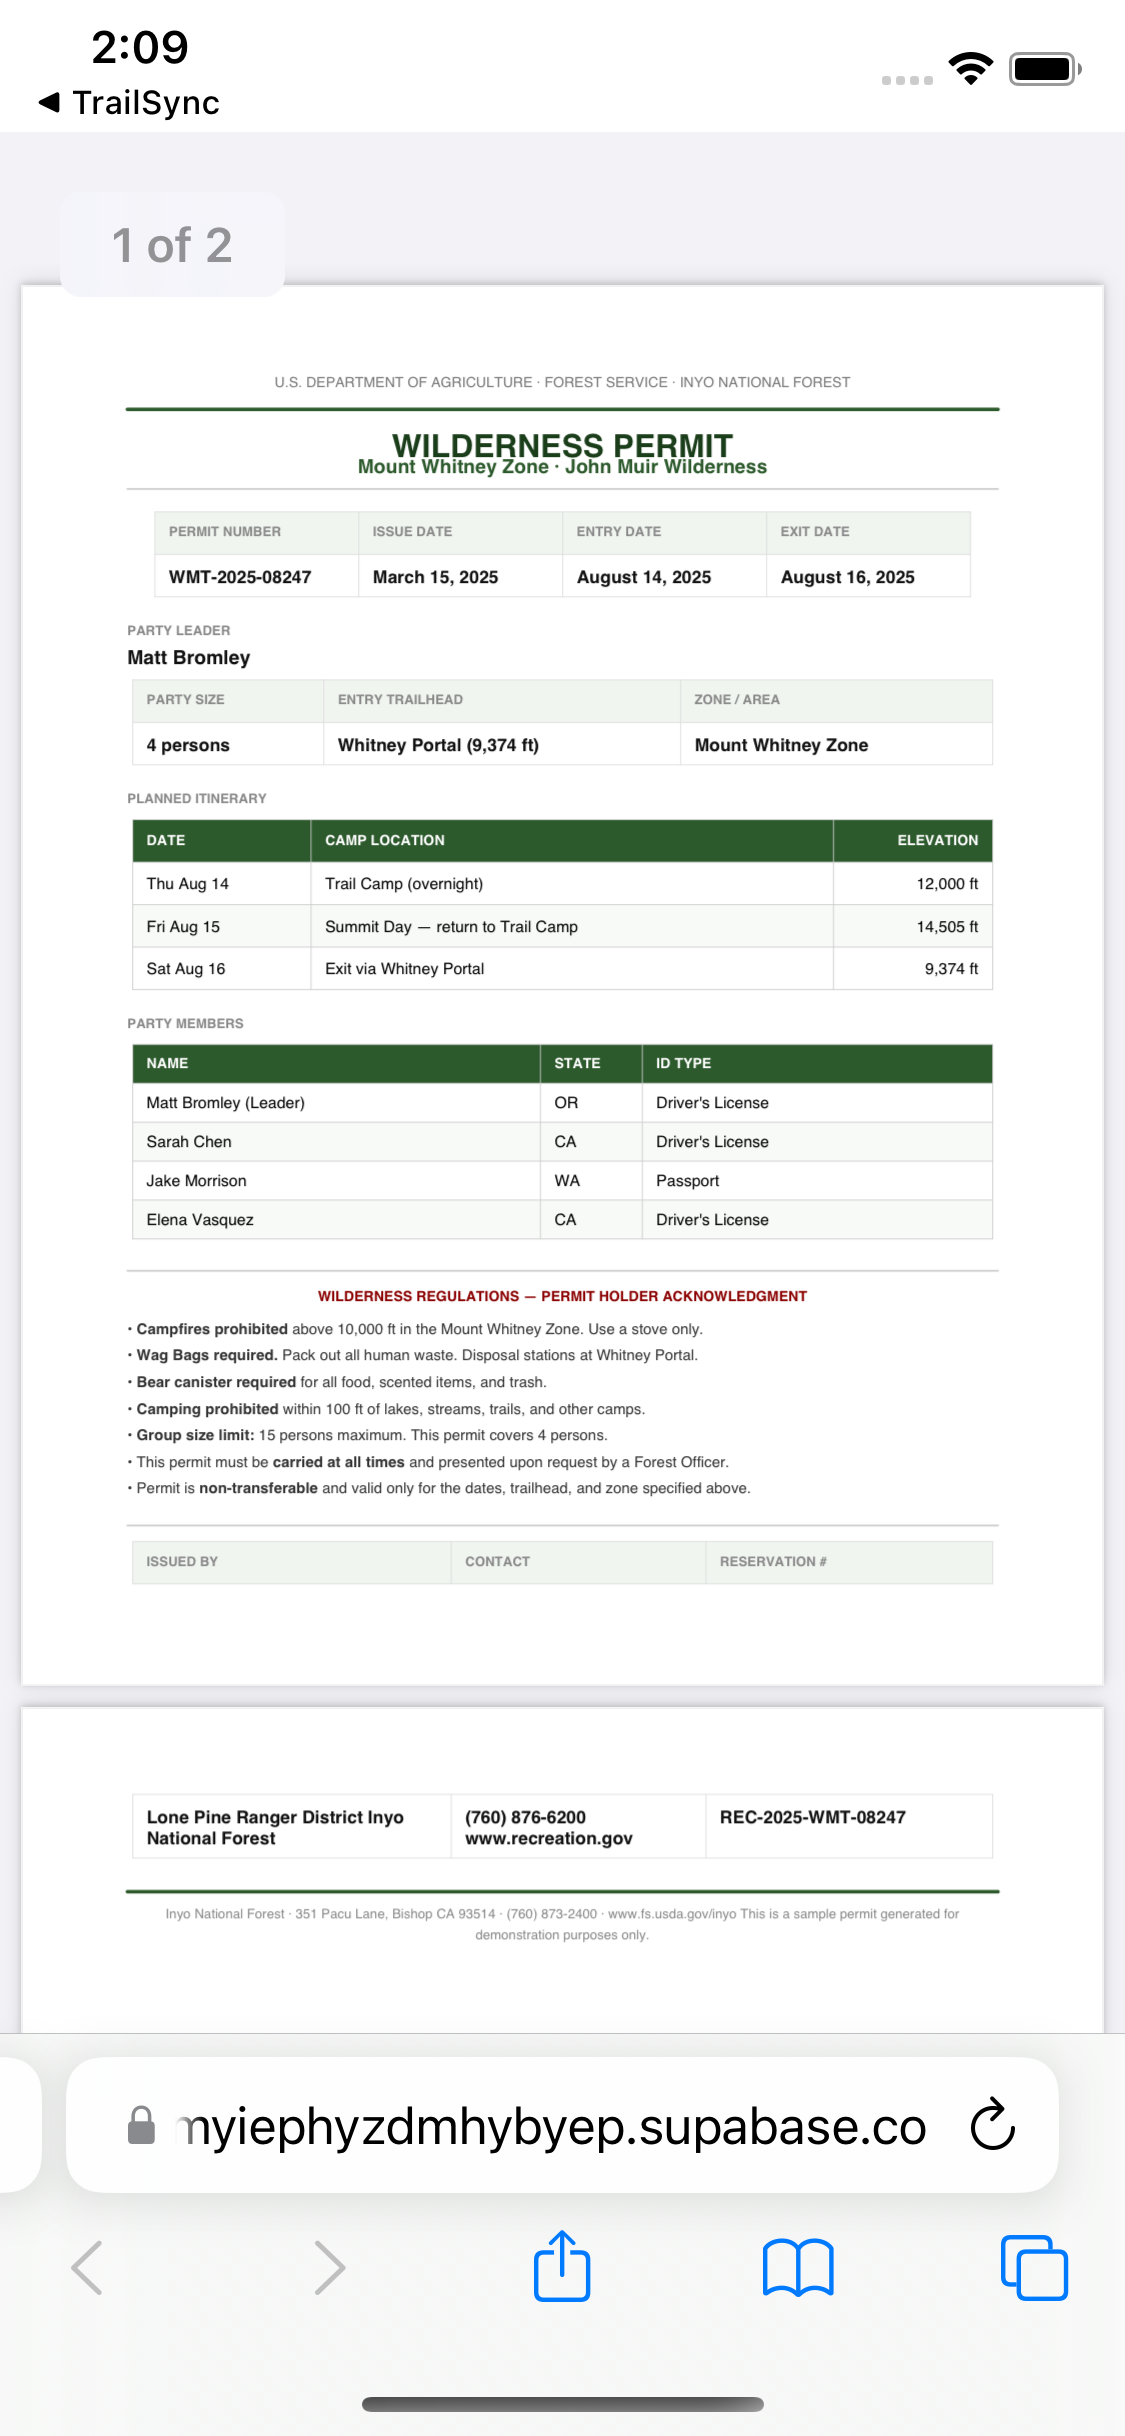
🎟️ Permits
If your trip requires a wilderness permit, TrailSync gives you a place to store and share it with your whole group. Uploading the permit means everyone can pull it up on the spot — no more frantic messages trying to find who has the permit photo when you're at the trailhead.
Uploading a Permit
- Open your trip
- Tap the Permits tile on the trip dashboard
- Tap the + button in the top right
- Choose how to add your permit:
- Take a Photo — photograph your physical permit at the trailhead register
- Choose from Gallery — use a photo you've already taken
- Upload Document — attach a PDF confirmation email
- Optionally add a description (e.g., "Whitney Zone — 3 nights") and the permit date
- Tap Upload
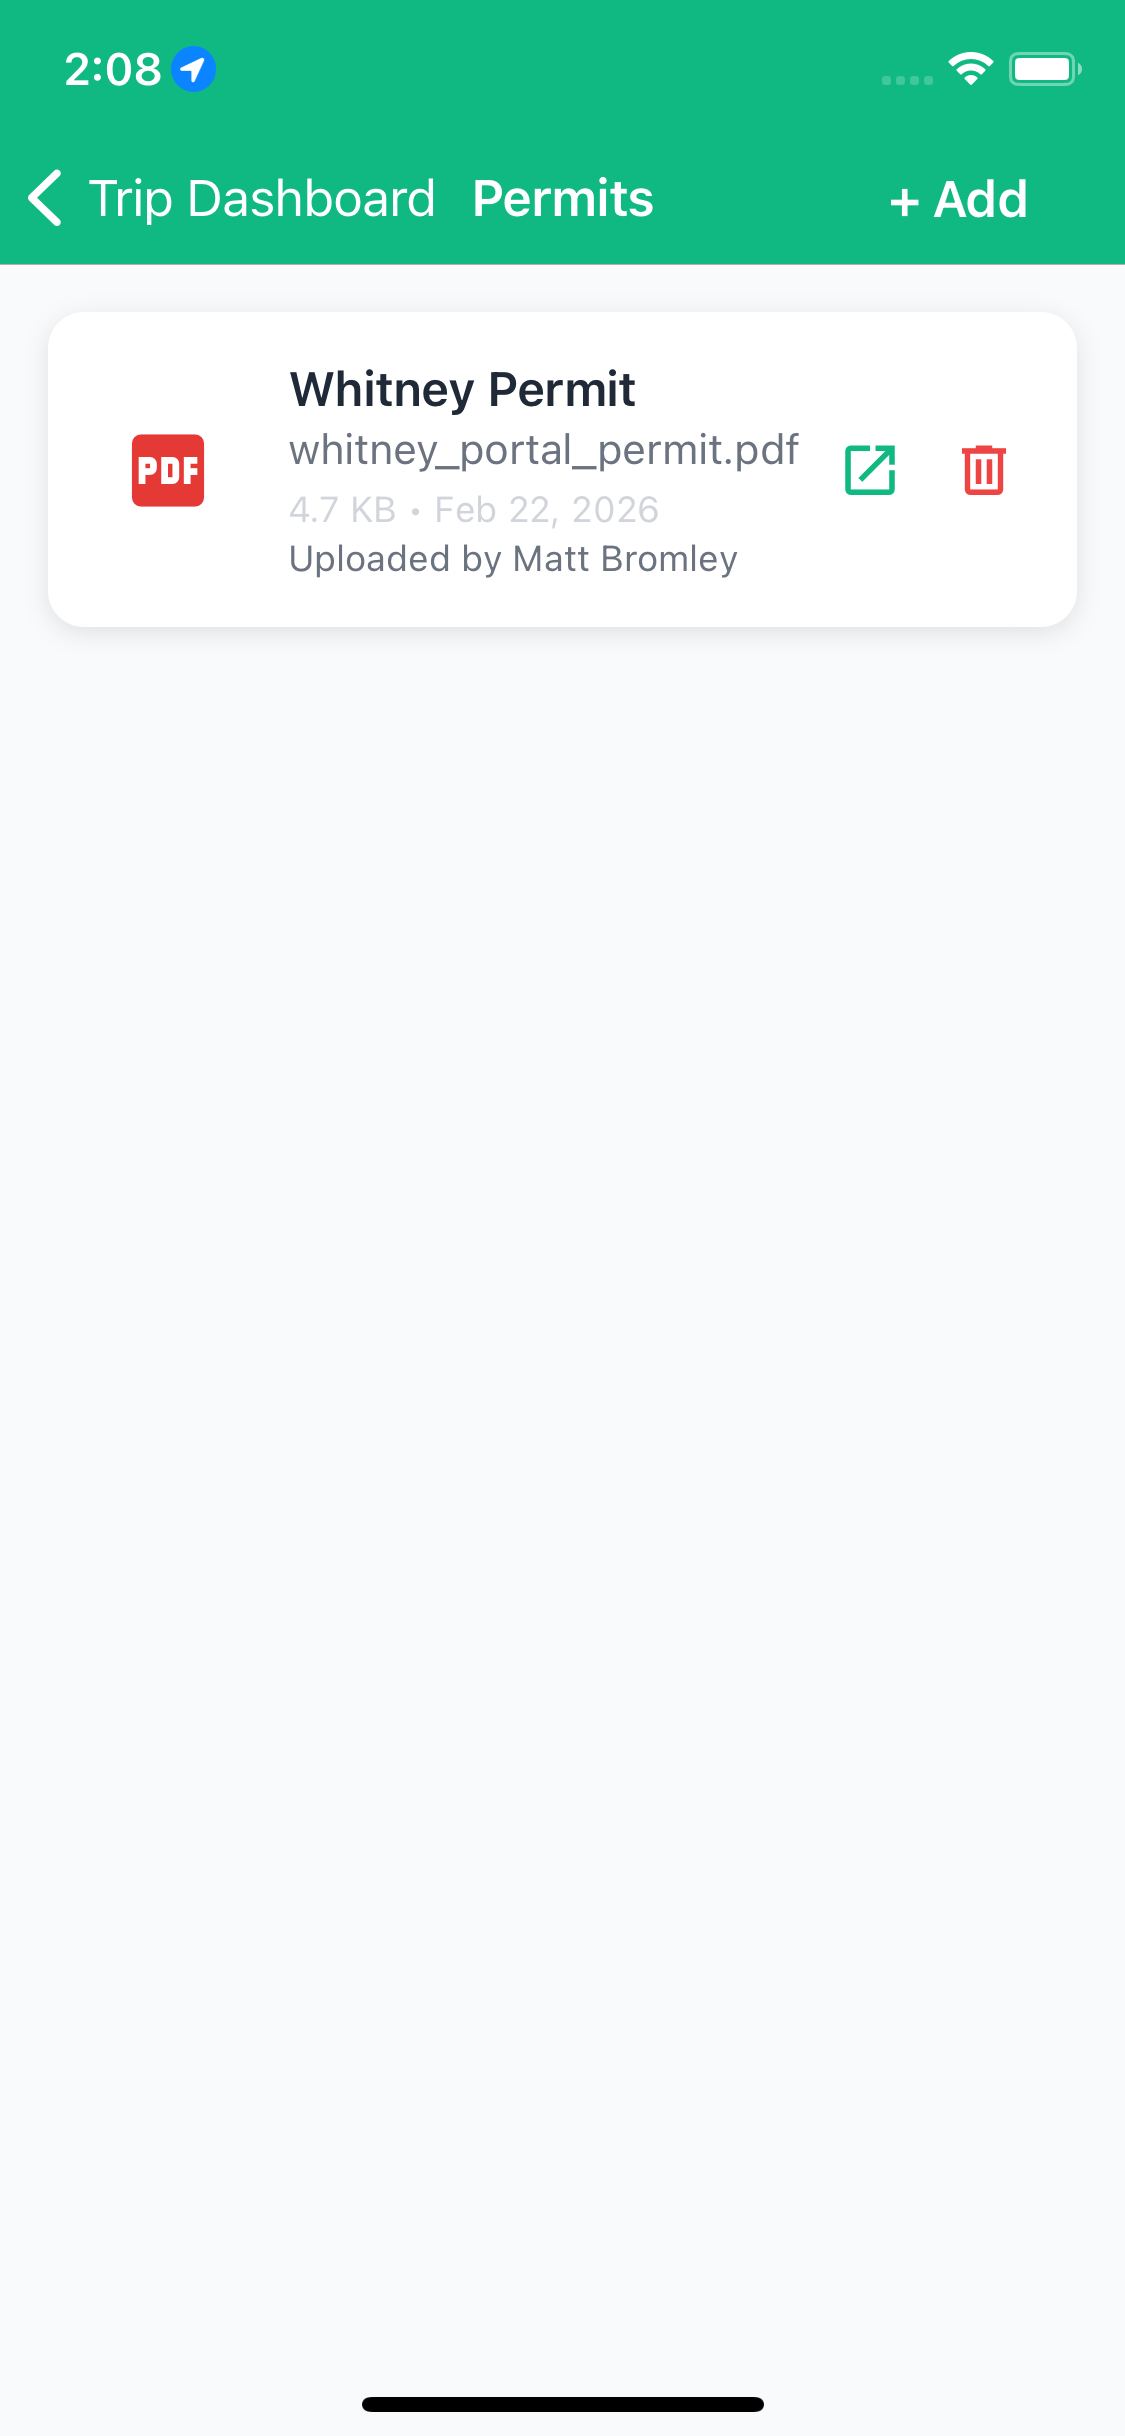
Viewing Permits
All trip participants can view and download any permit uploaded to the trip. Image permits show as thumbnails; PDF documents show a document icon. Tap any permit to open it full-screen.
Deleting a Permit
You can delete any permit you uploaded yourself. The trip organizer can delete any permit regardless of who uploaded it. Tap and hold a permit (or tap the trash icon) to remove it.
💬 Messages & Communication
Viewing Messages
- Open your trip
- Tap the Messages tile
- All trip-related conversations appear here
- Messages show:
- Sender's name and avatar
- Timestamp
- iMessage-style bubbles (your messages on right, others on left)
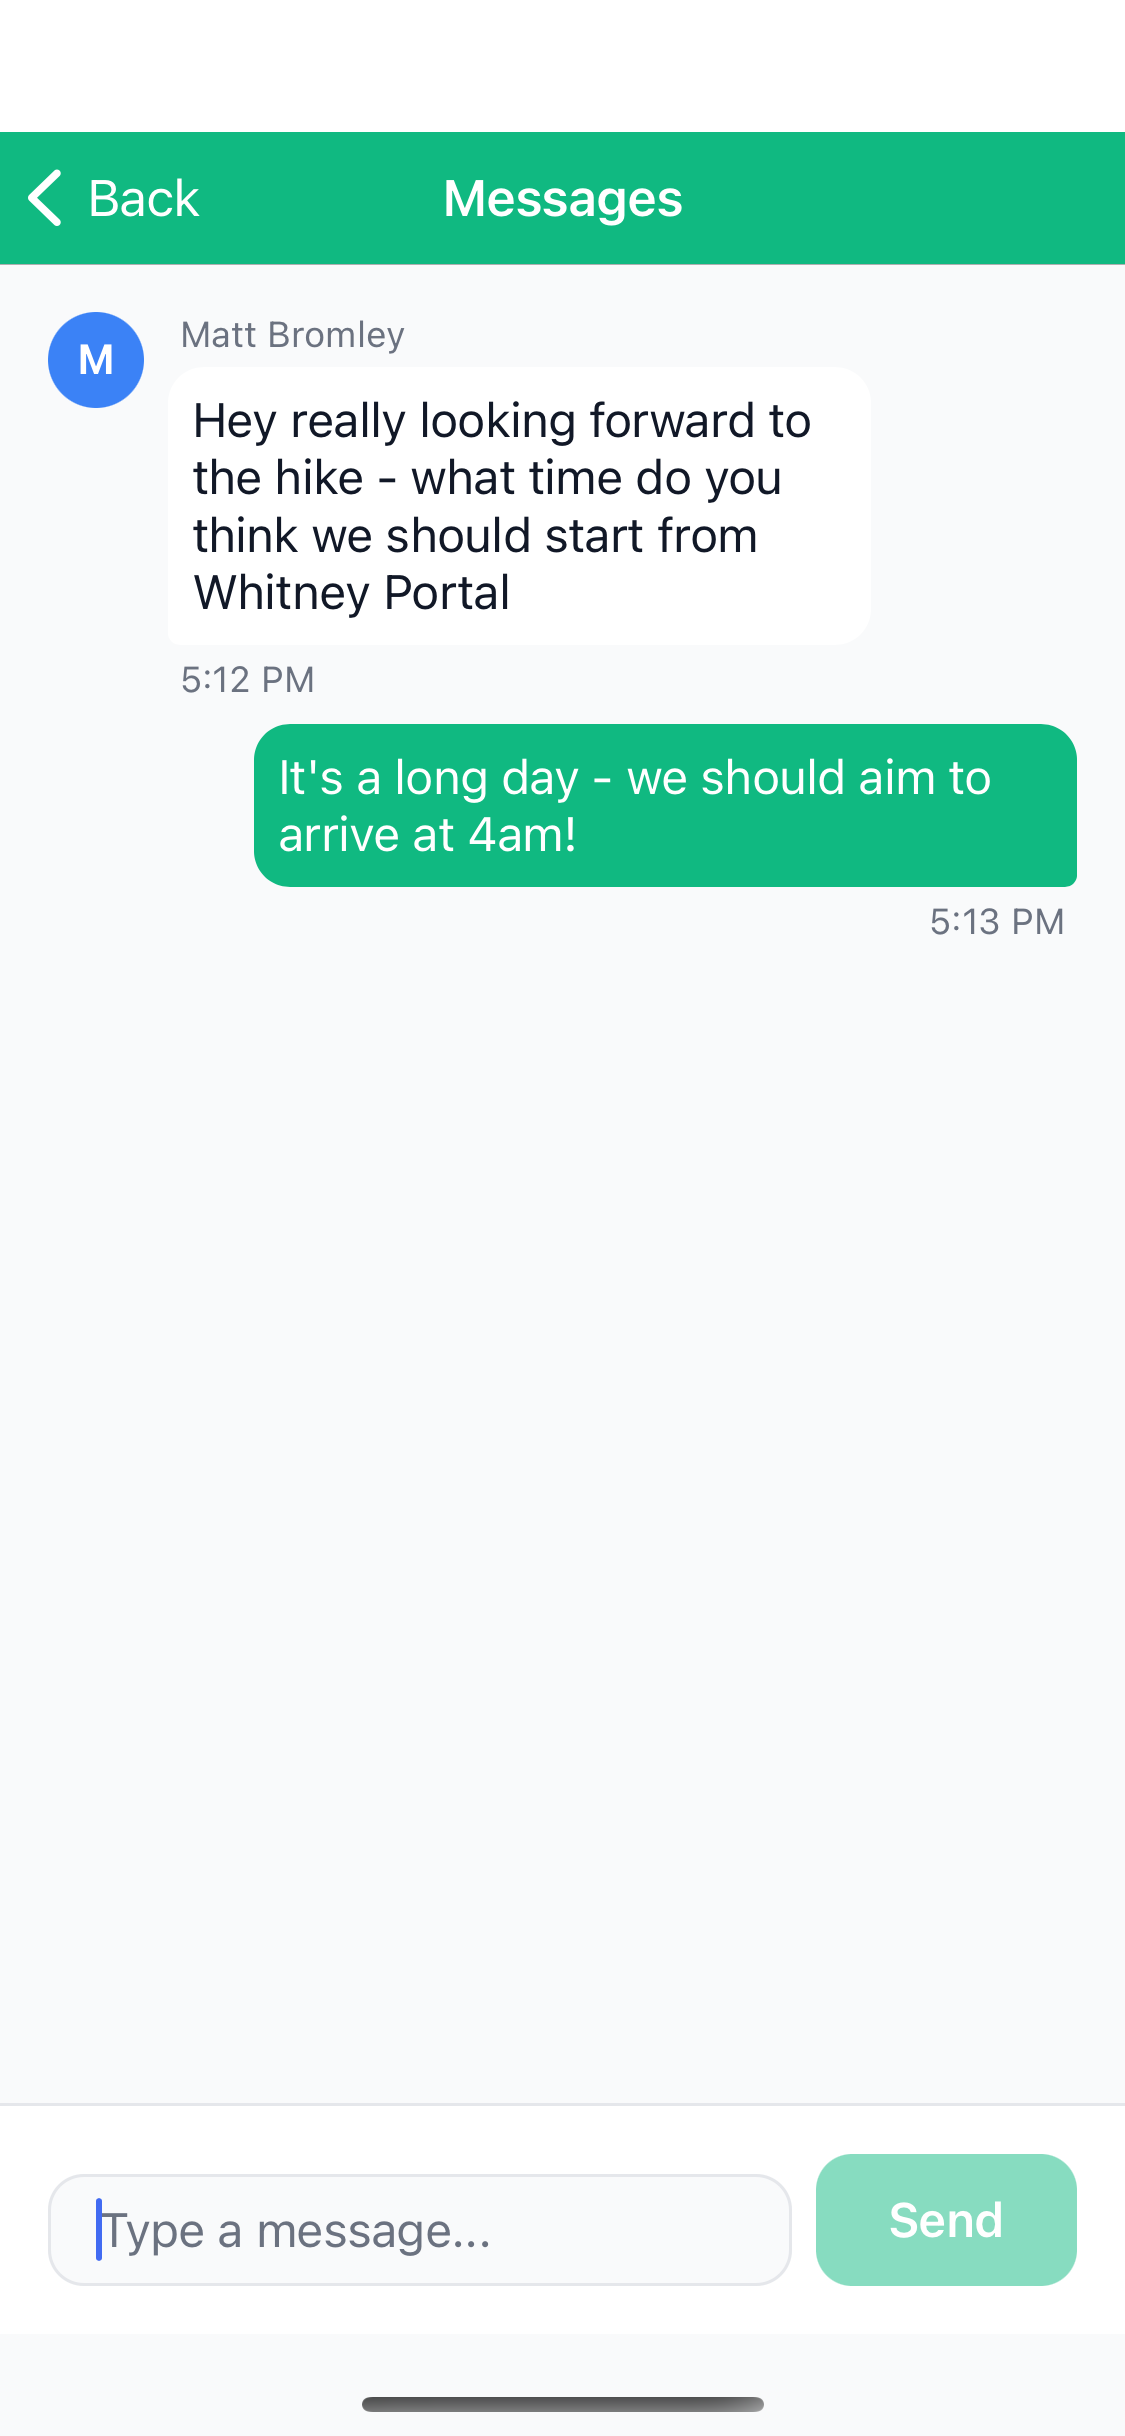
Sending a Message
- Type your message in the text field at bottom
- Tap the send button (→)
- Message appears immediately (optimistic update)
- Syncs to server in background
Unread Message Badges
TrailSync tracks which messages you've seen:
- Home screen: Green badge shows trip has unread messages
- Trip dashboard: Red badge on Messages tile shows count
- Opening Messages marks all as read
- No push notifications (check app regularly)
- Cannot edit or delete messages
- Use messages for group coordination and updates
- Use action items for specific tasks that need completion
- Keep important info (like trailhead parking details) as action items so they don't get lost in conversation
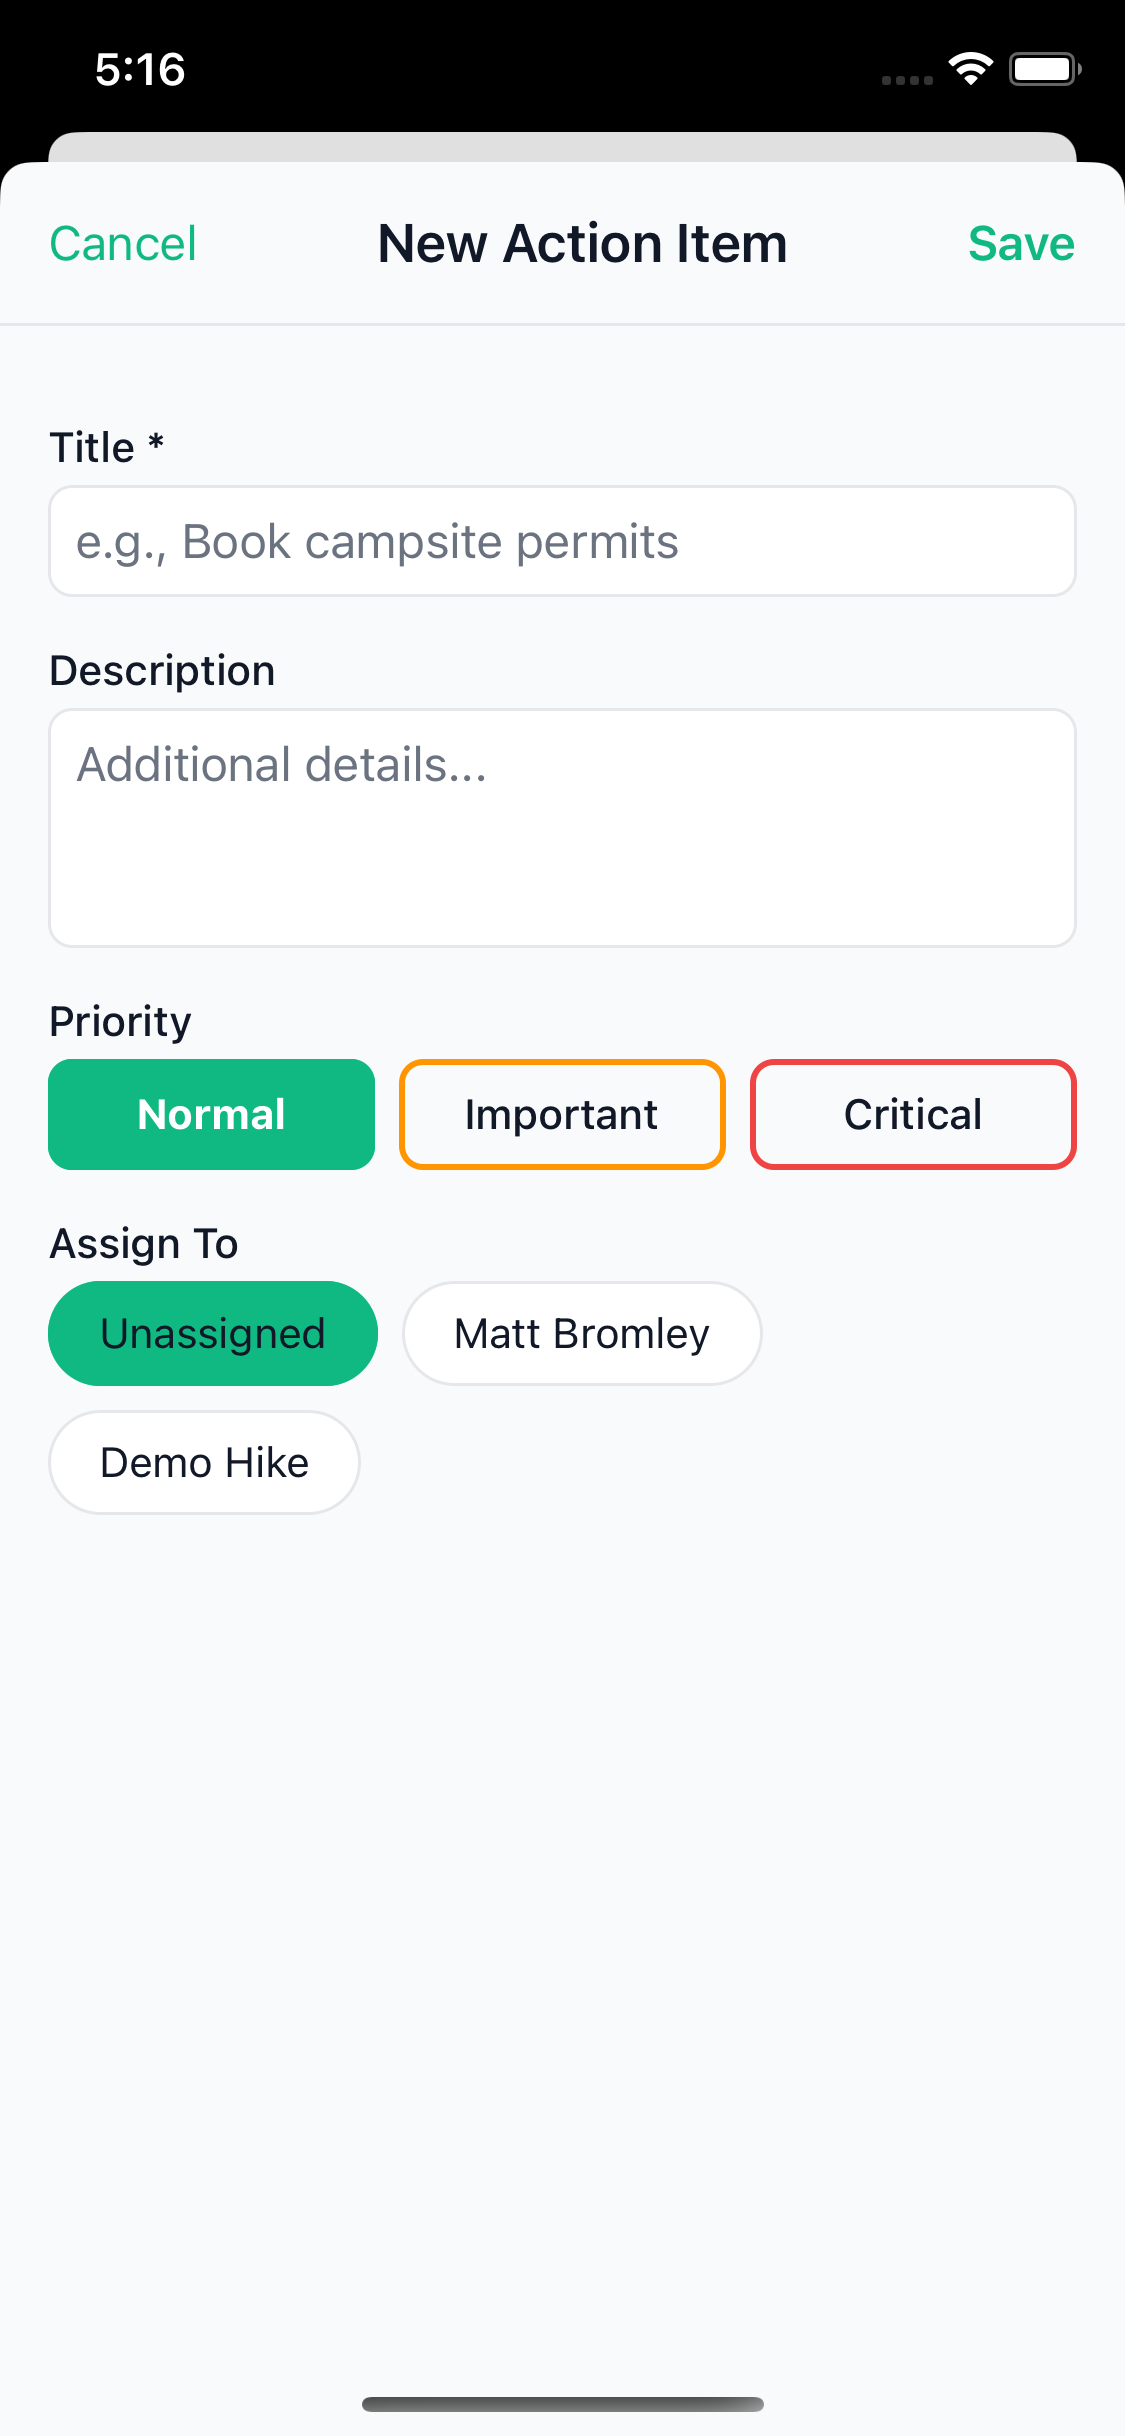
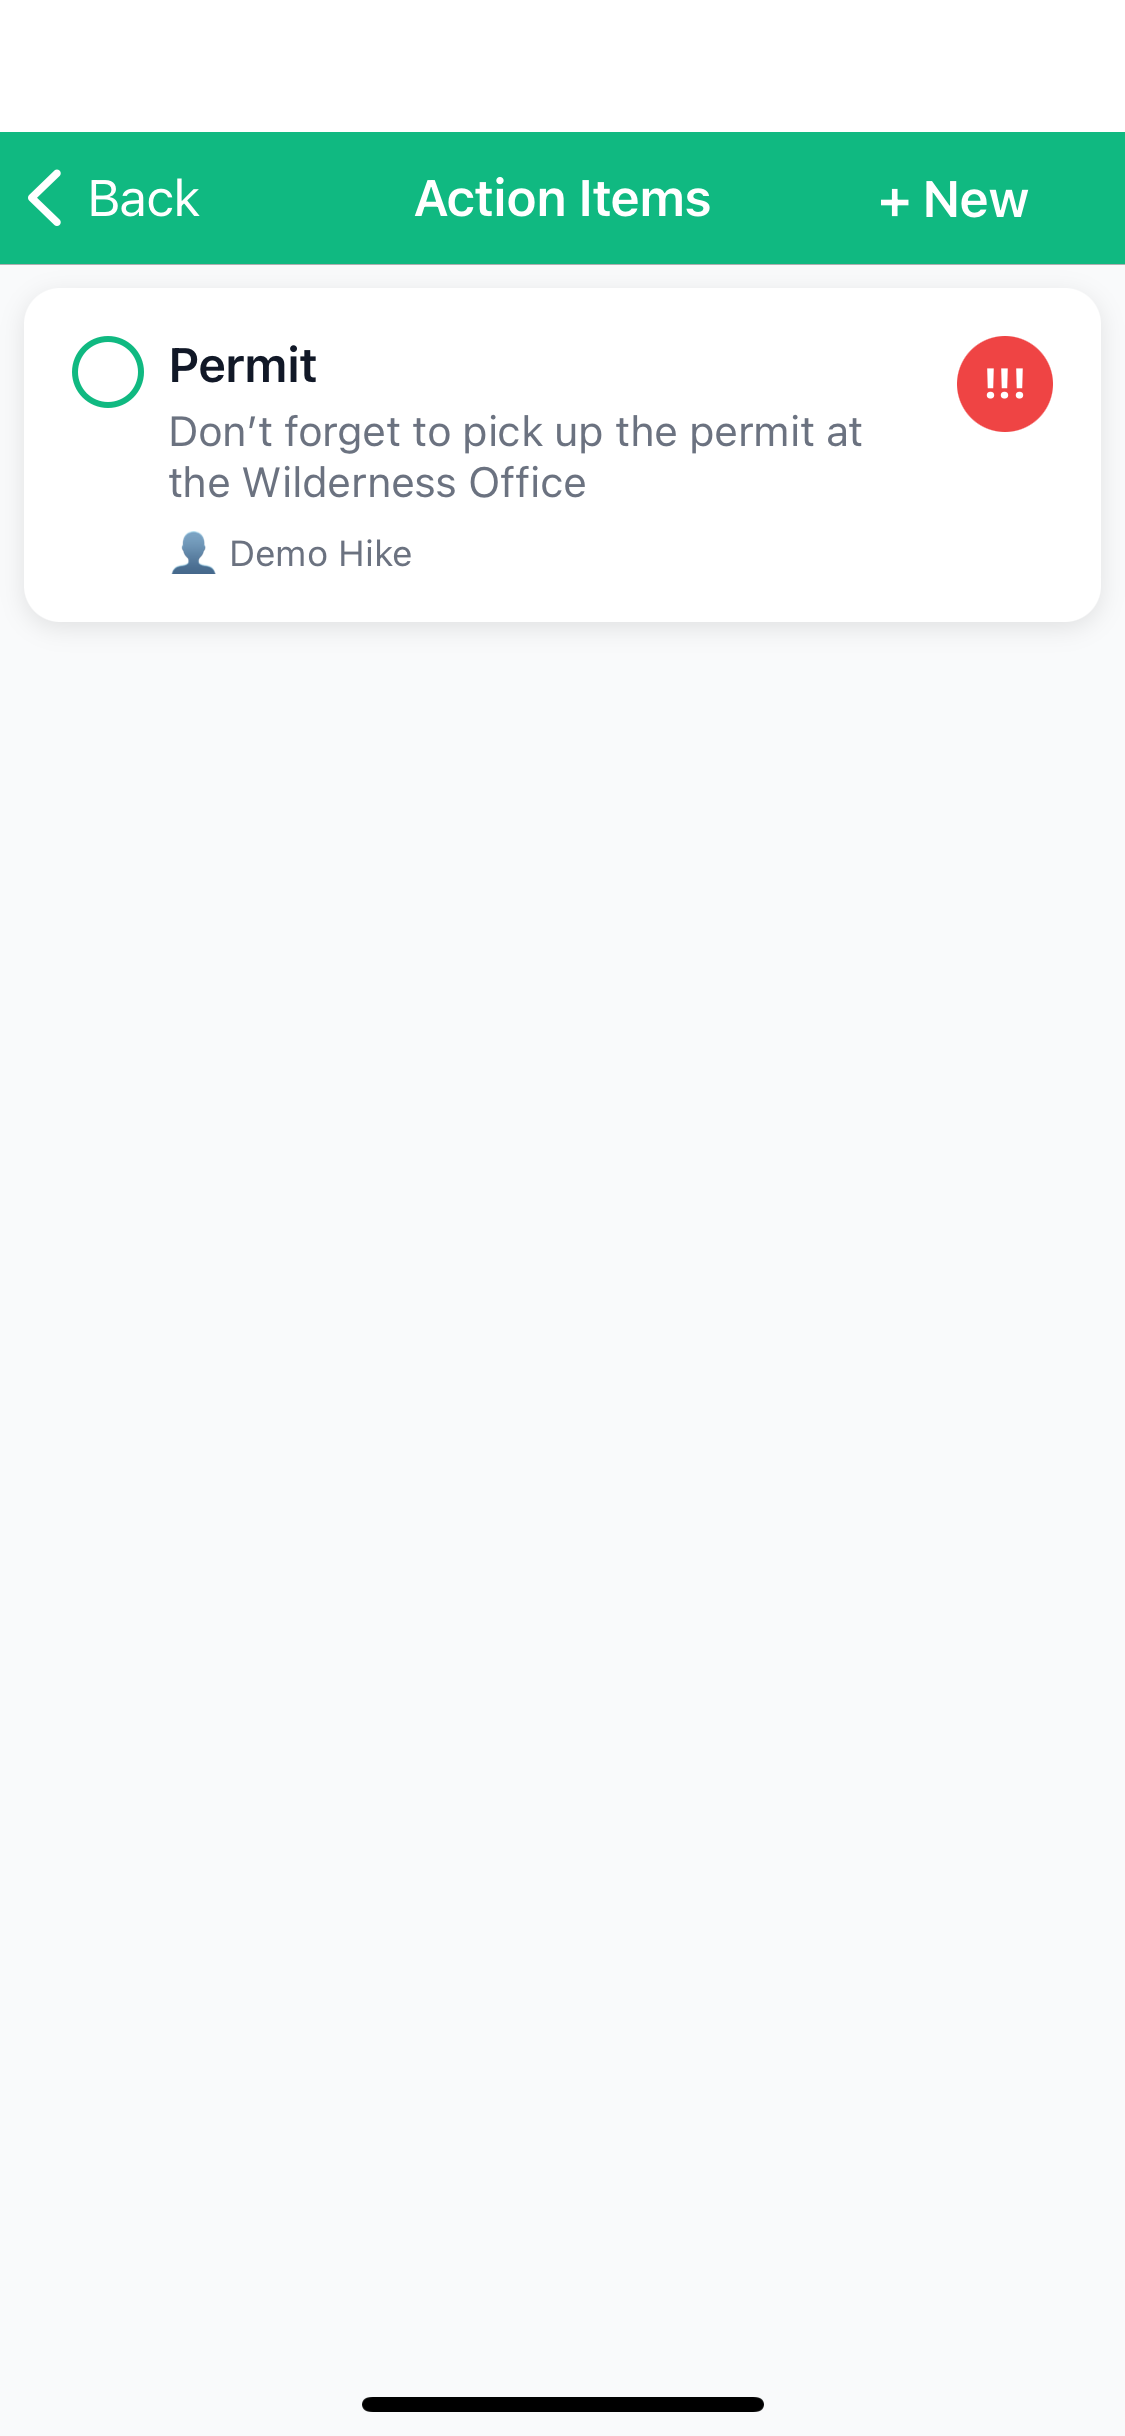
✓ Managing Action Items
What Are Action Items?
Action items are tasks that need to be completed before or during your trip. They help ensure nothing falls through the cracks.
Creating an Action Item
- Open your trip
- Tap the Action Items tile
- Tap the + Add Action Item button
- Fill in:
- Title: e.g., "Get wilderness permit"
- Description: Optional details
- Priority:
- Critical (!!!) - Red badge, must do before trip
- Important (!!) - Orange badge, high priority
- Normal (!) - Green badge, standard priority
- Assign To: Select a participant (or leave unassigned)
- Tap Create
Marking Items Complete
- View your action items list
- Tap the checkbox next to a completed item
- It moves to the "Completed" section at the bottom
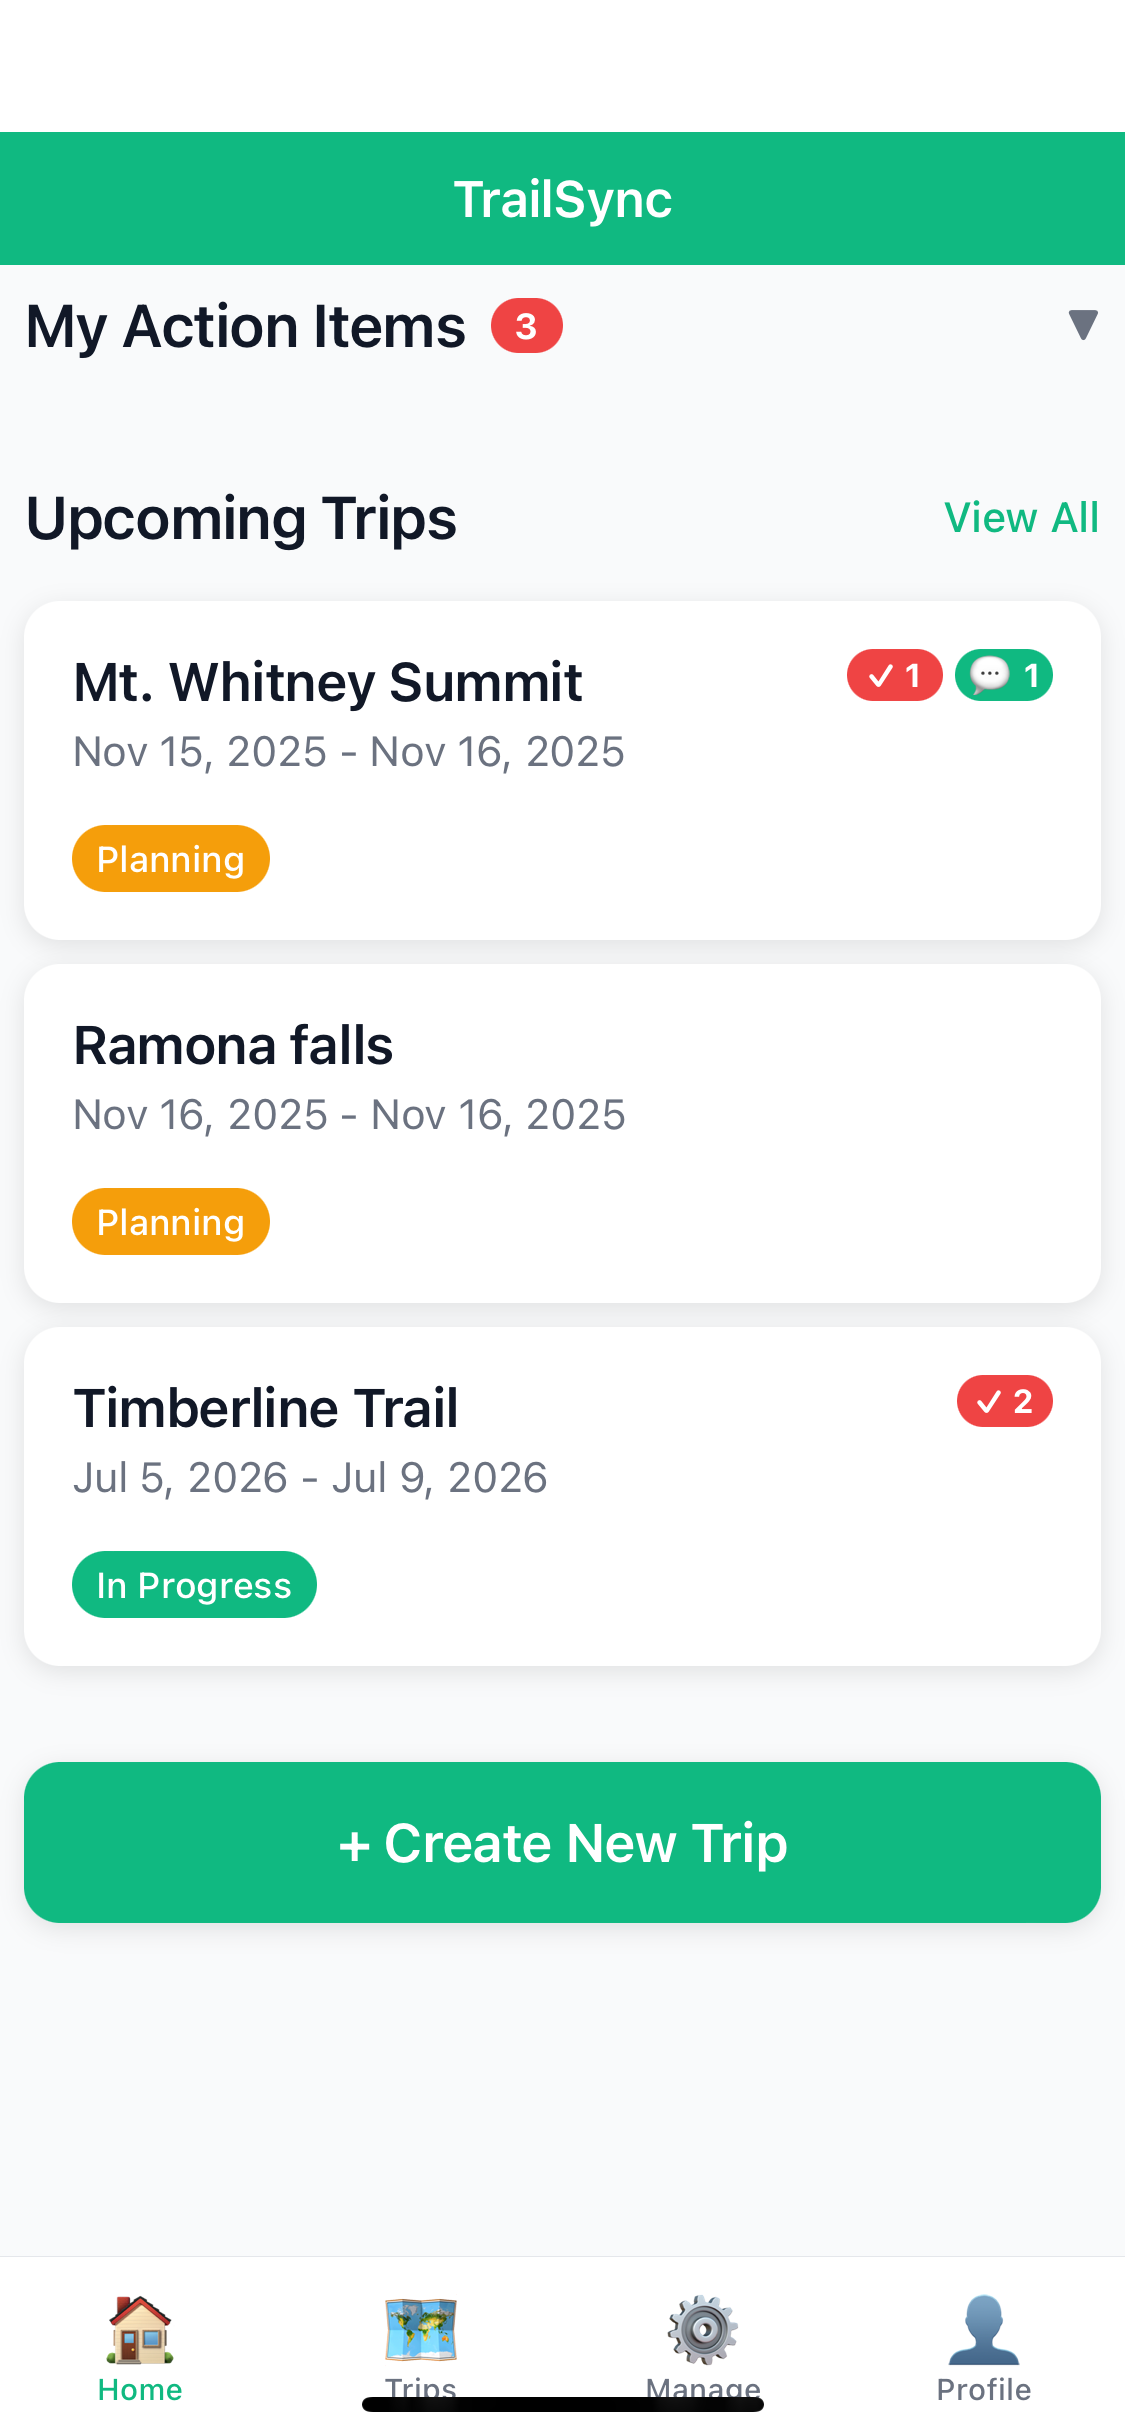
Viewing Action Items on Home Screen
The Home tab shows all pending action items across all your trips:
- Collapsible section labeled "Action Items"
- Grouped by trip
- Quick overview of what needs attention
- Tap any item to jump to that trip
Common Action Items to Create
Here are some typical pre-trip tasks:
- 🎫 Permits: "Reserve wilderness permit for Mt. Whitney"
- 🚗 Transportation: "Book shuttle from Lone Pine to Whitney Portal"
- 📄 Documentation: "Print map and elevation profile"
- 🥾 Gear Prep: "Check tent poles and repair as needed"
- 📦 Supplies: "Buy fuel canisters and freeze-dried meals"
- 📱 Communication: "Share trip itinerary with emergency contact"
💰 Tracking Expenses
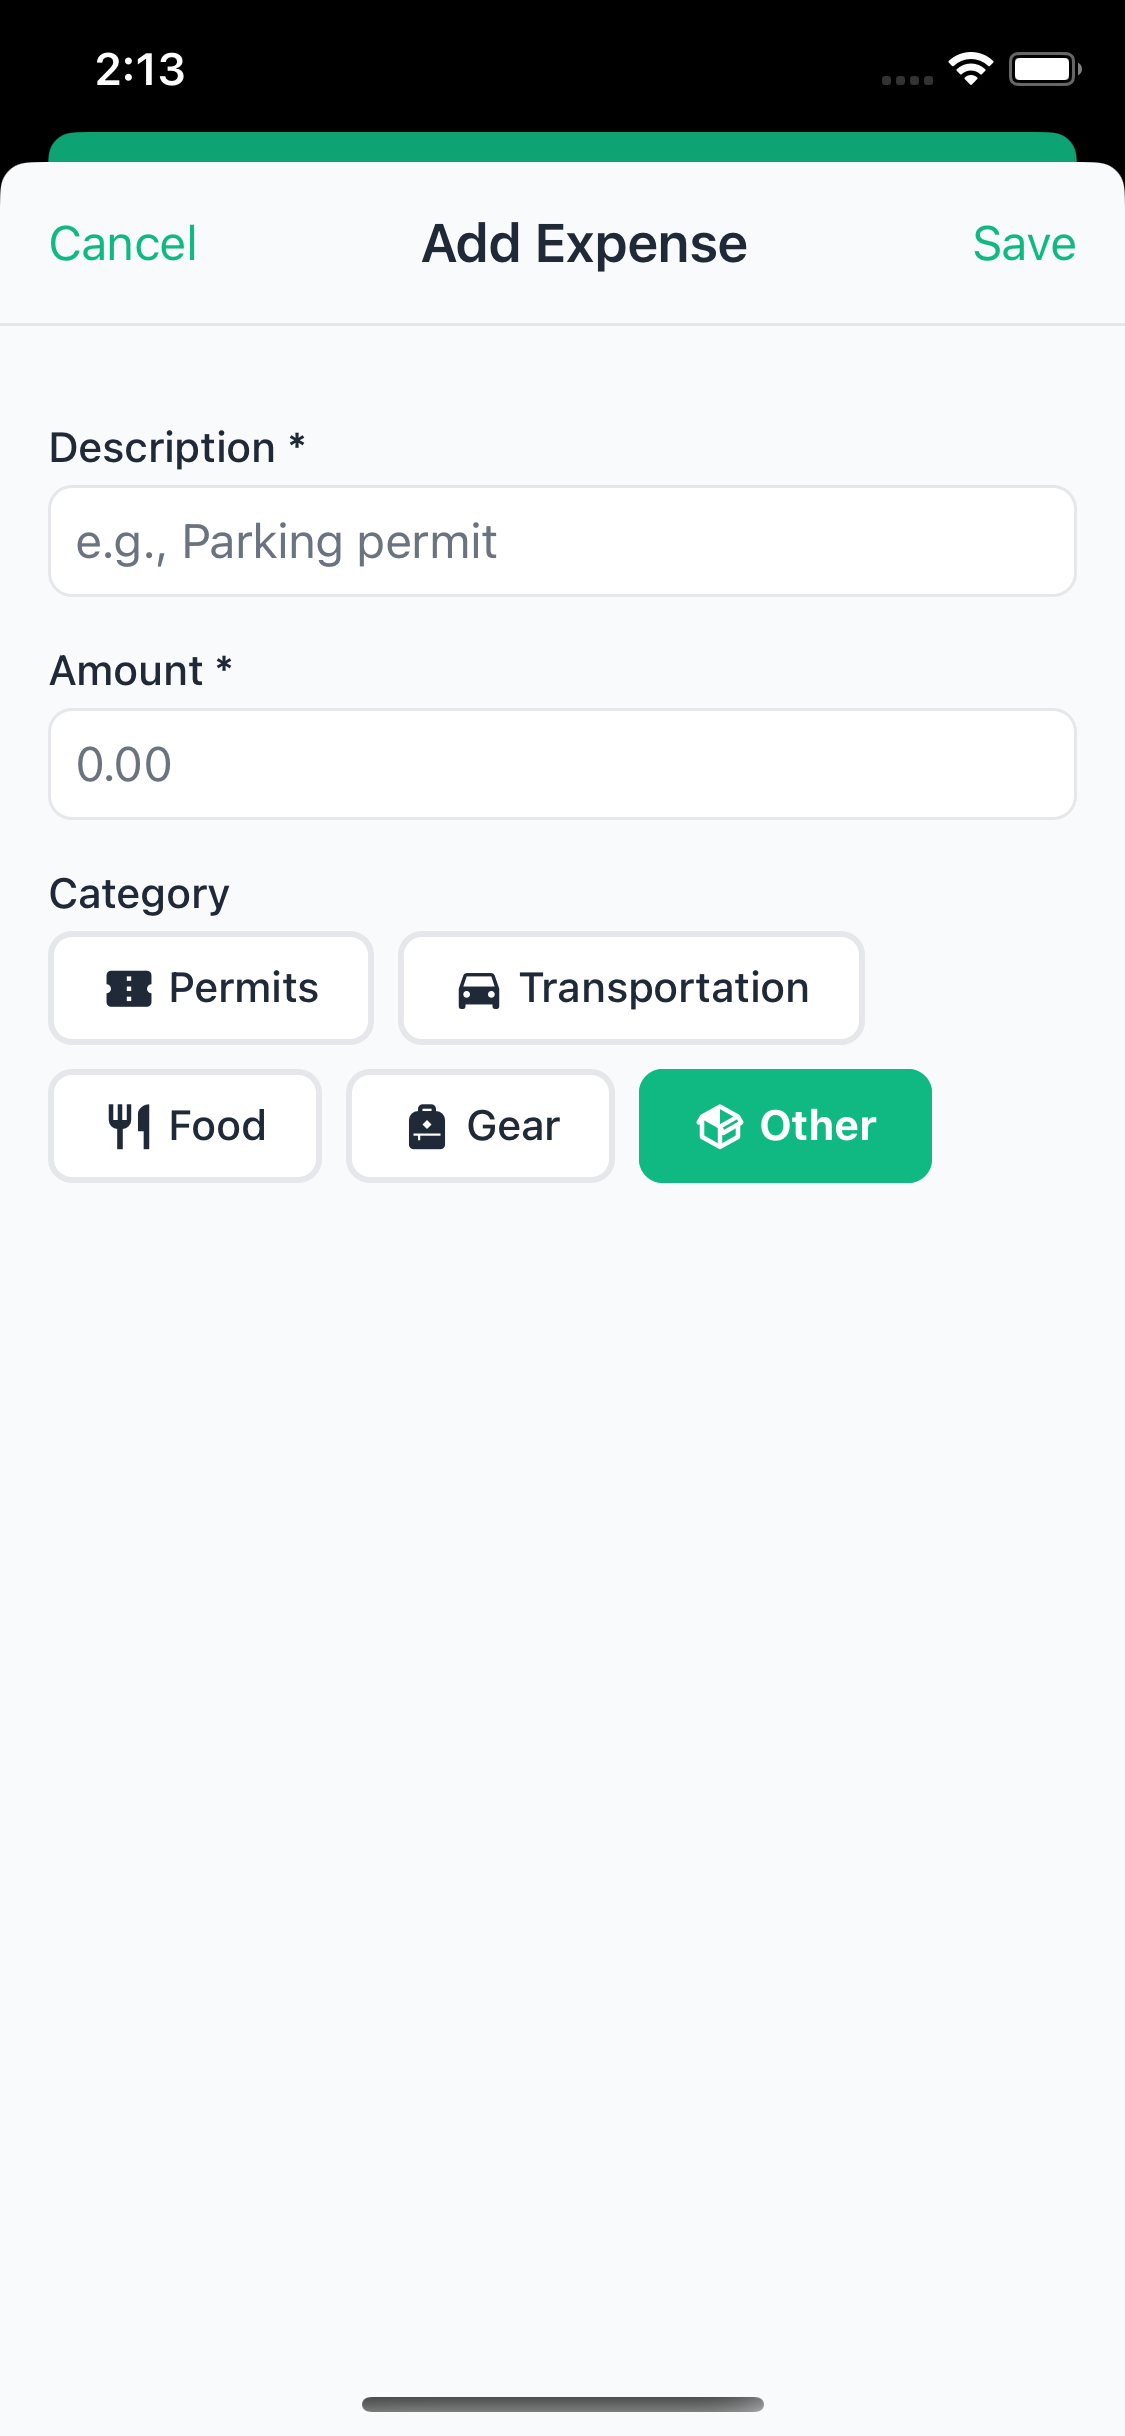
Adding an Expense
- Open your trip
- Tap the Budget tile
- Tap + Add Expense
- Enter details:
- Description: e.g., "Wilderness permit fees"
- Amount: Dollar amount
- Category: Permit, Transportation, Food, Gear, or Other
- Date: When expense occurred
- Tap Save
How Expenses Are Split
TrailSync automatically splits expenses equally among all confirmed participants:
- 4 participants, $80 permit = $20 per person
- Only confirmed participants count (not pending invitations)
- Split calculation updates when participants join or leave
Viewing Settlement Summary
The Budget screen shows who owes whom:
- Green cards: Money owed to you
- Red cards: Money you owe
- Settlement amounts optimized to minimize number of transactions

- No receipt photo upload (coming soon)
- No custom split percentages (equal split only)
- No expense report export
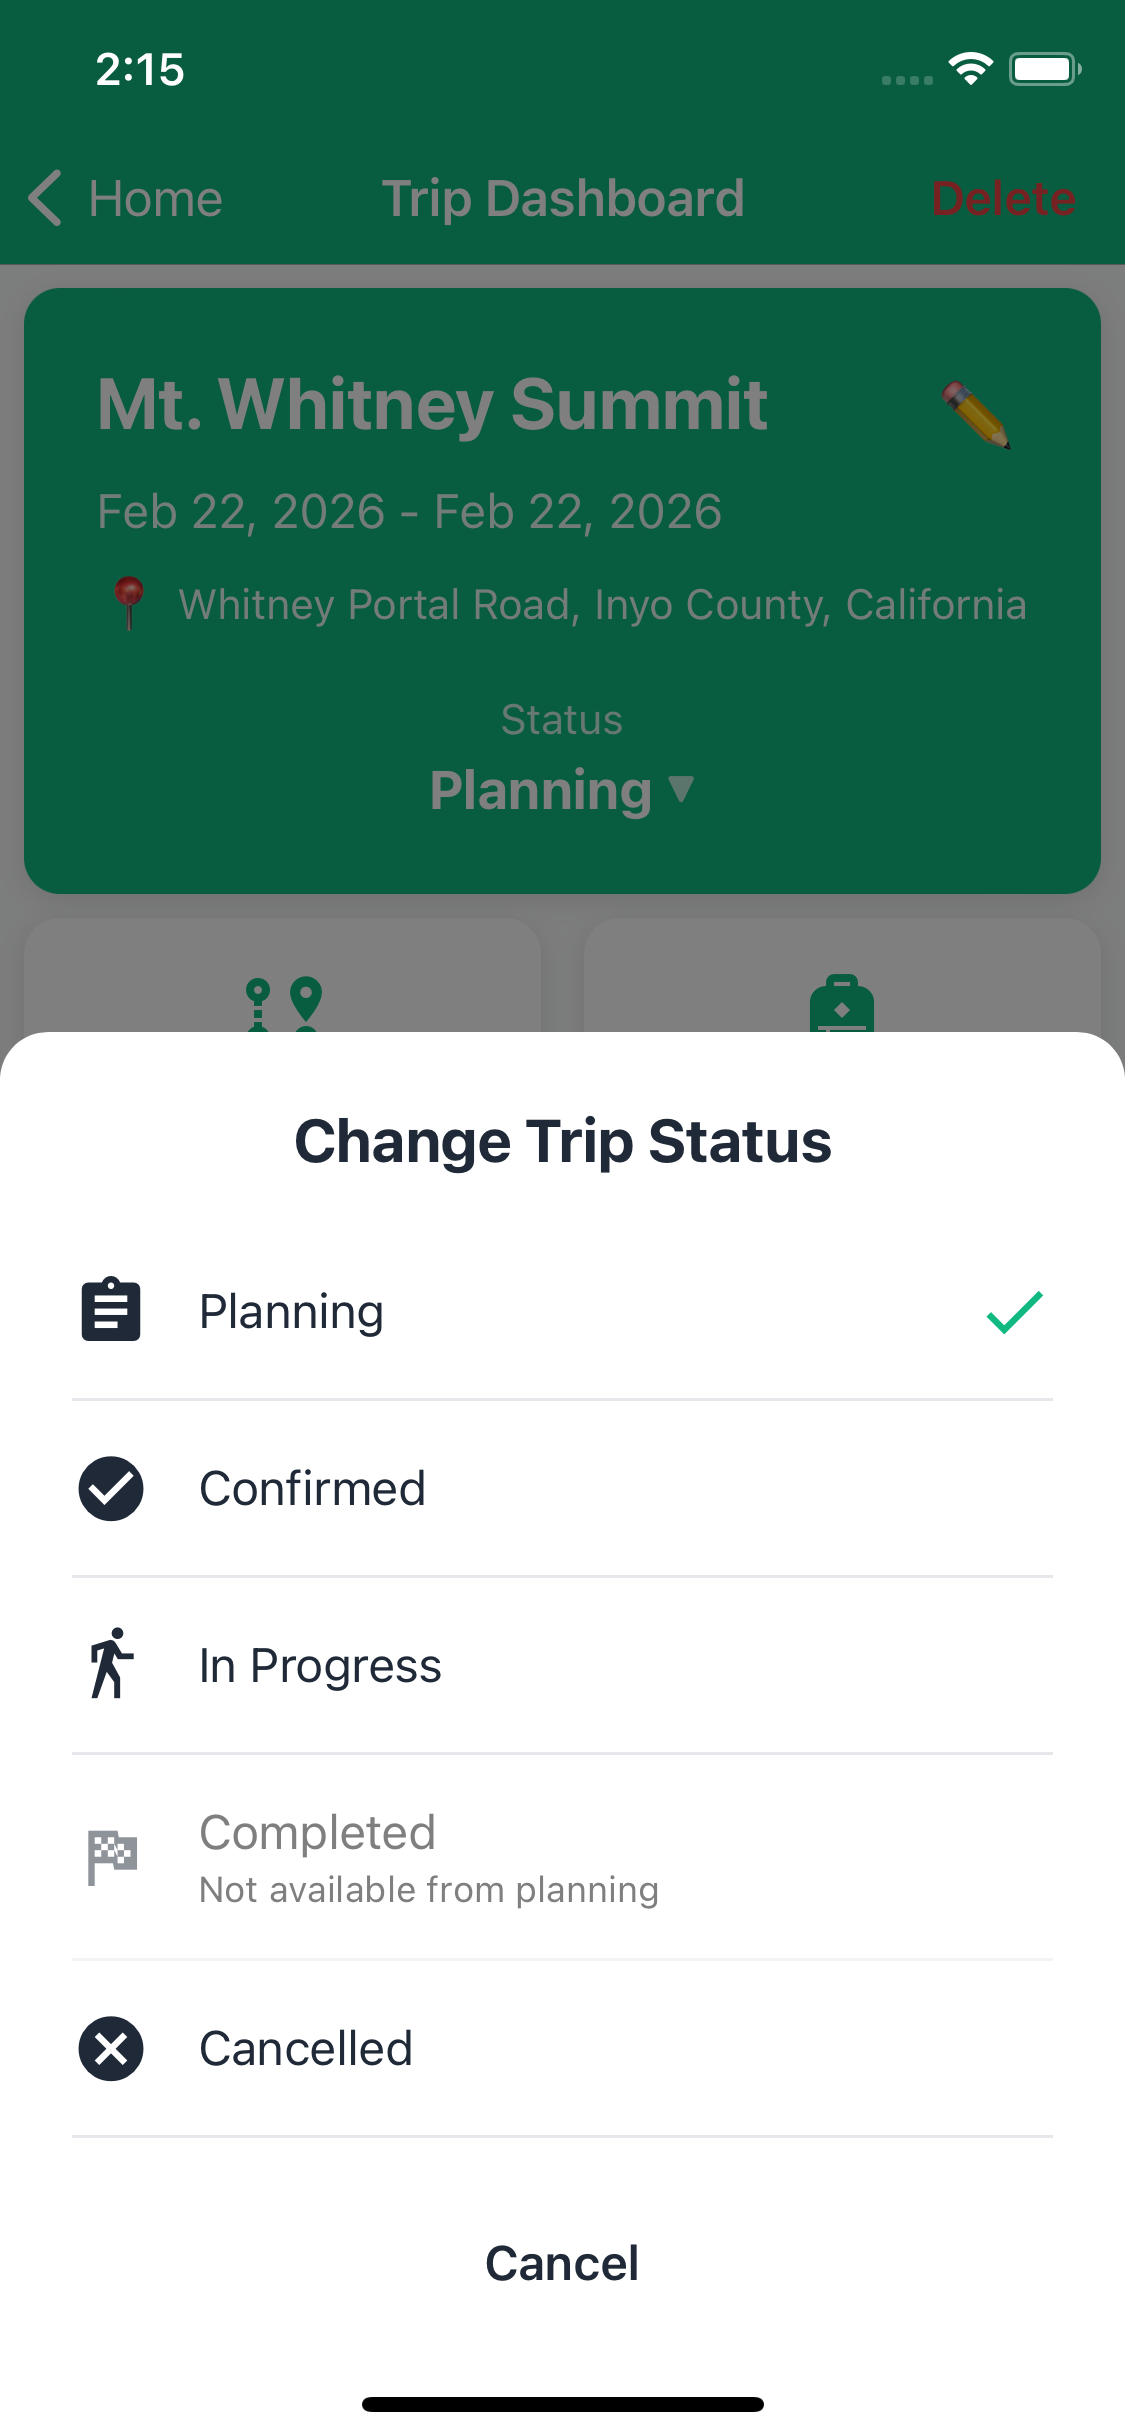
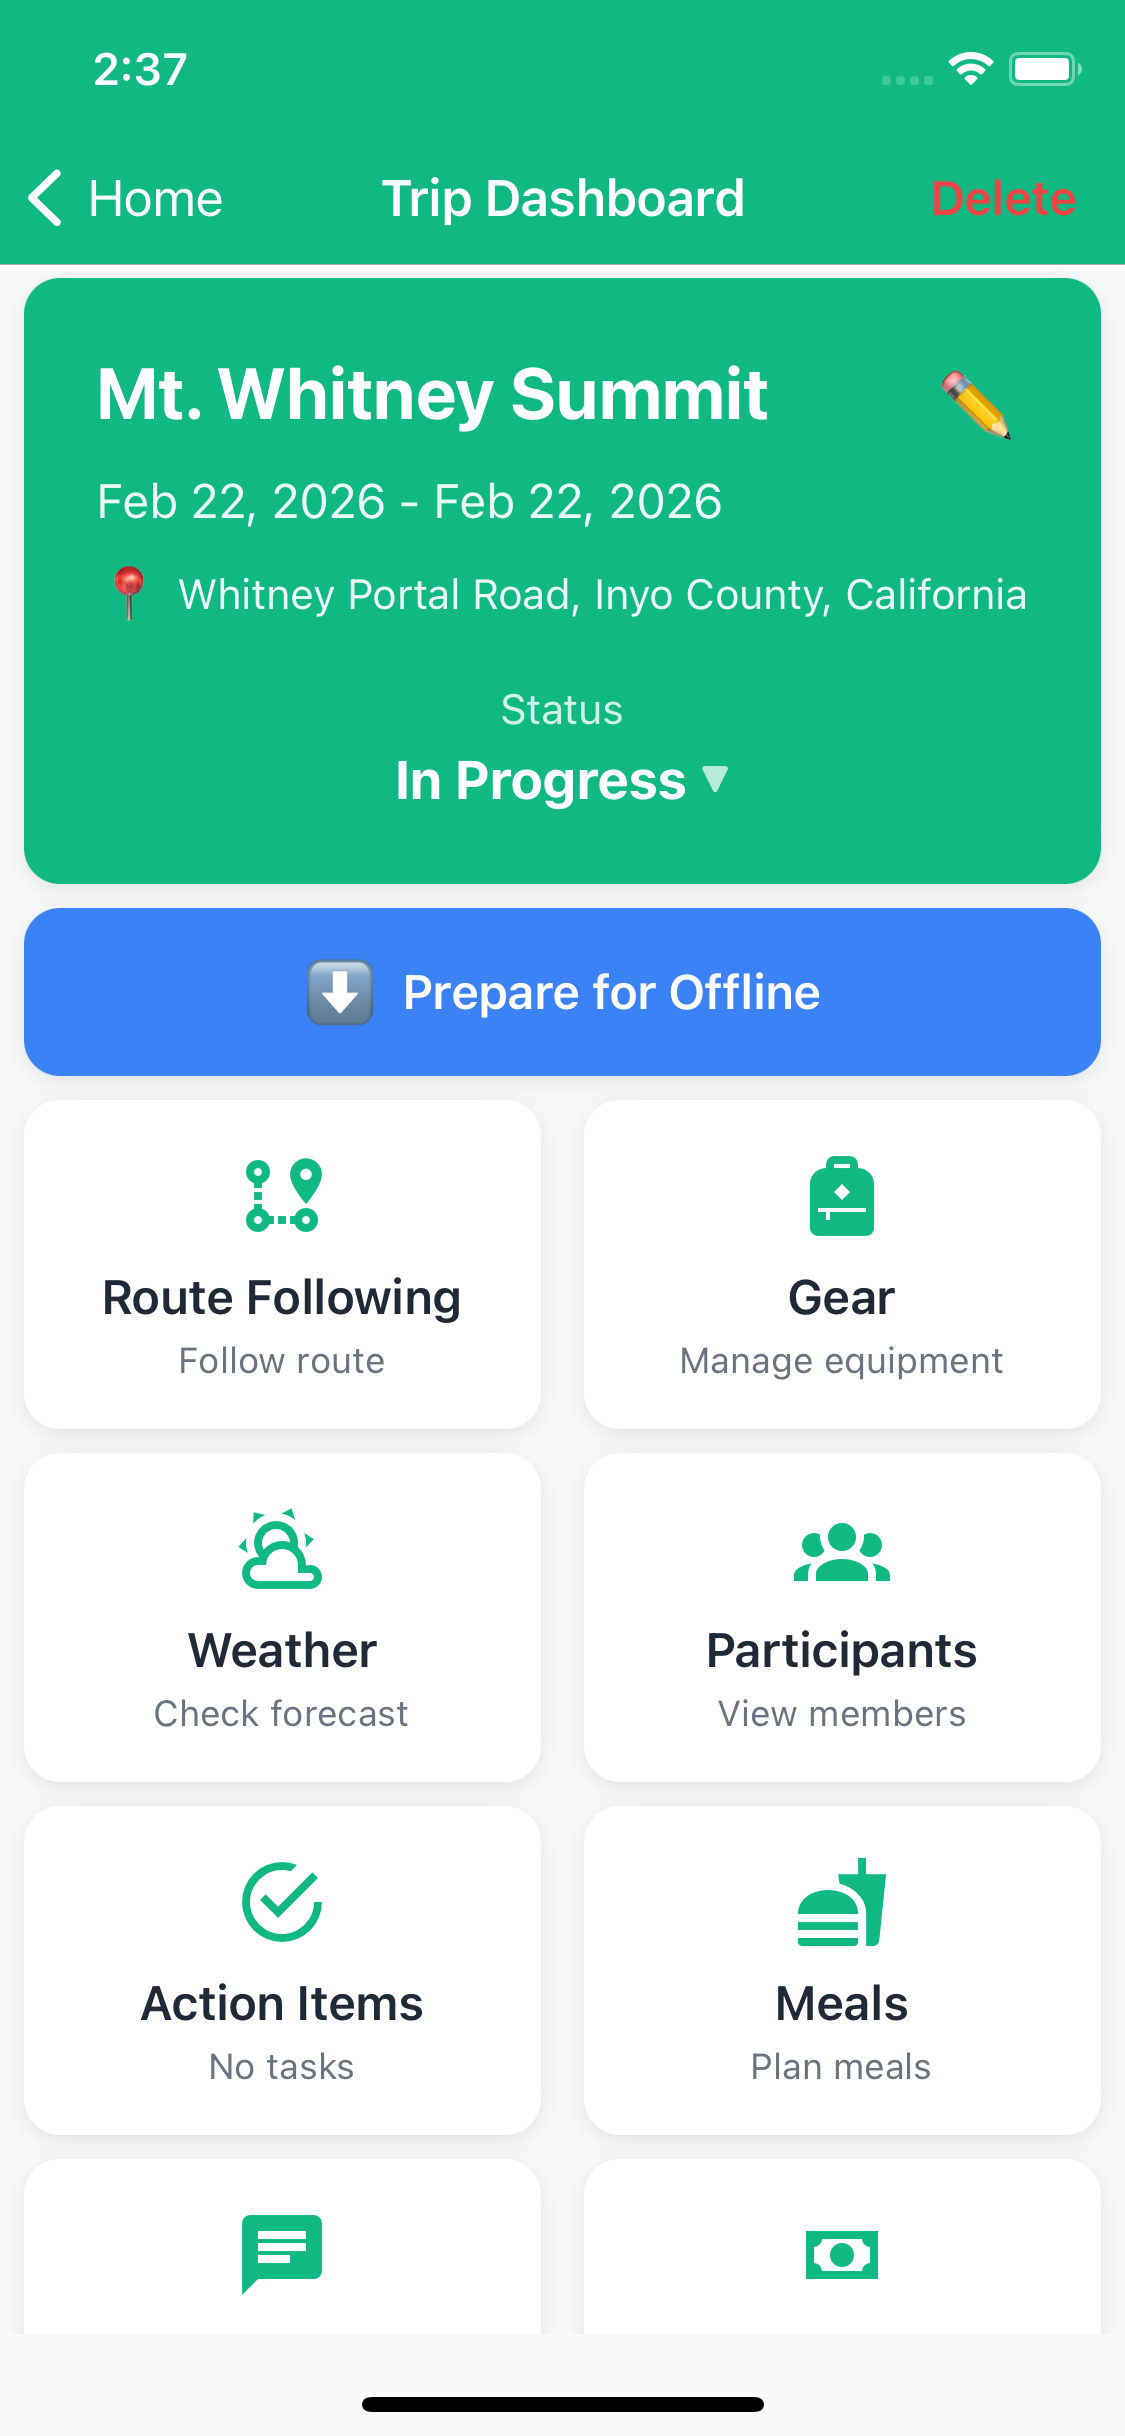
📊 Changing Trip Status
Understanding Trip Lifecycle
Trips move through different stages:
1. Planning Initial
- Default status when created
- Still figuring out details
- Participants may not be confirmed
- Dates might change
2. Confirmed Locked In
- Dates are final
- Participants committed
- Permits secured
- Final planning underway
3. In Progress Active
- Trip is happening now
- You're on the trail
- Enables offline mode preparation
- Real-time updates
4. Completed Finished
- Trip has ended
- Appears in "Past Trips" section
- Read-only for reference
- Can be used as template for future trips
5. Cancelled Ended
- Trip won't happen
- Moved to "Past Trips"
- Preserves planning for future reference
How to Change Status
Organizers and Co-organizers only:
- Open your trip
- On the dashboard, tap the status badge at the top
- Select new status from menu
- Confirm the change
📍 GPS Route Following
Once your trip is underway, you can use TrailSync to navigate your planned route in real time. It shows your position on the map, tracks your progress through each waypoint, and lets you know if you've drifted off course — useful for those trail junctions that aren't always obvious in the field.
Starting GPS Navigation
- Open your trip (must be status
In Progress) - Tap the Route tile
- Tap Follow Route to switch into navigation mode
- Tap the GPS toggle in the GPS Controls drawer to enable location tracking
- Your position appears on the map as a blue dot
Location tracking starts automatically shortly after you enable GPS, so there's no separate "start" step.
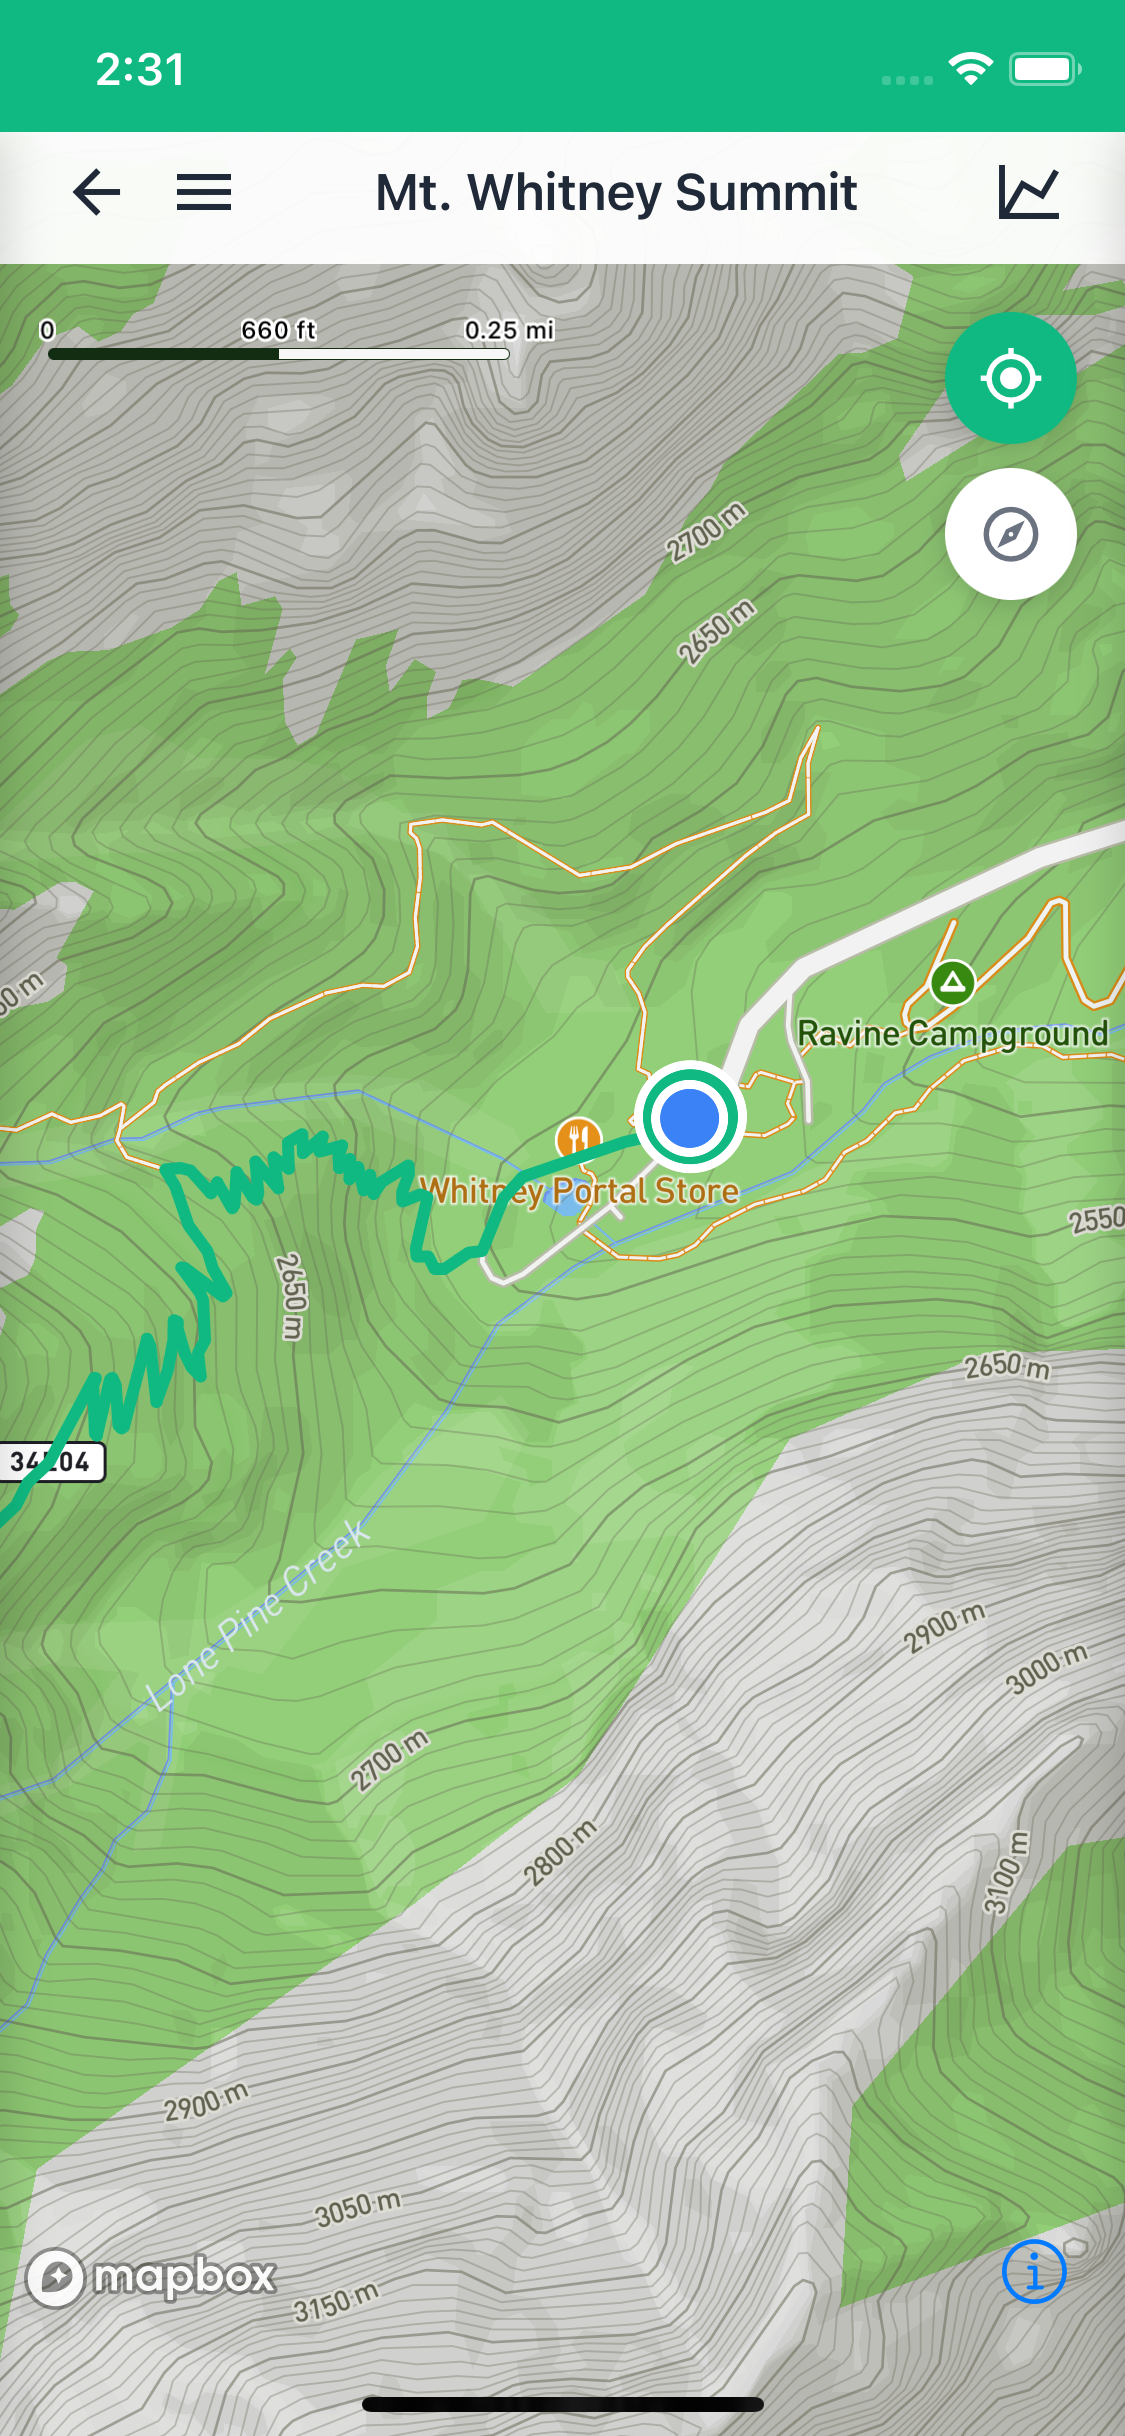
Off-Trail Alerts
TrailSync watches your position relative to the planned route as you move. If you wander too far from the line — perhaps you've taken the wrong fork — you'll get a notification showing how far off you are. Distances show in whichever unit system you have set (feet/miles or meters/kilometers).
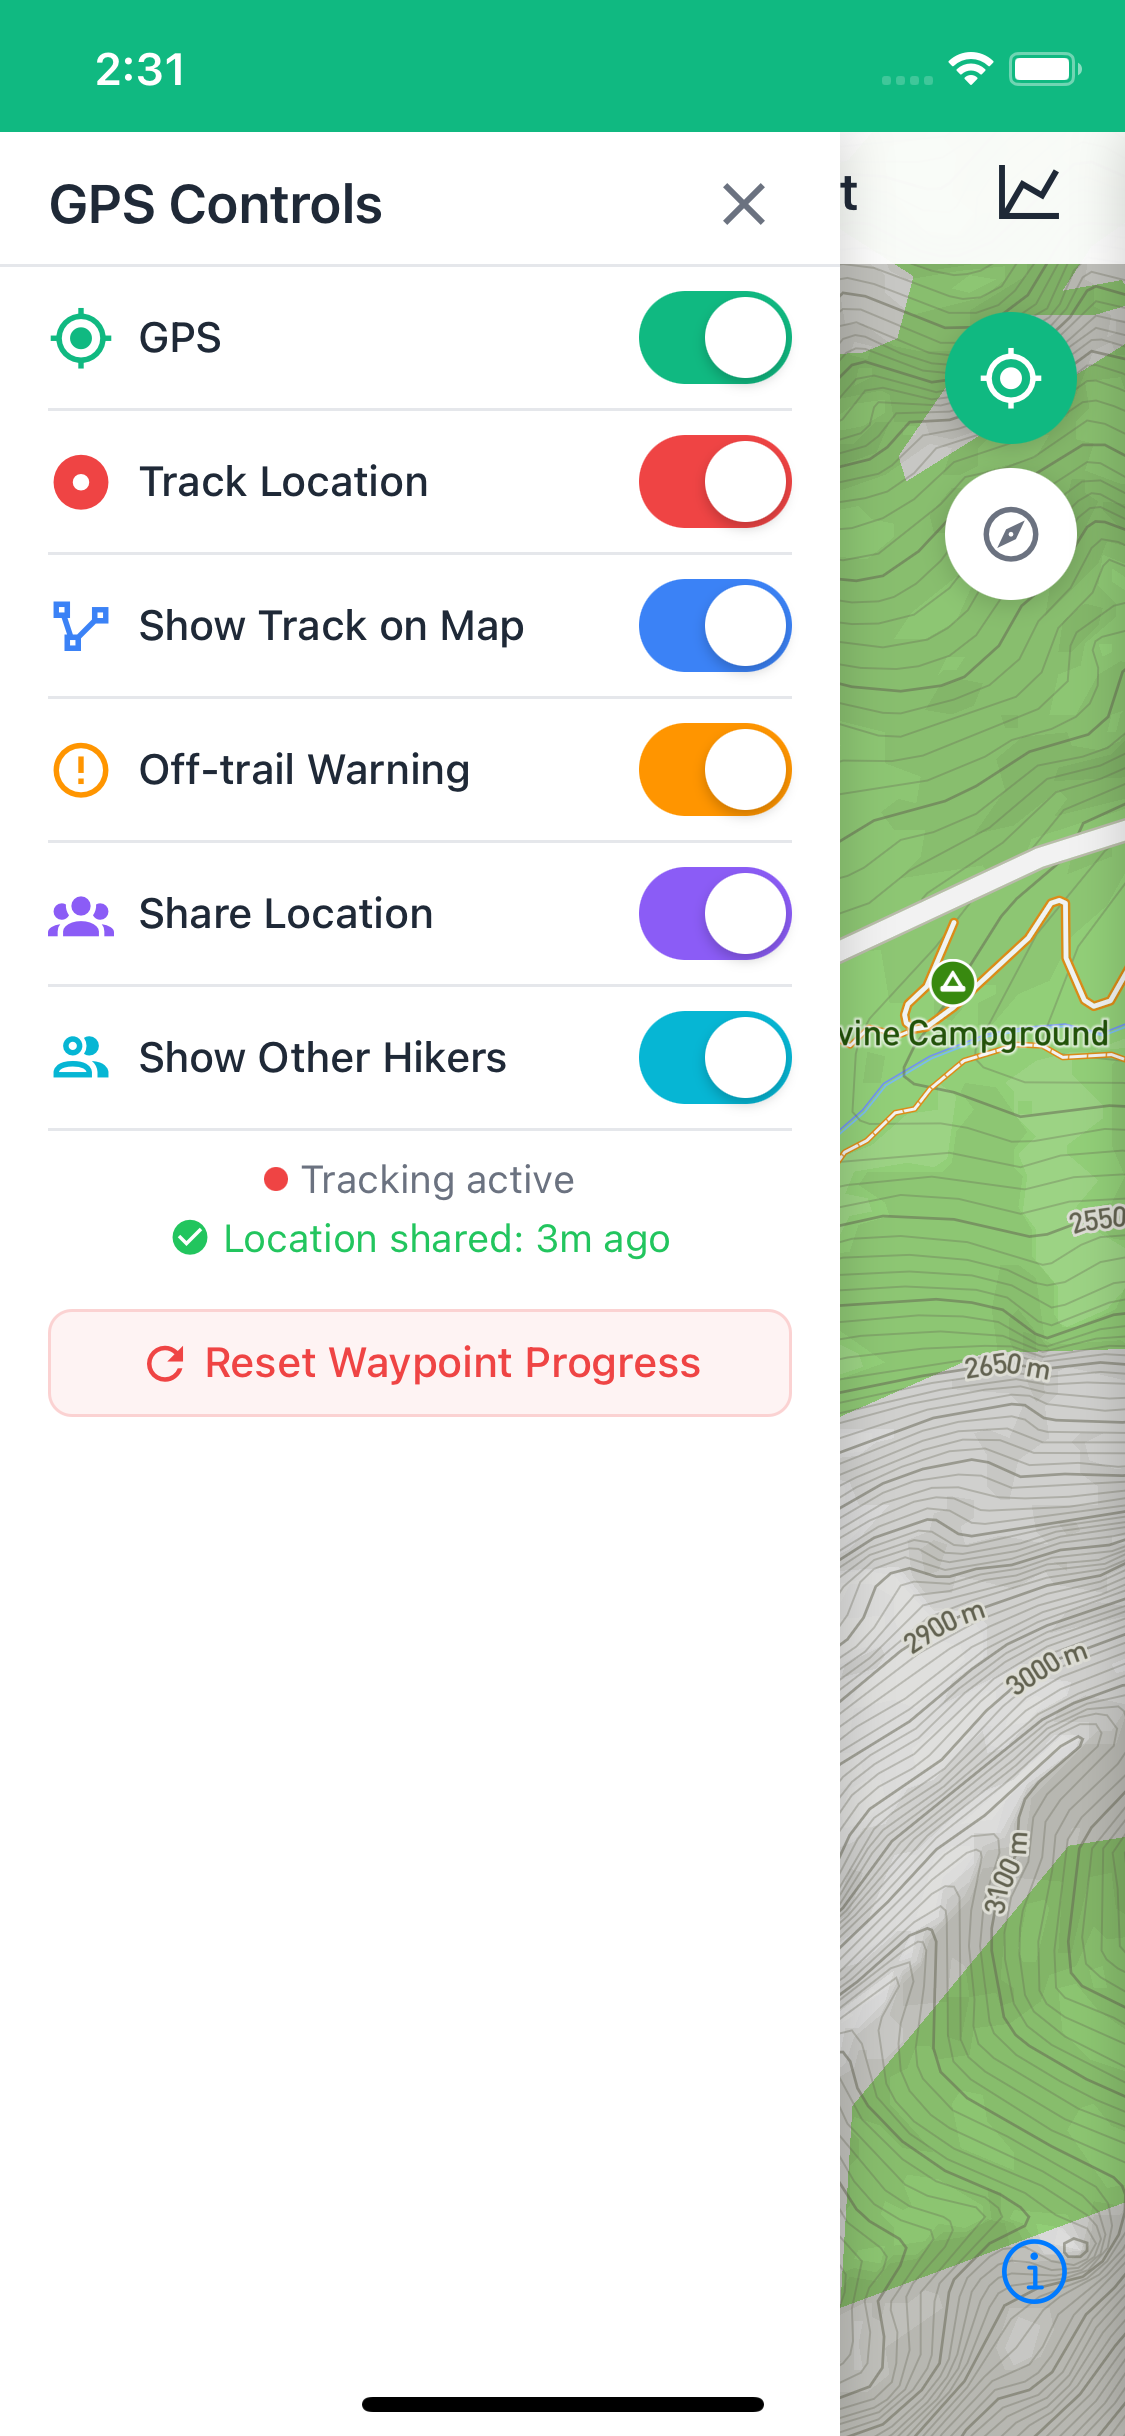
GPS Controls
Swipe open the GPS Controls drawer on the left side of the screen to access:
- GPS On/Off — enable or pause location tracking
- Track Location — keeps the map centered on your position as you move
- Off-Trail Alerts — toggle route deviation notifications on or off
- Reset Waypoint Progress — clears your progress if you need to restart from the beginning
Route Stats
Swipe open the Route Stats drawer on the right to check your progress at any point:
- Distance covered and remaining
- Current elevation
- Waypoints completed
- Estimated time remaining
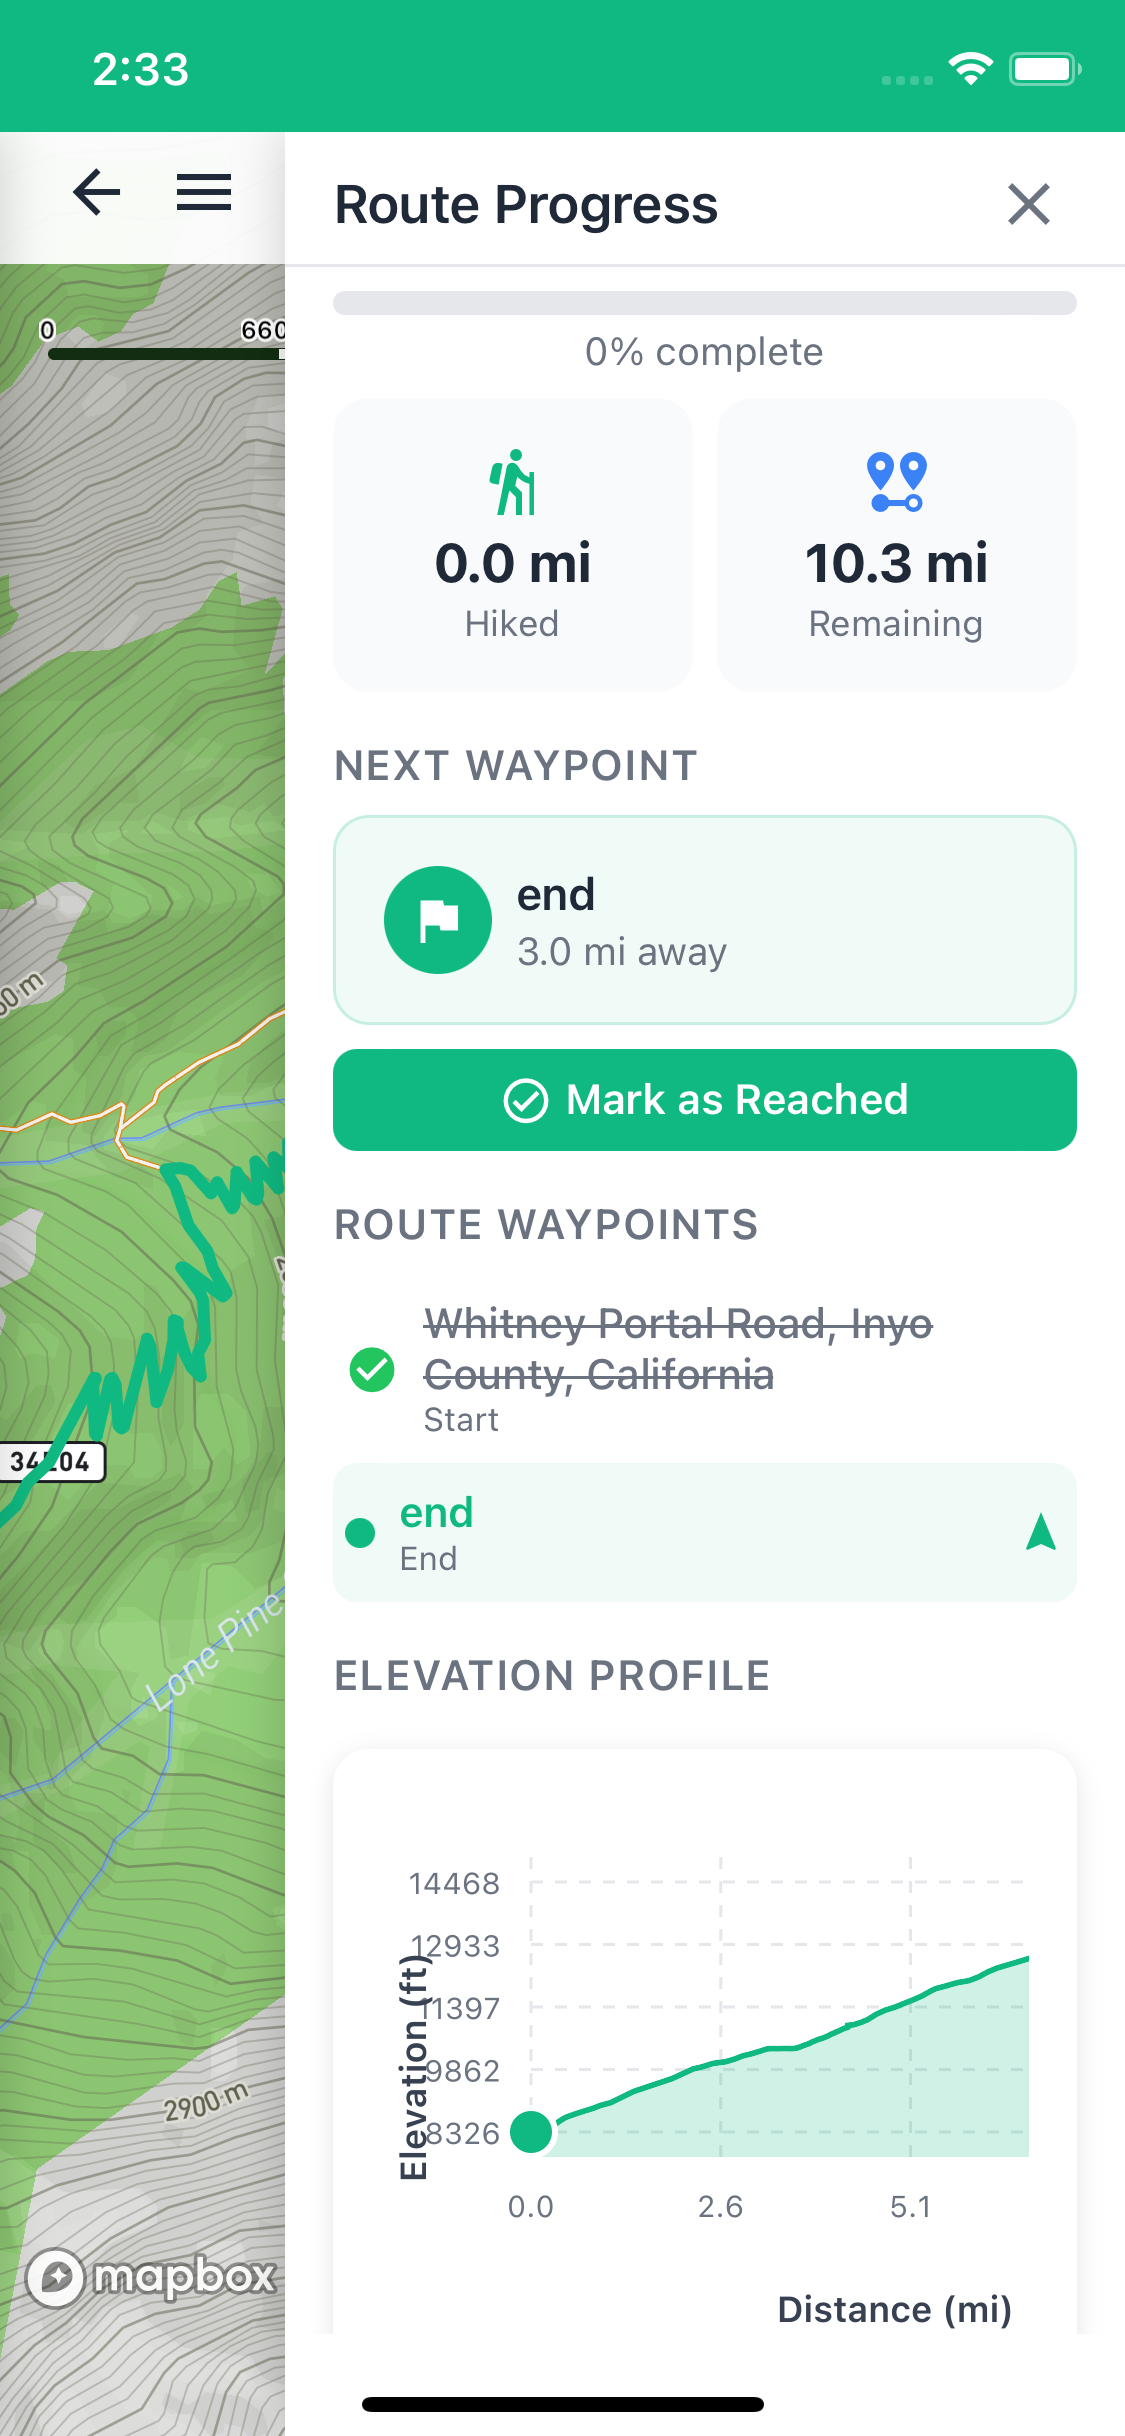
Waypoint Progress
As you pass through each waypoint, TrailSync marks it as reached. Your progress is saved, so if you close the app and reopen it you'll still see which waypoints you've completed.
📋 Trip Report
When a trip is marked as Completed, TrailSync can generate a full summary report of the whole adventure — route stats, gear breakdown by person, meals, expenses, and a settlement summary. It's a useful record to keep, and handy reference material when you're planning a return trip.
Generating a Report
- Open a completed trip
- Tap View Trip Report from the trip dashboard
- The report generates automatically — this takes a few seconds
The report opens as a formatted page you can scroll through, showing your route summary with total distance and elevation, the full participant list, what each person carried, the meal plan, and the final expense settlement.
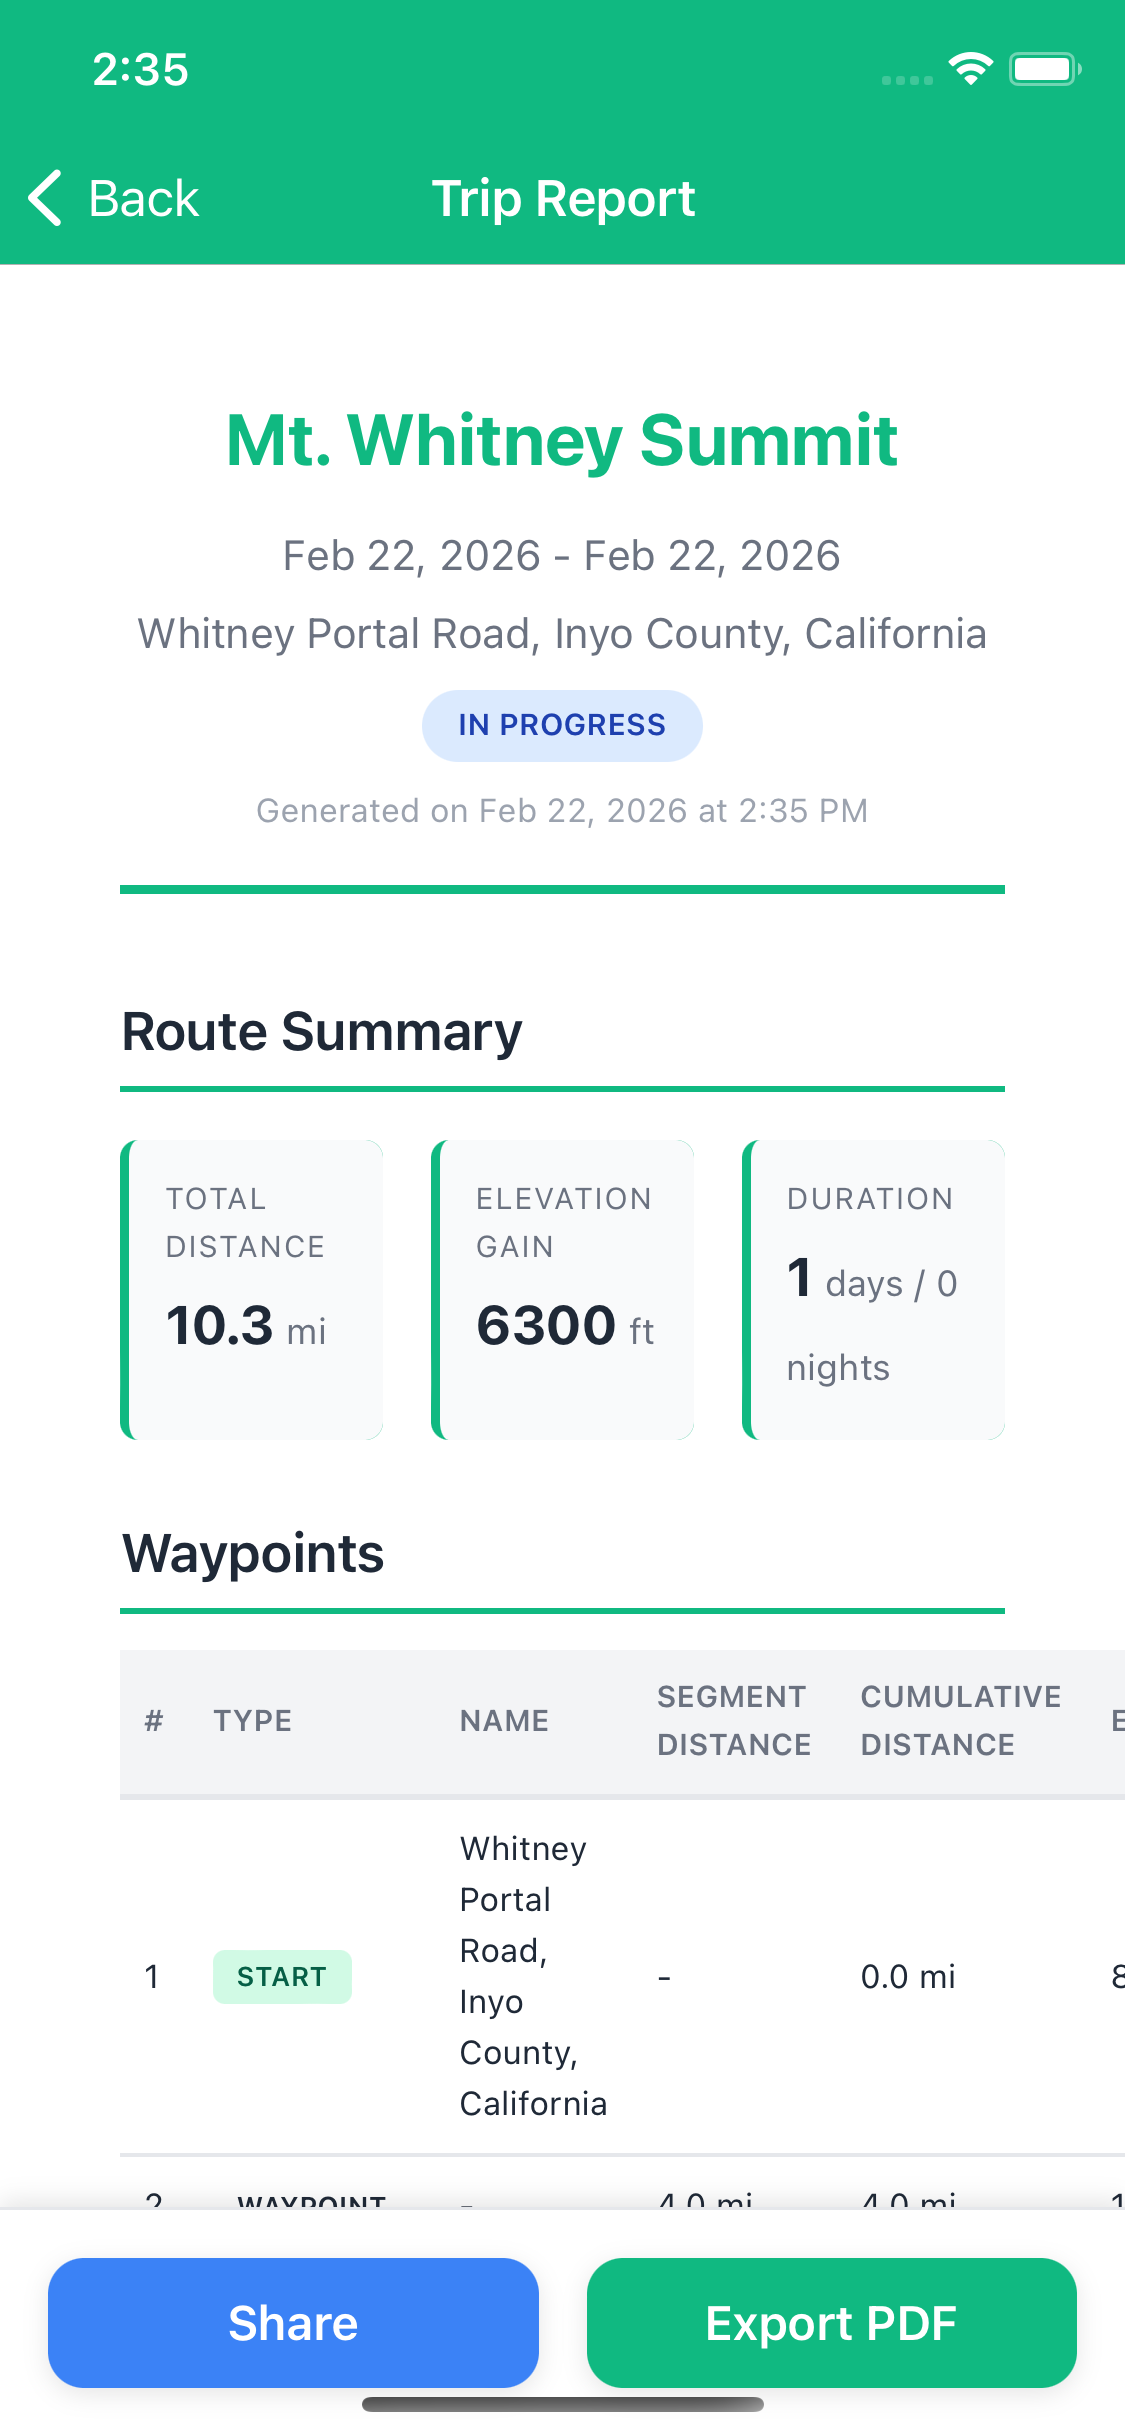
Exporting
Use the Share button to send the report, or Export PDF to save a copy. Full PDF export and share functionality are coming in a future update — in the meantime, screenshots capture the key details well.
📥 Preparing for Offline Use
Why Prepare for Offline?
Most backcountry areas have no cellular service. Downloading your trip data ensures you can:
- View route maps and waypoints
- Check gear assignments
- Review meal plans
- See action items and messages
- Access participant info and emergency contacts
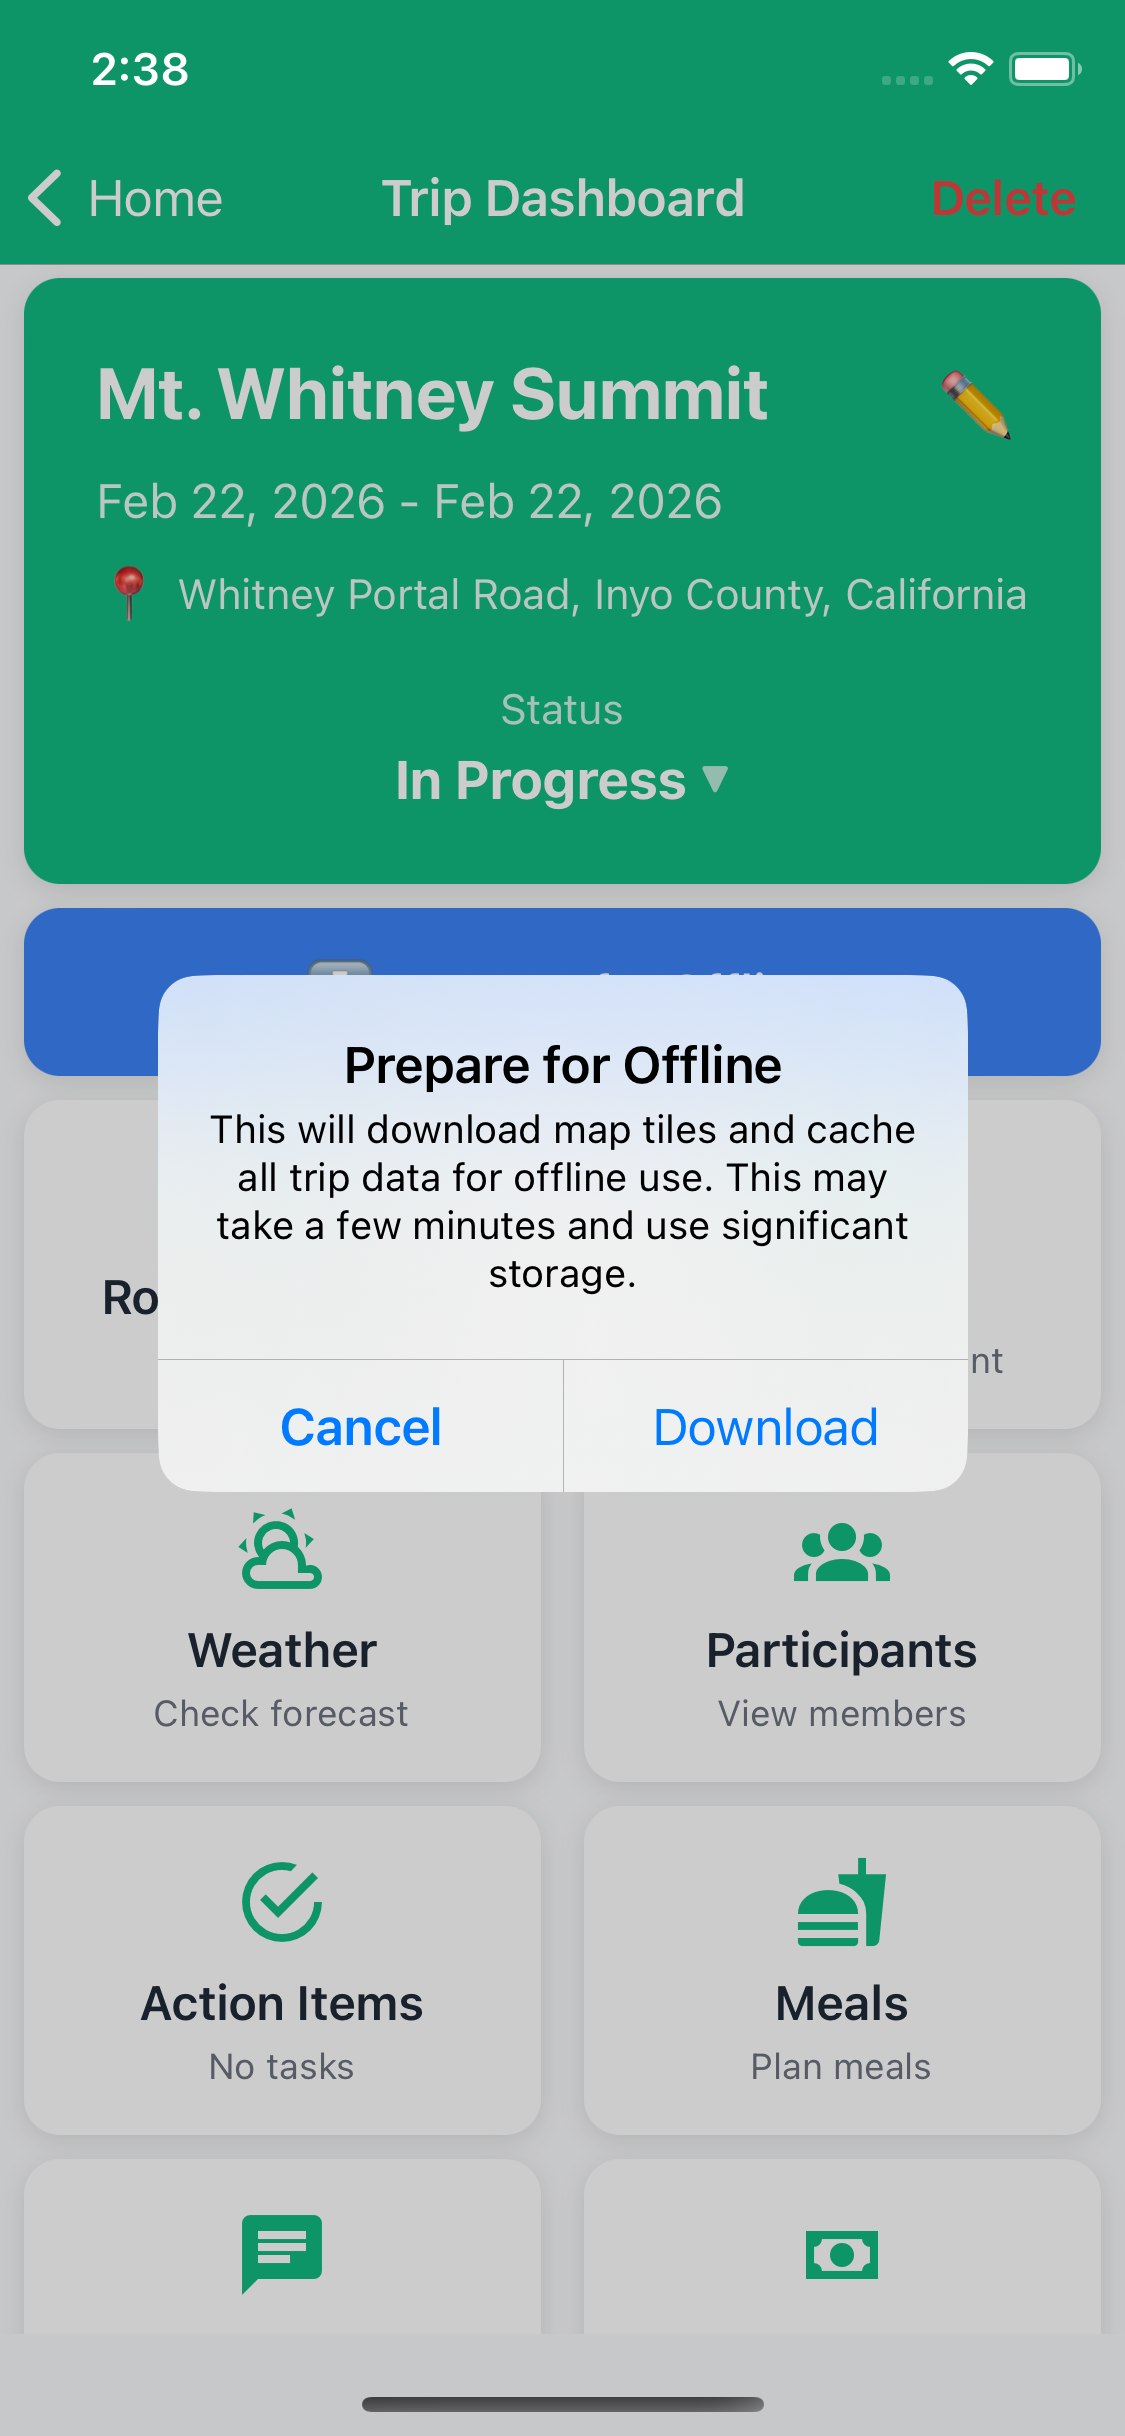
When Can I Download?
The "Prepare for Offline" button appears when:
- Trip status is
In Progress - You have internet connection
- Trip hasn't been downloaded yet
Downloading Your Trip
- Ensure you're connected to WiFi (downloads can be large: 100-350 MB)
- Open your trip (must be status "In Progress")
- Tap the green Prepare for Offline button
- Confirm you want to download
- Progress modal shows current step and percentage
- Wait for "Download Complete!" message (1-3 minutes typical)
What Gets Downloaded?
TrailSync caches 9 types of data:
- Map Tiles: Mapbox vector tiles for your route area
- Trip Details: Name, dates, location, description
- Waypoints: All route points with coordinates and notes
- Route Segments: Turn-by-turn geometry and elevation profiles
- WeatherThe current weather details
- Participants: Names, roles, experience levels, emergency contacts
- Gear: All assignments and pack weights
- Meals: Full meal plan with recipes and instructions
- Action Items: All tasks and completion status
- Messages: Last 50 messages
Managing Offline Trips
View and manage downloaded trips:
- Go to Profile tab
- Tap Settings
- Tap Storage
- Tap Offline Trips
- Delete individual trips by tapping the trash icon
- Or tap Delete All Trips to free all storage
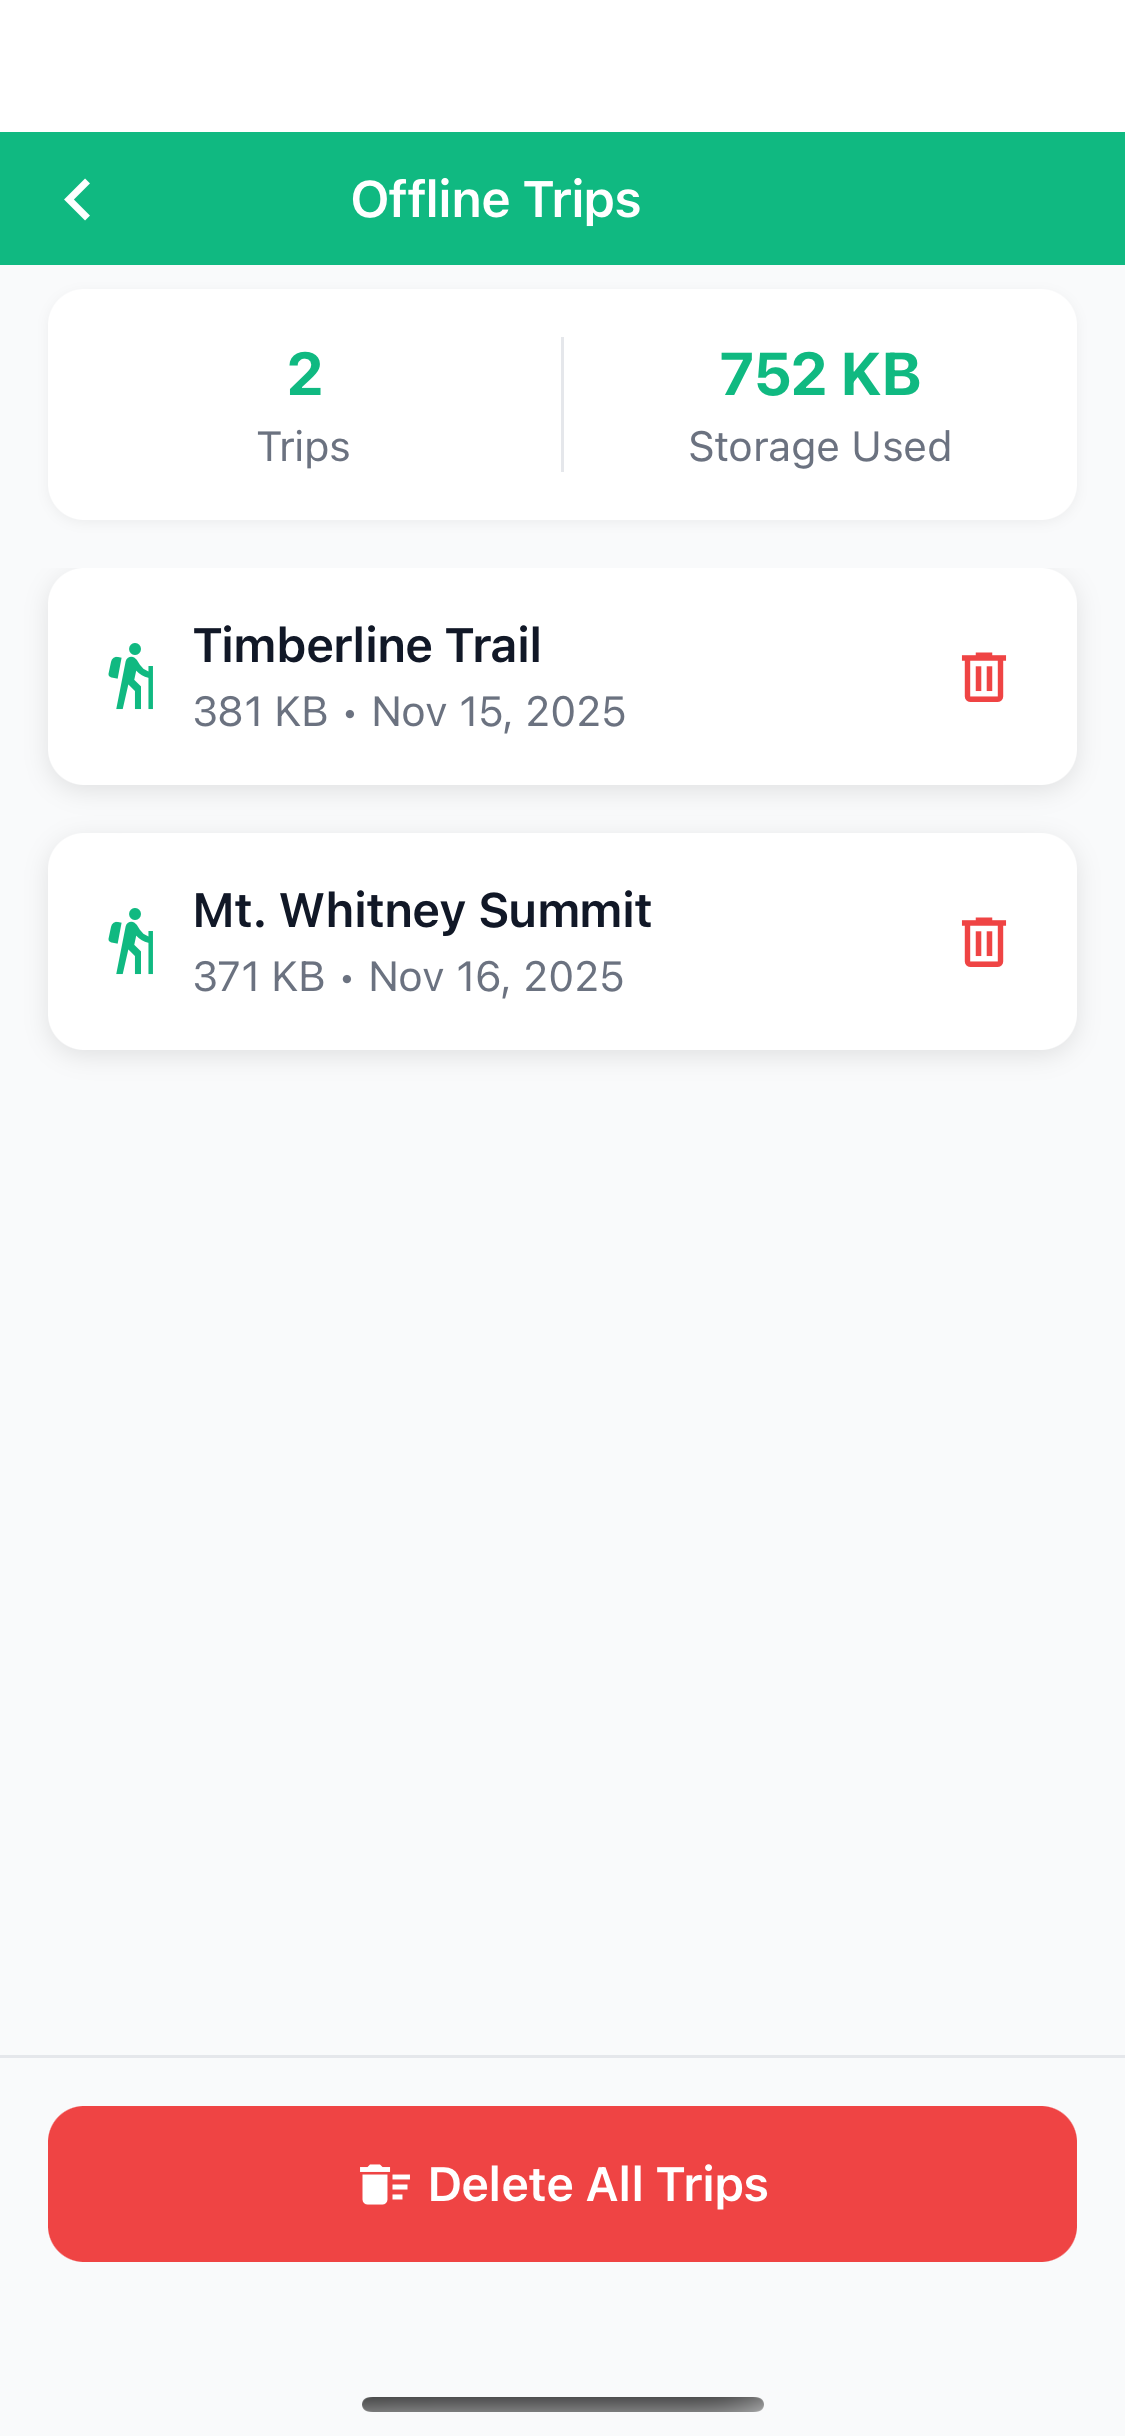
- Download on WiFi to avoid cellular data charges
- Download the day before your trip
- Delete old trips after returning to free space
- Keep 2-3 upcoming trips cached maximum
✈️ Working Offline
Recognizing Offline Mode
When you lose internet connection, you'll see:
- Orange banner at top of screen: "Offline Mode"
- Banner appears across all screens
- Automatically disappears when back online
What You Can Do Offline
If your trip is cached, you have view-only access to:
- ✅ View route maps and waypoints
- ✅ Check all gear assignments and weights
- ✅ Review meal plans and recipes
- ✅ See action items and their status
- ✅ Read last 50 cached messages
- ✅ View participant profiles and emergency contacts
What You Cannot Do Offline
All write operations are disabled. You'll see an "Online Required" alert if you try to:
- ❌ Add/edit waypoints
- ❌ Assign gear
- ❌ Add meals
- ❌ Create/update action items
- ❌ Send messages
- ❌ Add expenses
- ❌ View weather forecasts
Returning Online
When you regain internet connection:
- Orange "Offline Mode" banner disappears automatically
- All write operations re-enabled
- Data syncs from server
- Review route and waypoints before losing signal
- Check gear assignments at camp each night
- Reference meal instructions when needed
- Keep phone in airplane mode to save battery
- Take screenshots of critical info as backup
🧭 Explore — Community Templates
The Explore tab is where the TrailSync community shares trip plans with each other. If you're looking for somewhere new to hike, or want a head start on a well-known route, there's a good chance someone has already mapped it out and published the full plan — waypoints, gear suggestions, meal ideas, and all.
Discovering Templates
- Tap the Explore tab at the bottom of the screen
- You're in Discover mode by default, showing community-published templates
- Browse the list or use the search bar to find a specific trail or region
- Tap any template card to see full details
Each card shows the trail name, region, trip length, total distance, elevation gain, difficulty rating, and how many times other hikers have used the template.
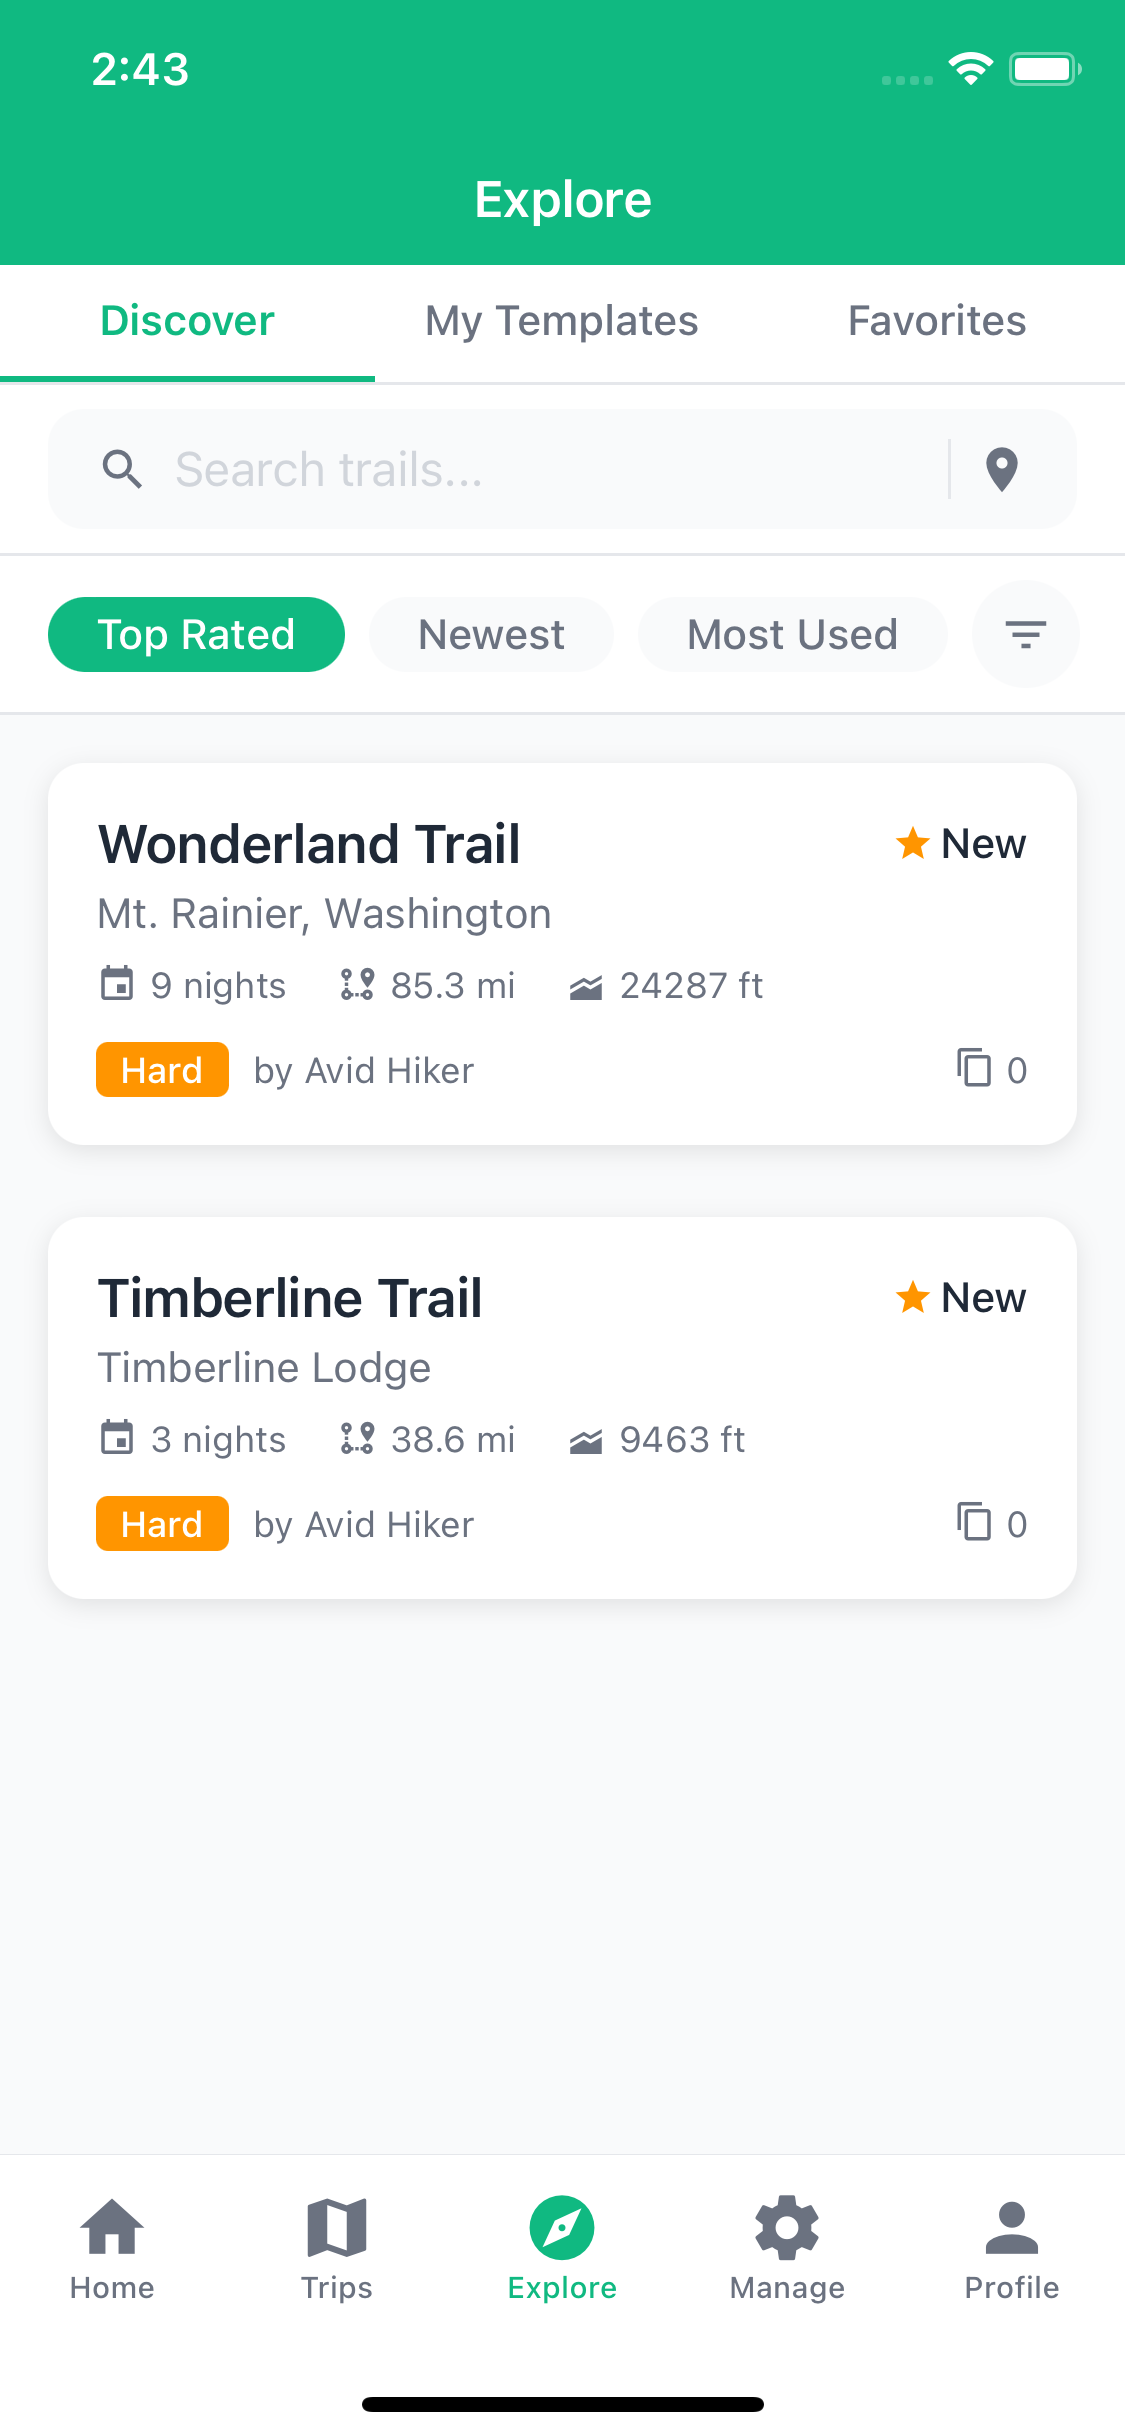
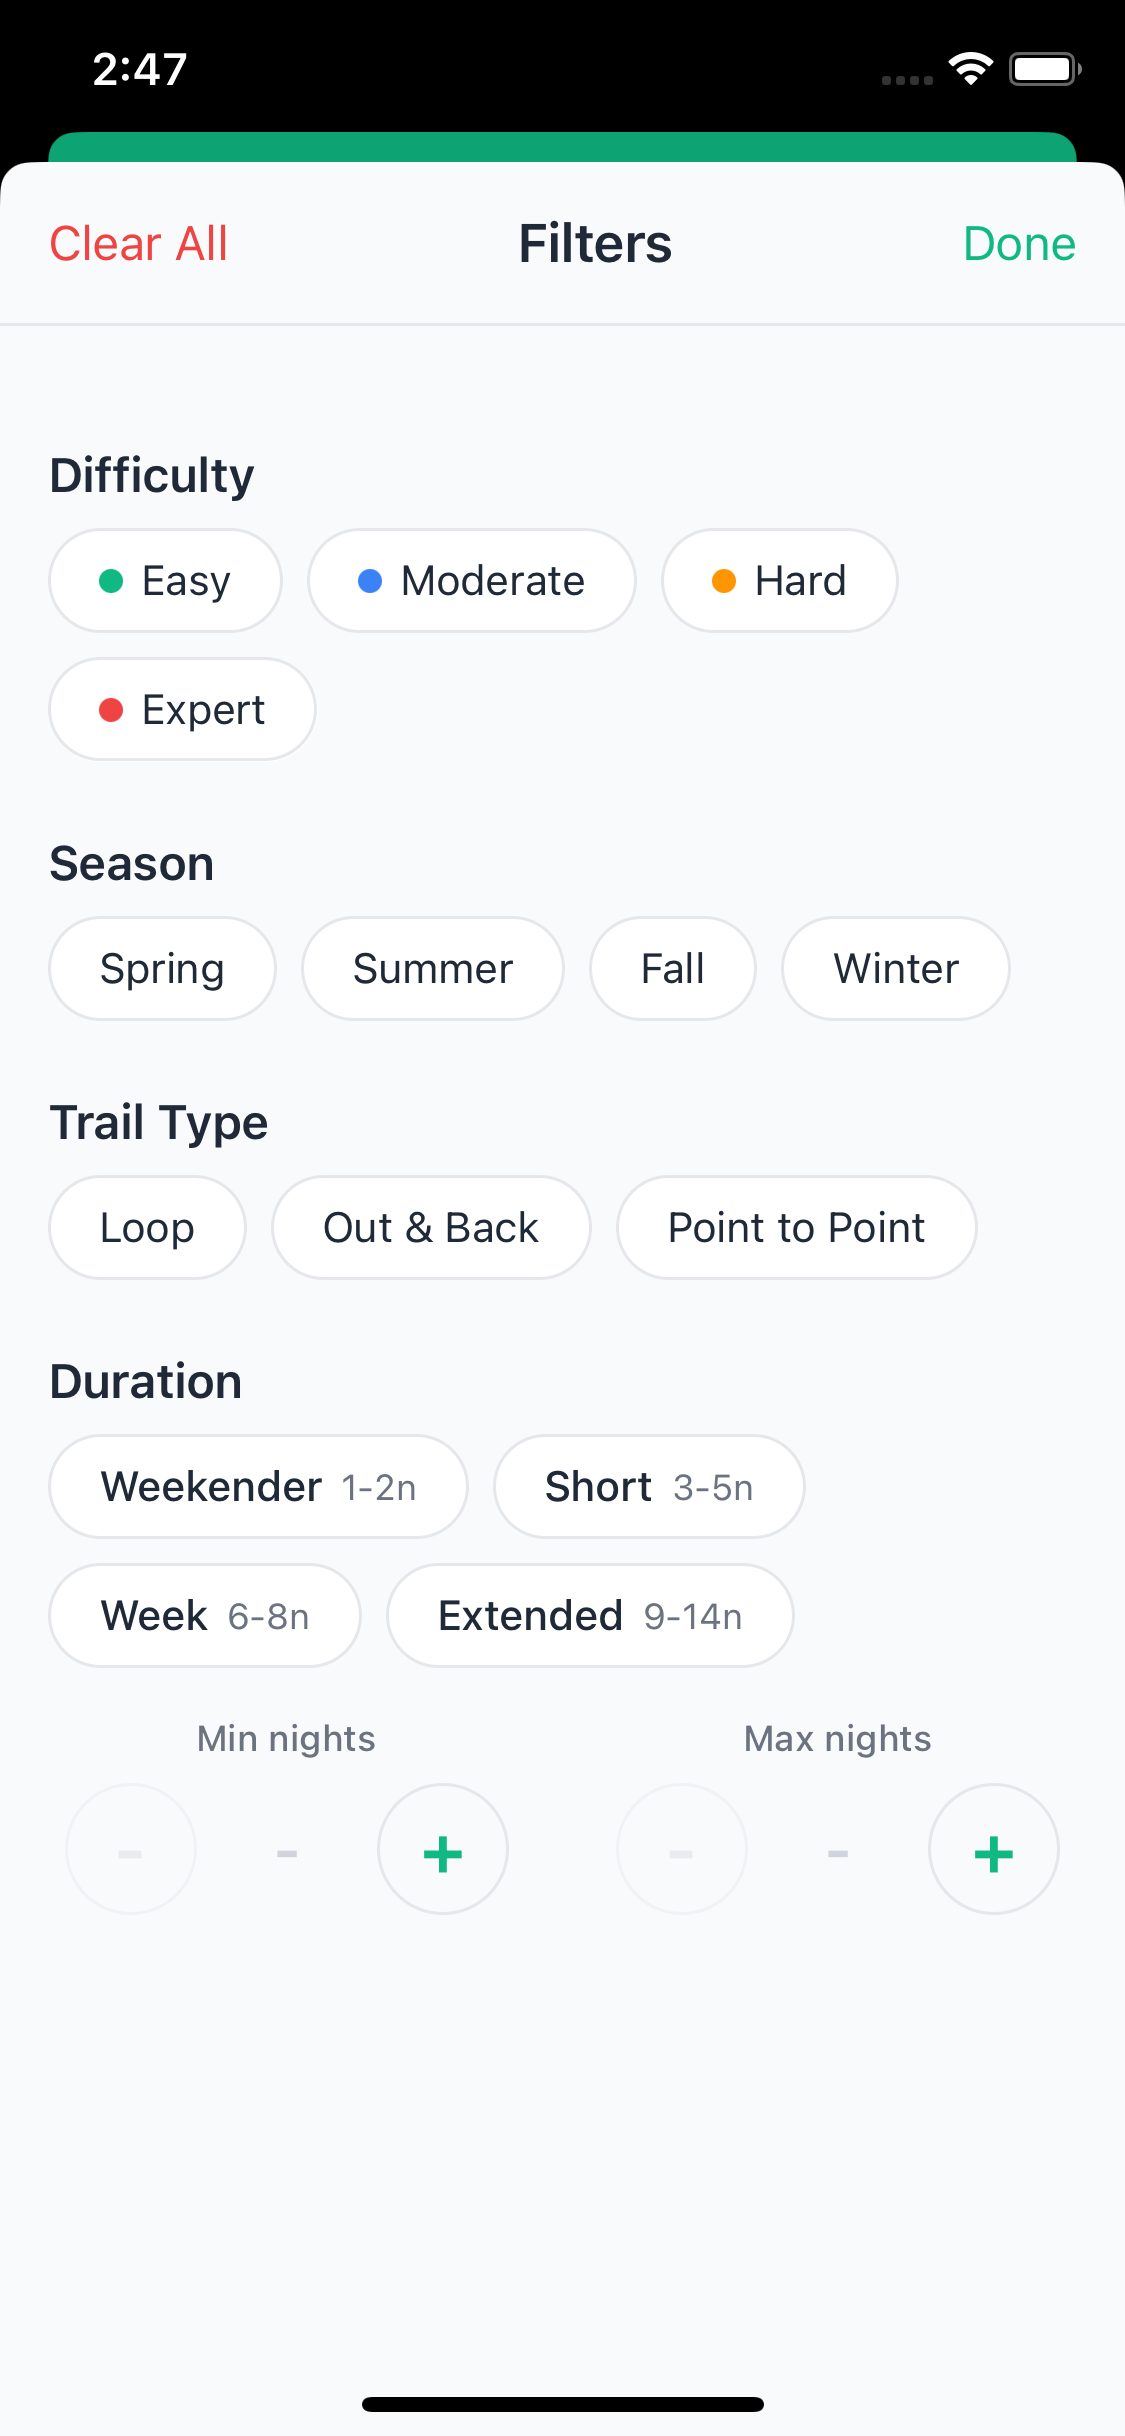
Filtering and Sorting
If you're looking for something specific, the sort and filter tools make it easy to narrow things down. Sort by Top Rated, Newest, or Most Used. Tap the filter icon to filter by:
- Difficulty: Easy, Moderate, Hard, or Expert
- Season: Spring, Summer, Fall, or Winter
- Trail Type: Loop, Out-and-back, or Point-to-point
- Duration: Minimum and maximum number of nights
Active filters appear as chips below the sort bar so you can see what's applied and remove individual filters with a tap.
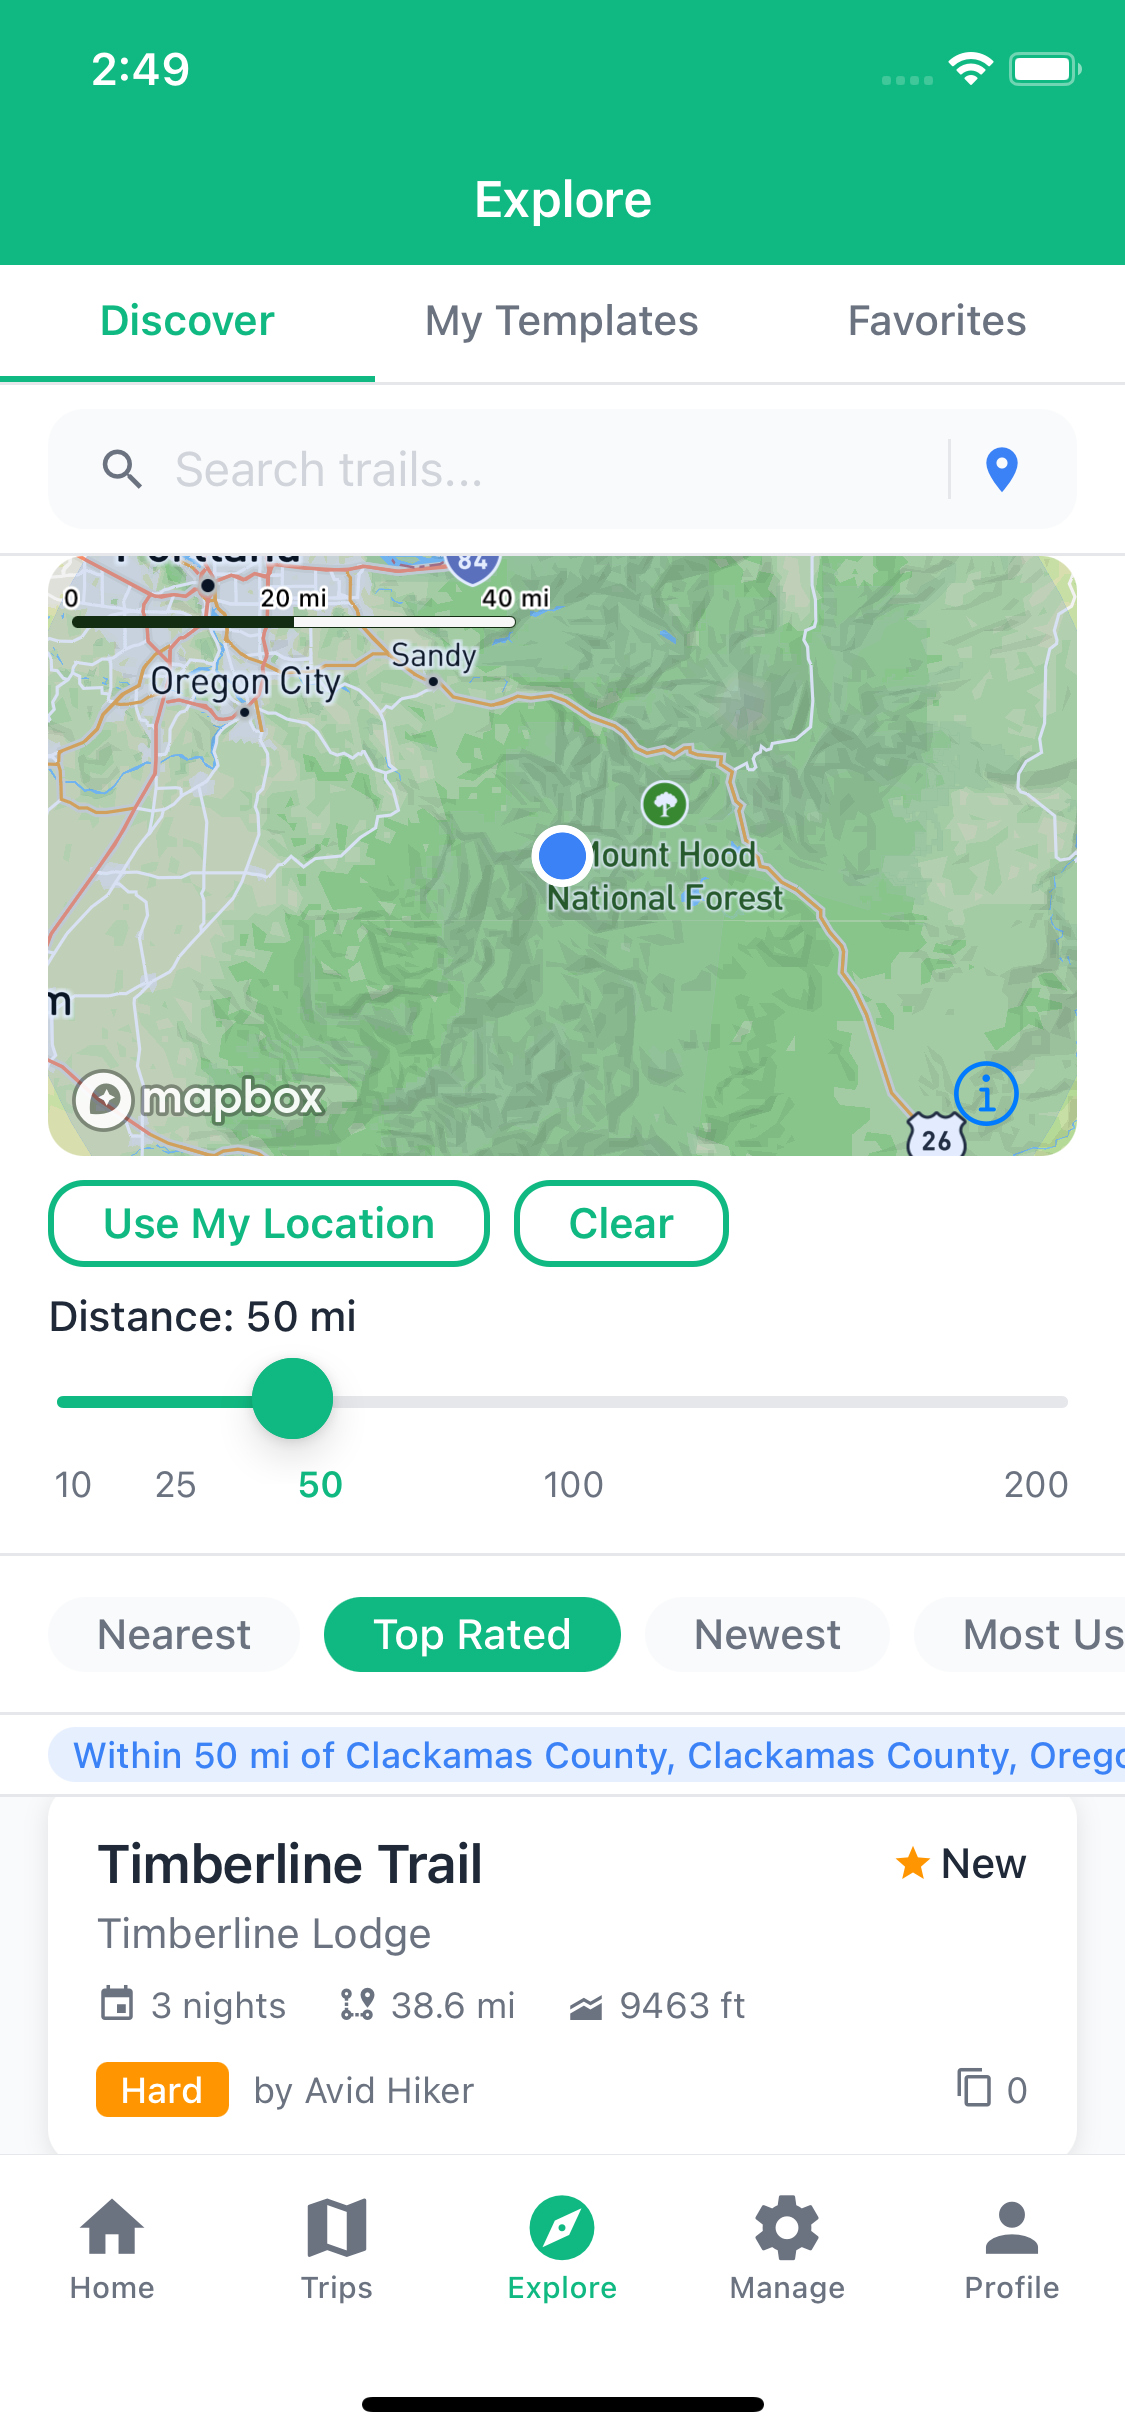
Location-Based Search
Want to find hikes near where you are, or near a destination you're planning to visit? Tap the location icon in the search bar to open the location filter.
- Tap Use My Location to find trails near you right now
- Or tap Set on Map to drop a pin anywhere
- Drag the radius slider to control how far out to search
Once a location is active, a Nearest sort option appears so you can see the closest trails first. Each card shows how far away the trailhead is from your chosen point.
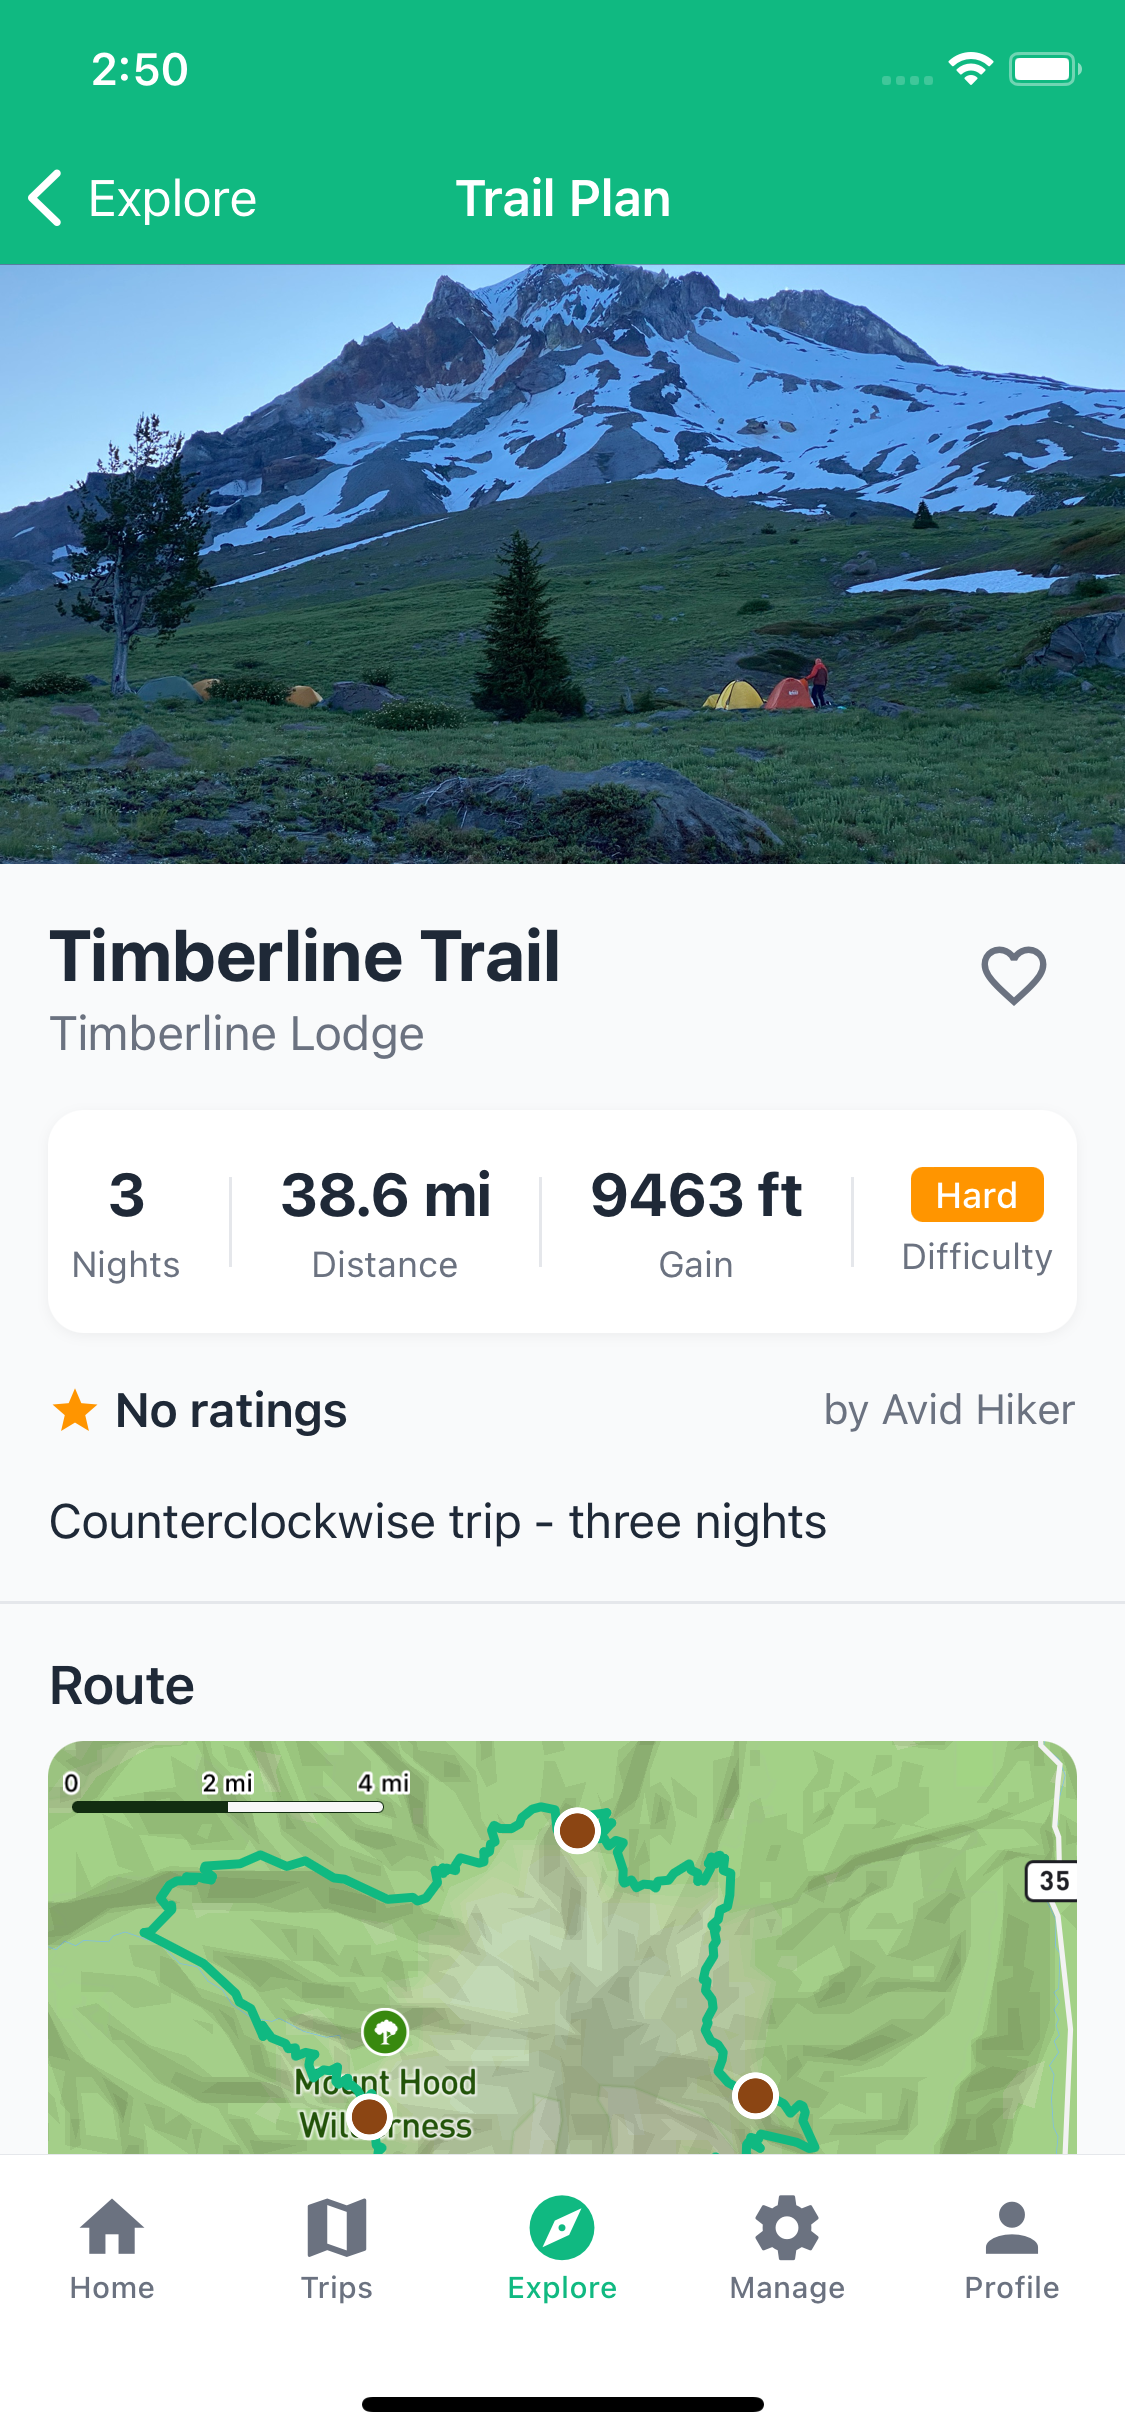
Template Details
Tap any template card to see the full picture before committing:
- Route map — an interactive snapshot of the waypoints and route line
- Photos — trail photos shared by the creator and community
- Daily plan — day-by-day breakdown of campsites and mileage
- Gear snapshot — recommended gear for the trip
- Meal snapshot — the planned meal schedule
- Reviews and ratings — honest feedback from hikers who've done it
Using a Template (Cloning)
Found a plan you want to use? Tap Use This Plan to clone it into your trips. TrailSync creates a new trip for you with the route, gear list, and meal plan already filled in. Set your dates, invite your group, and adjust anything that doesn't fit your situation.
Cloning gives you a completely independent copy — changes you make to your trip won't affect the original template or anyone else using it.
Saving Favorites
Not ready to plan yet but found something you want to revisit? Tap the heart icon on any template to save it to your favorites. Find them later under the Favorites tab at the top of the Explore screen.
My Templates
Tap My Templates to see all the trip plans you've published. From here you can see how many people have cloned your templates and manage what you've shared.
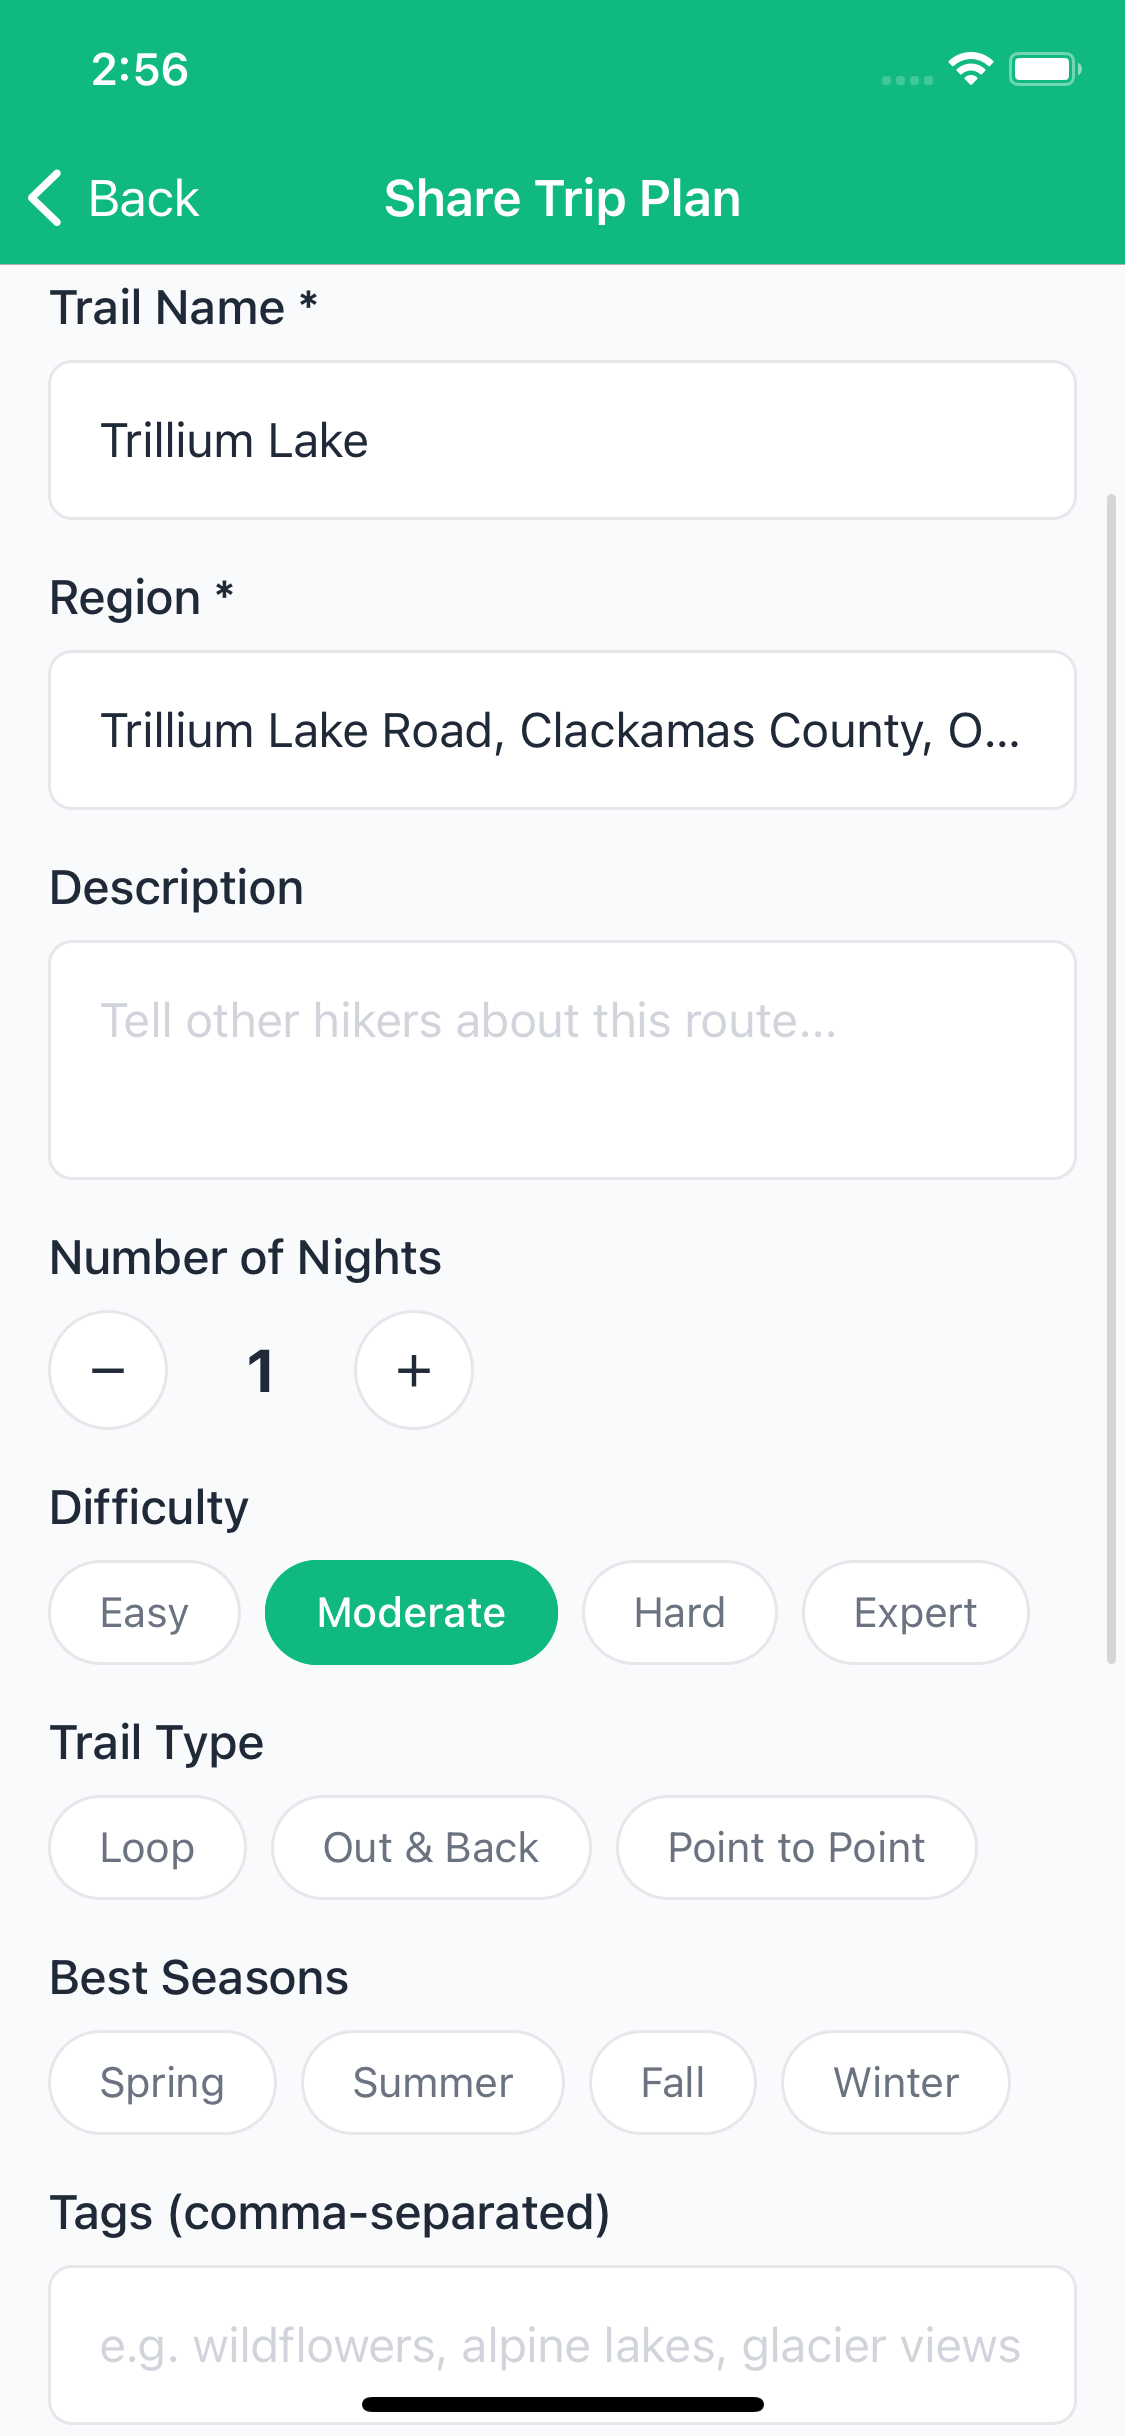
Publishing a Trip
If you've planned a great trip that others would enjoy, you can share it with the community directly from your trip dashboard.
- Open the trip you want to share
- Scroll to the bottom and tap Share as Template
- Fill in the details:
- Trail name and region
- Difficulty and trail type
- Recommended seasons
- Description — what makes this route worth doing
- Tags — keywords to help others find it
- Add photos if you have them — templates with photos get significantly more attention
- Tap Publish
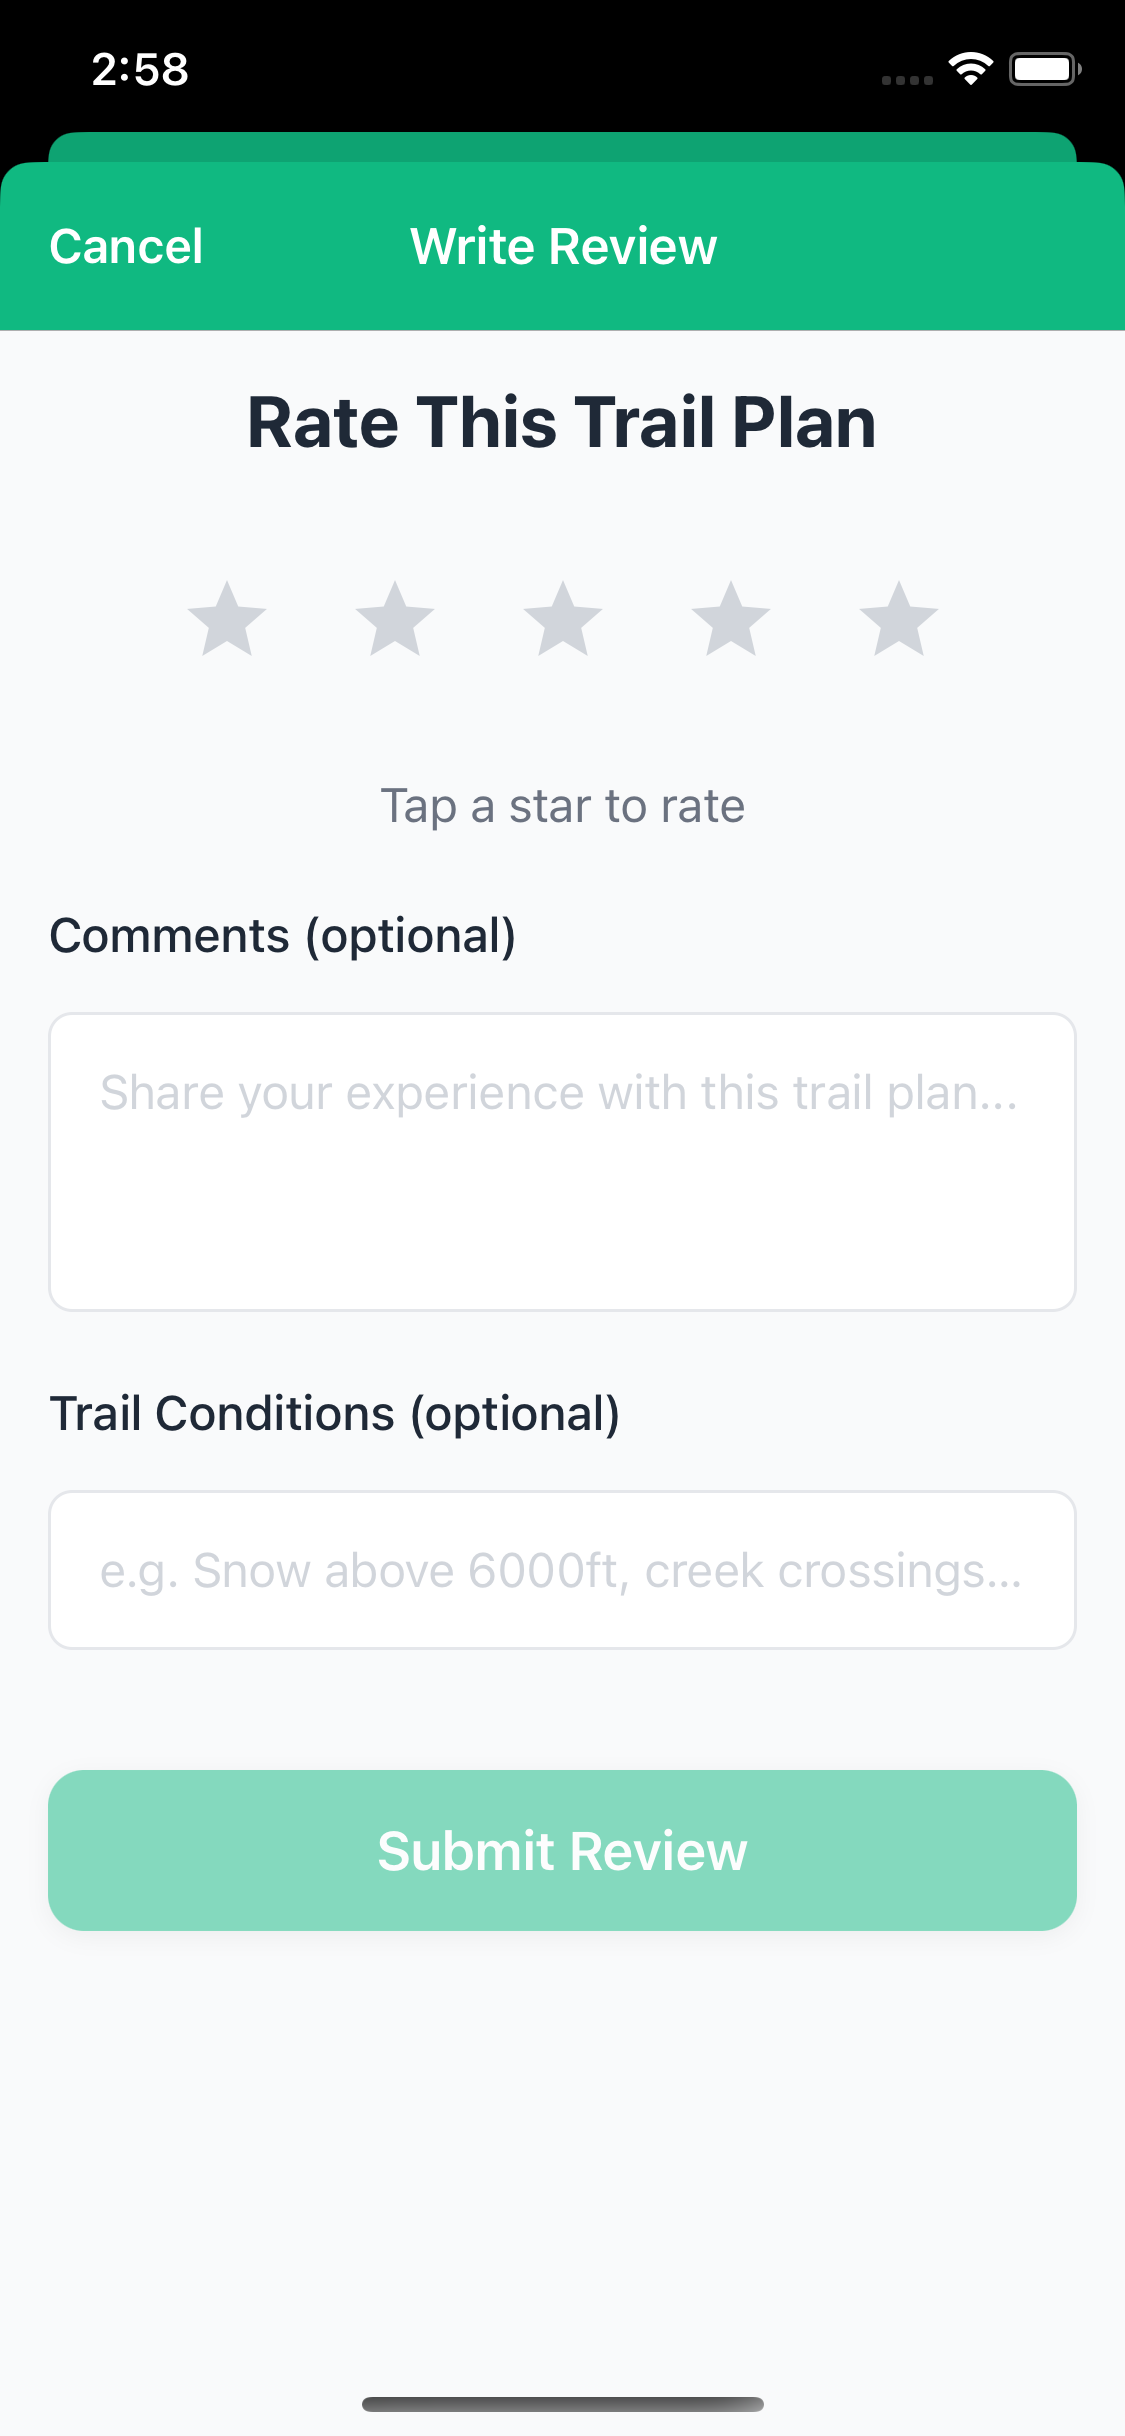
Writing a Review
After completing a trip that used a community template, leaving a review helps future hikers make better decisions about whether the route is right for them.
- Find the template in the Explore tab
- Scroll to the reviews section and tap Write a Review
- Give a star rating and write a few honest notes about conditions, accuracy, and anything worth knowing
- Tap Submit